Eggless Fruit & Nut Banana Bread

Fluffy, Moist, Dense and loaded with my favourite fruits and nuts, this banana loaf is definitely a must try.

Hello Readers, screenshot_2016-01-08-12-38-23-1_wm-e1452776022893

If you are a banana lover then this recipe is definitely for you. On the contrary if you don’t like bananas then you might definitely fall in love with these after you eat this loaf. This recipe is by far the best recipe on my blog. Reason being its extremely easy to put together and I can absolutely swear by this recipe every time. If there is one thing I would love to bake any day and any time would be this loaf.

Read the full Recipe only on http://www.cookingdiarybyshruti.com

And please subscribe to the new blog.

New Website(cookingdiarybyshruti.com)

Hello all you lovely readers,

Header 2400x800 (1)

I know its been really long that I posted something here. But as promised, I was working on making a new website for blogging which is way better. I say better because its easier to navigate, has additional features that enhance the look and help you better, has a lot of space for pictures and is really beautiful.

Now if any of you are wondering as to why did I shift from WordPress to a personal domain Its simple guys… After 1 year of blogging at WordPress I thought it was time I should make the shift.

I launched the website on Christmas 2015, well it does sound too old but it was just 3 weeks ago. I am really excited to put this  post up here, so that we can connect again on my new website. Now some of you follow my blog posts only through WordPress and not on other social media platforms like Instagram or Facebook which is why you might not know about the all new cookingdiarybyshruti.com

P.S- Just log on to http://www.cookingdiarybyshruti.com, and on the right hand side under my picture, you can see a small dialogue box where in you need to fill in your name and email and you can subscribe to my new website. All new post updates will come directly to your mail box. Please please subscribe to the whole new cookingdiarybyshruti.com and I promise you won’t be disappointed. 

I hope to see you all there. Some really exciting posts like Christmas Tree Brownies, Strawberry Pie, Banoffee Pie Parfaits etc are up on the blog already. Do check it out.

Lots of Love

Shruti

Dark Chocolate Loaf (Eggless)

Those moments when your house is filled with the aroma of a chocolate loaf baking….are the moments I live for. This dark chocolate loaf is surely going to melt your hearts.

IMG_20150422_203203_wm

Hello Lovely Readers,

I am sorry for being away for 2 weeks now. If you have been following me on Instagram, you would know that I was in Kathmandu during the Nepal Earthquake,25th April 2015. Those were really tough days but now things are much under control. Nepal is fighting back and a new Nepal is going to build soon. This recipe is the one I was supposed to post 2 week ago. I haven’t really baked or cooked much these 2 weeks.

P.S- Please #PrayforNepal Guys!!!!

This Dark Chocolate Loaf was for my Mom as she is really fond of loaf cakes. Its one of her weaknesses. So this Mother’s Day what better than posting My Mom’s Favorite Recipe.

IMG_20150509_212000_wm

IMG_20150422_203732_wm

Who doesn’t love a slice of rich dark chocolate loaf? I hardly know of anybody. And if you are one of those, please do not speak to me 😛 Just kidding guys. But really, this is one thing that you definitely need on a Sunday. A slice of these along with a cup of coffee and your favorite movie is enough to distress from all that you went through during the weekdays. This is totally how I love spending my Sundays. :3

IMG_20150422_203620_wm

I baked a Pistachios,Nuts and Chocochip Loaf a few months ago which was quite a hit. I haven’t baked loafs since then although I was craving them since long. I don’t know why but I have this special attachment with a beautifully risen loaf. Do you feel the same???? If I am going through a really bad day, all I want to do is Bake. It is theorapatic. It is the best way I can relax.

IMG_20150509_211618_wm

When we talk about chocolate cakes or loafs, I personally do not like it too sweet. I made this loaf once before but it was a total disaster. I used sweet milk chocolate and it ruined the entire loaf for me. It turned out too sweet and I hated it like anything. I was so upset that I didn’t want to give it another shot, until I tried them now. This time I used Hershey’s Dark Chocolate along with Hershey’s Cocoa Powder and my loaf came out exactly the way I wanted it to. It wasn’t sweet or too bitter. Just perfect to my liking.

IMG_20150509_205404_wm

P.S- Trust me guys, a sweet chocolate loaf is just not worth it…. Try this one!!!

Generally, I post a fuss free and easy recipe on a Sunday for all you guys. And most of you must be wondering looking at the picture that this ain’t EASY. But here is the surprise…This loaf is ready in about 50 mins from start to finish and you have to do nothing while its baking. Yes this is TRUE. You really don’t need to be pro at baking to make these. Just follow the steps and measurements and you are good to go. As i always say, please follow the measurements to the par while you are baking and your end results would be amazing.

IMG_20150509_210225_wm

 P.S- The Correct Measurements are extremely important while baking.

I also added dark chocolate chips to this one. I feel they enhance the flavor and texture of the cake all the more. Also it gives it a little bite and crunch and I absolutely love it. It is entirely optional though. You could also replace it with hazelnuts, cashews or any other nuts or dried fruits of your choice.

Lets get started with the recipe now.

RECIPE: DARK CHOCOLATE LOAF

Makes: One 9″ Loaf

Prep Time: 15 mins

Baking Time: 40 mins

INGREDIENTS

  • All Purpose Flour- 200 gms
  • Unsalted Butter-50 gms
  • Sugar-100 gms
  • Salt-1/2 tsp
  • Baking Powder-2 tsp
  • Baking Soda-1 tsp
  • Hershey’s Dark Chocolate- 1 bar
  • Hershey’s Coco Powder- 3 to 4 Tbsp
  • Semi-Sweet Chocolate Chips-1/4th cup
  • Vanilla Extract-1 tsp
  • Yogurt-1/2 cup
  • Oil-1/4th cup

PROCESS:

In a bowl sift together all purpose flour, salt, baking powder, baking soda and coco powder. Set this aside. Sift twice if possible.

In another bowl melt the dark chocolate. I melted it in a microwave stirring every 3 seconds until its is smooth.

Now beat the butter, sugar together until it is combined. Add oil and melted dark chocolate and whisk everything until smooth. Make sure you do not over beat it.

Now add the dry ingredients in the wet ingredients,,alternating with yogurt until everything is smooth and combined. The mixture need not be very watery. It will be thick so don’t worry.

Add vanilla extract and this mixture is ready. At the end add half a cup of semi sweet chocolate chips.

Line your loaf tin with some parchment paper, and add the mixture. Bake in a pre heated oven for 40 mins at 180 degrees.

Your amazing dark chocolate loaf is now ready.

IMG_20150421_200650_wm

 For any queries and collaborations contact me at : cookingdiarybyshruti@gmail.com

You can connect with me on FacebookInstagram and Pinterest for more regular updates.

If you cook or bake anything from Cooking Diary By Shruti…Please Share the Pictures on Instagram or Facebook and Tag @cookingdiarybyshruti. I would love to see them. Also I would feature it on my blog.

Macaroni and Cheese

They say One Classic Recipe is a must for a Food Blogger. Could I go wrong by not trying Mac & Cheese…Haha.. Here is the most classic recipe ever.

Who Doesn’t love a big bowl of cheesy Goodness?

IMG_20150419_021333_wm

Hello Lovely Readers,

Its a bright sunny day, and I was wanting to drink something really special. Cantaloupes are in this season and nothing refreshing than a glass full of cantaloupe lemonade. Its sounds quite different isn’t it??? Wait for the recipe that will just blow your mind away. As I was shooting it, I wanted to post it immediately. But I definitely had this amazing MAC & CHEESE Lined up for today.

IMG_20150422_164611_wm

P.S- As promised I am here with a new post on Wednesday. (New post every Sunday and Wednesday)

Lately, I have been needing a big bowl of comfort. Sometimes life just screams ” I need a big bowl of ooey-gooey cheese noodles.Feed me”  Who am I to say no? Its mid- week and I think it is the best time for some comfort food. Who wants to spend so much time in the kitchen during this heat..No one right. Try this recipe and I bet you will want to eat it every now and then. Most of you would be knowing by now that I can eat Pastas and Macaronis almost everyday. Please do not judge me…I am not a calorie counter 😛

IMG_20150418_232954_wm

For those who do not know what Mac and Cheese is:

it is a dish of English Origin, consisting of cooked macaroni and Cheese..mostly cheddar cheese, though you can also incorporate other ingredients like herbs, vegetables etc. Traditionally Mac & Cheese is a one pot, oven dish which is why it is known as comfort food. But you can always make it in a sauce pan.

The most important part in this recipe is the creamy sauce. Do not think it requires any fancy ingredients or something. Just Milk, Butter, Cream and Cheese and your sauce will by rich and creamy. The more cheese you add to the sauce the more creamier the sauce becomes. But do not add too much. Just the right amount will do good. So what are you waiting for guys. Make your own gooey, delicious, macaroni and cheese with this delicious no fail recipe.

IMG_20150418_232830_wm

P.S- If you are a calorie counter please do not look into this recipe…pls!!

This recipe is great because its super quick and you can make it from start to finish in just about 20 mins. It really really easy and as I always say..this one is a BEGINNERS recipe too. The best part about this recipe is that it is a one pot recipe. You do not need anything else. The only thing to keep in mind while making this recipe is to add the cheese in small batches so that it stays extra creamy, and I have cooked the pasta in a  milk mixture which takes the decadence up a notch. Also I topped it with dried mixed herbs which gives it a bit of kick. It SO SO GOOD…..yummmmm..

So lets get started with the recipe.

RECIPE: MACARONI AND CHEESE

Makes: 1 pot

Prep Time: 5 mins

Cooking Time: 20 mins

INGREDIENTS:

  • Macaroni: 150 gms
  • Butter: 4 Tbsp
  • Whole Milk: 2 1/2 cup
  • White Flour- 1/4th cup
  • Salt- to taste
  • Mixed Dried herbs- 1 Tbsp
  • Ground Mustard- 1 tsp
  • Ground Pepper- 1/2 tsp
  • Cheddar Cheese- 1 1/2 cup
  • Parmesan Cheese- 1/2 cup

PROCESS:

Boil your macaroni..drain..rinse and set aside.

In a deep pot, add butter and melt it. Add in 1/4th cup flour and whisk into the butter. Once combined add in  milk, salt and ground mustard. Whisk all the ingredients together and cook until its nice and bubbly,

Turn off the heat and start adding the CHEESE! Slowly whisk in the cheese until it is melted. The sauce will now be really thick and creamy. Add in the macaroni along with ground pepper and mixed dried herbs.

Your one pot macaroni and cheese is not ready. You can also bake it for 5 to 10 mins if you want or eat it right away. I could not resist it so no baking in my case.

IMG_20150419_021828_wm

Nutella Bread

If you want to try your hands at baking a sweet bread… then this one is the first thing you should be baking. A bread slathered with NUTELLA… Doesn’t is sound amazing??

IMG_20150419_170320

Hello Lovely Readers,

Sunday is my favorite day for writing a blog post. I don’t know why, but I enjoy writing on Sunday’s. Generally I post a recipe early morning on Sunday’s so that if you guys wish to try the recipe you may do so. But I kinda got late today. Nonetheless, I know that this recipe is too luscious to be ignored. If you are a NUTELLA lover (which I am assuming most of you are), you definitely need to try this bread…..

IMG_20150419_165318_wm

If you are following me on INSTAGRAM, you would know that I have decided on certain fixed days for my blog post. I am now onward going to publish a new post every SUNDAY and WEDNESDAY. The reason behind this is that most of you keep messaging me about what would be my  next post or when is it coming out. So, I decided to fix days for the blog post so that you guys are more aware about it. Also, I am trying to click as many WORK IN PROGRESS pictures as possible so that it helps you create the recipe same as I did. Guys, I try to keep the recipe as simple as possible, but if you have any doubts or queries please feel free to message or email me. I would be more than happy to help.

IMG_20150419_015707_wm

Coming back to this recipe, this was my very first attempt to a sweet bread. I just did my Caramelized Onions, Tomatoes and Herbs Foccacia Bread recipe last week and it was a huge hit. But savory breads are a little easier in comparison to the sweet ones. Not like the making process is any lighter. But it just tastes amazing with so much of flavor. In case of sweet breads its a little tough that ways.

IMG_20150419_014955_wm

IMG_20150419_015305_wm

The only thing that Kills me about this bread is that I just got a tiny little bite of it. I am not kidding guys. All I got was a tiny little bite of it. That is it. I was so so happy and excited with the victory of having nailed it in my first attempt that I didn’t even care of eating the bread.I was just too happy to smell it, admire it and photograph it. I wanted to click the best of pictures for this one. I hope I have clicked it well…what do you think??? hahaha… I can be so naive sometimes 😛

IMG_20150419_170756_wm

Bread making has always been on my mind but I always thought that this is not something I can do. It used to scare me. Though I had like a zillion of bread recipes written and developed I never ever gave it a shot. Unless, last week. When my Foccacia bread was successful, I wasn’t as much scared as I used to be.This bread is a true delight to the senses. TRUST ME !

P.S- This bread not only tastes good, but looks and smells good too. It is totally a treat.

This bread does not require any fancy ingredients. The recipe is fairly simple. Also the use of yeast in this bread is really less. That is because we do not want the dough to rise high high high and lose its shape. The final rise in the bread is more of swelling and not of doubling. If you are good at kneading the dough then this one is surely a must try. You can definitely use a dough kneader to knead the dough but you need to knead it for atleast 10 mins.

IMG_20150419_171202_wm

The process is fairly simple. You need to mix all the ingredients to make the dough. Make sure you knead the dough well and let is rise. Once the dough has risen, roll it out into a rectangle, spread NUTELLA on it and roll it into a log. Cut the log from the center, and start twisting the ends overtop each other. Bake and your bread will be ready.

IMG_20150418_212637_wm

P.S- The best part about the bread is the swirls of nutella in between.

Lets begin with the recipe now.

RECIPE:NUTELLA BREAD

Makes: 1 loaf

Prep Time: 2 hours( Includes dough resting time)

Baking Time: 30 mins

INGREDIENTS:

  • All Purpose Flour- 200 gms
  • Yeast- 1/2 tsp
  • Vinegar-1/2 tsp
  • Warm Water- 1 cup
  • Salt- 1 Tsp
  • Sugar- 2 Tbsp
  • Nutella- 1/2 cup
  • Cornmeal- for dusting
  • Butter- for brushing

PROCESS:

In a small bowl, dissolve yeast in  1/4th cup water. Let it sit for 10 minutes to activate. Meanwhile combine flour, sugar, salt, vinegar in a bowl. Add yeast mix and the remaining water and start kneading the dough.

Dust the work surface with some flour and knead the dough for 10 mins until it is smooth. Lightly grease the bowl with oil and place the dough in it. Cover loosely with a plastic wrap, and let it rest in a warm place for an hour or until its double in size.

IMG_20150419_015932IMG_20150418_214205_wm

Punch down the dough as shown in the picture to remove excess air. Roll the dough to form a rectangle, roughly about 10*12″. Spread Nutella in an even layer on the surface, leaving the sides.Roll tightly to form a log. Dust the parchment lined baking tray with some corn meal, and place the log in it. Now cut the dough down the middle with a knife, leaving one end intact. Twist ends on top of each other,making sure to turn the cut side towards the top. Cover the dough with a plastic wrap for another 20 mins.

Brush the braided bread with some butter.Bake for 30 mins at 160 degrees in a pre-heated oven. Remove and let it cool in a wire rack.

This bread is good to go for upto 3 days. ENJOY!!

IMG_20150419_014626_wm

IMG_20150419_165916_wm

For any queries and collaborations contact me at : cookingdiarybyshruti@gmail.com

You can connect with me on FacebookInstagram and Pinterest for more regular updates.

If you cook or bake anything from Cooking Diary By Shruti…Please Share the Pictures on Instagram or Facebook and Tag @cookingdiarybyshruti. I would love to see them. Also I would feature it on my blog.

Classic Margherita Pizza Cups

They say happiness comes in small packages 🙂  This recipe is nothing less than that. I am sure you love and adore all the toppings of your favorite pizza but nothing beats a simple, yet CLASSIC MARGHERITA PIZZA!!!

This pizza cup recipe is a tiny version and is surely a hit and one of a kind.

IMG_20150415_191652

Hello Lovely Readers,

I know most of you are going to hate me for not posting recipes through out the week since past 2 weeks. I am really sorry guys. I have a really special surprise for you guys. Something I have been planning for months now. But i am only going to talk about it once it is completely ready to be showcased. Why spoil the fun right??? Its a really special project for me and i am busy with that. I promise once that is over and I am back to the normal routine, i am going to post 2 recipes per week as always or may be 3.

IMG_20150416_181838

Nonetheless, coming back to this recipe, I want you guys to try it as soon as you read the post. The reason is that these are really really easy to make and also amazingly delicious. I don’t think I have posted a easier recipe than this. If you are a pizza lover, then get the ingredients and start baking them right away guys.

Honestly, I love my pizza loaded with a variety of toppings right from mushrooms to bell peppers to caramelized onions and what not. To me a pizza without topping is like a cupcake without frosting. I heart my toppings that much. But sometimes the simpler the better. Once in a while, I love to indulge in a Classic Margherita Pizza. The combination of cheese, tomato and basil is enough to get your taste buds dancing. So, I decided to bake these yummy-licious pizza cups.

P.S- My love for single servings is inseparable. Result: pizza cups. 😛

These pizza cups are the best blend of easy and satisfying food. Plain and simple, it just tasted GOOD. Also these are fulfilling without too much grease and gunk weighing you down. Now these pizza cups aren’t bite sized. They are filling as it is loaded with cheese. So, 2 to 3 of these along with salad or soup can make one heck of a meal. Please invite me if you are making some. I am tempted to eat them again as i am uploading the pictures..but they got over in minutes guys..

IMG_20150415_190753

These pizza cups aren’t made out of any pizza dough or pizza base. A pizza base becomes too thick for making cups. These are made out of tortillas as they fit perfectly as the base for the cups. Now, I make fresh tortillas for the cups and I am going to list down the recipe of making fresh tortillas too. But you can easily get a store bought one to make these. Making fresh tortillas is not at all important.

Besides the dough, there are only 4-5 ingredients here.Use your favorite homemade tomato sauce – not too much. Good quality mozzarella. Fresh, plump, juicy tomatoes. Lots of fresh basil… and bonus if it’s from your garden. Season with fresh ground pepper. That’s all.

IMG_20150416_182700

So lets get started with the recipe now.

RECIPE: CLASSIC MARGHERITA PIZZA CUPS

Makes: 10 to 12 

Prep Time: 30 mins( if you are making fresh tortillas)

Baking Time: 15 mins

INGREDIENTS:

For the Tortillas: (Optional, you can use store bought tortillas)

  • All purpose flour: 1 cup
  • Salt- 1/2 tsp
  • Oil or shortening: 2 tbsp
  • Water

For the recipe:

  • Olive Oil- 1 tbsp
  • Roasted Garlic- 2 cloves finely chopped
  • Your favorite pizza or tomato sauce: 1/4th cup (To make pizza sauce at home: Saute garlic, onions and add tomato puree. Cook for 10 mins and add seasonings)
  • Mozzarella Cheese: 1 cup
  • Plum Tomatoes- 2 sliced
  • Basil- dried or fresh
  • Ground Pepper- to taste
  • Salt to taste

PROCESS:

If you are making fresh tortillas at home, then mix all the ingredients under the heading and make a soft dough. Cover the dough with a wrap for 15 mins. After that, divide the dough into equal parts and start rolling each one of them into circle. Make sure it is very thin. In a slightly greased non-stick pan cook the tortillas until they have light brown spots on each side. Do not over cook them. This quantity will make about 8 to 10 tortillas.

Once the tortillas are ready, cut them into circles of about 3′ to 4′ in diameter with the help of a cutter. Press the circled out tortillas in a muffin tray to form a cup like structure. I used 2 muffin trays to make 12 pizza cups.

Now brush these tortillas in the tray with olive oil and garlic. Add half a spoon of tomato sauce (either homemade or readymade).

Fill it 3/4th with mozzarella and top it with sliced tomatoes.

Bake these in a preheated oven for 15 mins at 160 degrees. Top with ground pepper and salt once baked.

They are ready to be served hot.

For any queries and collaborations contact me at : cookingdiarybyshruti@gmail.com

You can connect with me on FacebookInstagram and Pinterest for more regular updates.

If you cook or bake anything from Cooking Diary By Shruti…Please Share the Pictures on Instagram or Facebook and Tag @cookingdiarybyshruti. I would love to see them. Also I would feature it on my blog.

Garlic Potato Stacks

Are you bored of the conventional boiled,mashed or fried potatoes?? Try my all new Garlic Potato Stacks which are so delicious that you cant just stop at one.

The ultimate Party Rockers!!!!!!

IMG_20150409_164045

Hello Lovely Readers,

Potatoes are everybody’s favorites. The form may be different though. Some of you would like it fried..some boiled..some mashed and some roasted but I hardly know of anybody who doesn’t like potatoes in any of these forms. Not that I am a calorie counter but I try and avoid fried potatoes as much as I can. I would rather roast them in the oven and eat them. But all this while I thought that no matter what, nothing can beat the taste of fried potatoes. Unless I tried this recipe.

IMG_20150409_164413

These garlic potato stacks are on top of my easy appetizers list. It is so easy to make and the end result is just unbelievable. I mean all you got to do is slice the potatoes..season them and then stack them together in a muffin tray. Bake them until brown and Voila….Your Potato Stacks are ready.

P.S- These are ultimate Party rockers.

The best part about this recipe is that you can make it any time you like. It does not require any fancy ingredient and is just perfect for your Sunday cravings. This one should definitely go up on my Fuss free Sunday recipes post. If you are following me on INSTAGRAM you would know that every Sunday I post a recipe which you could easily make without much to do. I think I should put up a separate page on the blog too regarding this. What say guys??? Let me know if you like the idea and I will definitely start working on it.

IMG_20150409_164213

Coming back to this recipe… you wouldn’t know what I am talking about until you try them. Craving for French Fries? No more because these potato stacks are unbeatable.

Lets begin with the recipe now.

RECIPE: GARLIC POTATO STACKS

MAKES: 6 single serves

PREP TIME: 10 mins

BAKING TIME: 30 mins

INGREDIENTS:

  • Potatoes: 3 large (Peeled and sliced)
  • Garlic Olive Oil: 4 Tbsp
  • Salt: to taste
  • Pepper: to taste
  • Garlic Powder: 1/2 tsp
  • Onion Powder: 1/2 tsp
  • Paprika: 1/4th tsp

PROCESS:

Peel the potatoes and slice them thinly. Mix all the seasonings with the oil. With a pastry brush, brush the muffin tins with this oil.

Then layer a potato slice in the bottom of a muffin tin with a thin layer of oil mix brushed on it. Layer another slice of potato and brush it with the garlic oil. Keep repeating till is stacks up to the top of the muffin tin. You can also season it with salt and pepper.

Bake them in a pre-heated oven for about 25 to 30 mins or until they are golden brown.

Enjoy these potato stacks.

IMG_20150409_164610

For any queries and collaborations contact me at : cookingdiarybyshruti@gmail.com

You can connect with me on FacebookInstagram and Pinterest for more regular updates.

If you cook or bake anything from Cooking Diary By Shruti…Please Share the Pictures on Instagram or Facebook and Tag @cookingdiarybyshruti. I would love to see them. Also I would feature it on my blog.

Garlic Butter Spinach Bow Pasta

If you talk about a lazy Sunday evening, comfort food, it cannot get better than this Pasta recipe. 

Good Evening Lovely Readers,

I am quite a pasta person on Sunday’s (actually I can have it as every meal..each day)…. but especially on Sunday’s.. I like to take a big bowl of my favorite pasta and just sit in front of the TV. Obviously you don’t want to work too much in the kitchen on a holiday. All you one to do is cook a one pot meal and you are sorted. This pasta is totally one of those.

Spinach With a handful of ingredients this one makes the job fairly easy. Now, if you are not a spinach lover you can add any other vegetable of your choice. But trust me the spinach tastes amazing in this one. You can try broccoli, mushrooms, zucchini, or even corns. Could it get any better for Sunday Supper??? No right.

I know most of you like your pastas in olive oil..at least I do. But try this one with butter and it tastes super amazing. Please do not count calories when making this. 😛   ( Its a warning) Though it does not have much calories as it has no cheese or sauce. Simple yet satisfying.

spinach 2

Lets begin with the recipe now.

RECIPE: GARLIC BUTTER SPINACH PASTA

Makes: Single serving 

Prep Time: 15 mins

Making Time: 5 mins

INGREDIENTS:

  • Bow Pasta : 150 gms or 1 cup (Boiled)
  • Butter- 2 tbsp
  • Garlic- 3 to 4 cloves finely chopped
  • Spinach- 1 cup
  • Oregano- 1 tsp
  • Chili Flakes- 1 tsp
  • Mixed Herbs- 1 tsp
  • Salt and Pepper- to taste

PROCESS:

Boil the pasta per your liking. In a heavy bottom pan,add butter and saute the garlic and spinach. Cook for about 2 mins.

Add pasta… rest of the seasonings and you are ready to go.

Serve hot. You can top it with some cheese if you like.

Caramelized Onions, Tomato and Herbs Focaccia Bread

This homemade recipe of Focaccia Bread is surprisingly simple but makes rich, flavorful, chewy yet soft bread that you are going to fall in LOVE with!!! 

If bread making scares you like it scares me, but you can’t resist a fresh and warm baked bread then Focaccia is the best way to begin with.

IMG_20150402_181604

Hello Lovely Readers,

If you wish to bake a bread from scratch at home and don’t know how to go about it..then Focaccia is the perfect choice. For all of you who do not know what Focaccia is:

Focaccia is a flat and oven baked Italian Bread similar to style and texture to a pizza. It is popular in Italy and is usually seasoned with salt, olive oil, herbs and may be topped with onion, tomatoes and any other topping of your choice. The best part about it is that this focaccia recipe is an absolute doodle and you can have great fun playing with the toppings 🙂

IMG_20150402_181510

Focaccia dough is really similar to a pizza dough in texture consisting of flour, oil, salt, water and yeast. If you are working with yeast do not worry at all. Just follow the recipe step by step and a perfect bread will be ready. I always feared working with yeast initially but not anymore. It an amazing thing to work with.

IMG_20150402_181447

The intoxicating smell of yeast, the wet stickiness between your fingers; the magical billowing quality of the dough when a warm spot turns it into a living thing.  These are the pleasures of bread making.  And these are the pleasures I was almost wholly unfamiliar with. Until now. I have tried making it long ago but the result wasn’t what i was looking for. This focaccia bread came like a real surprise as it looks amazing and tastes just like a bakery one.

IMG_20150402_181234

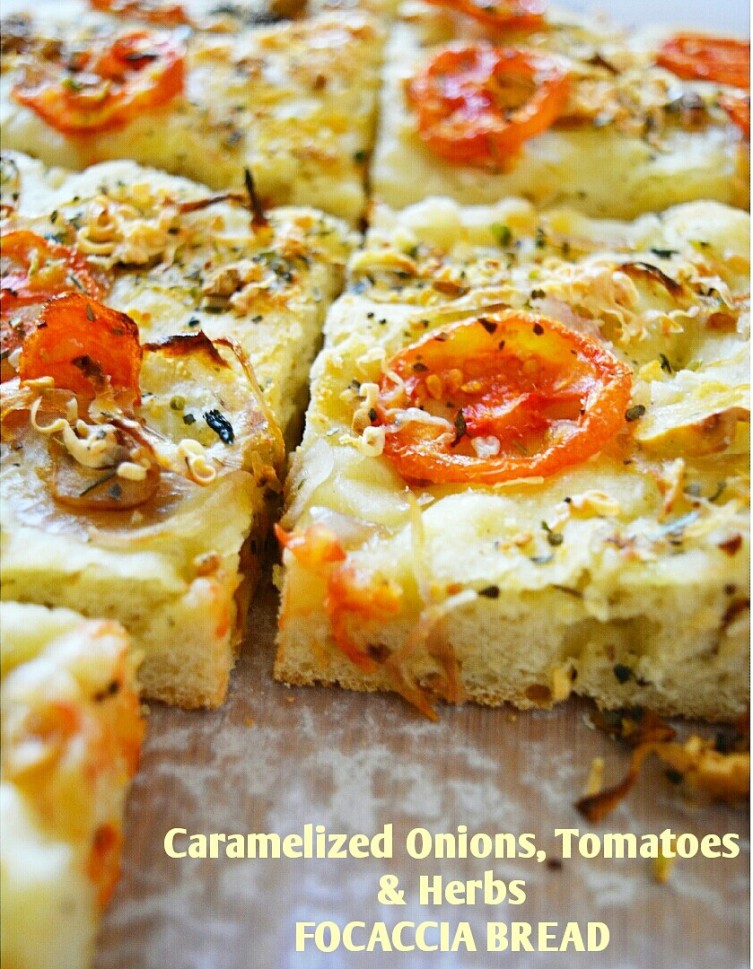
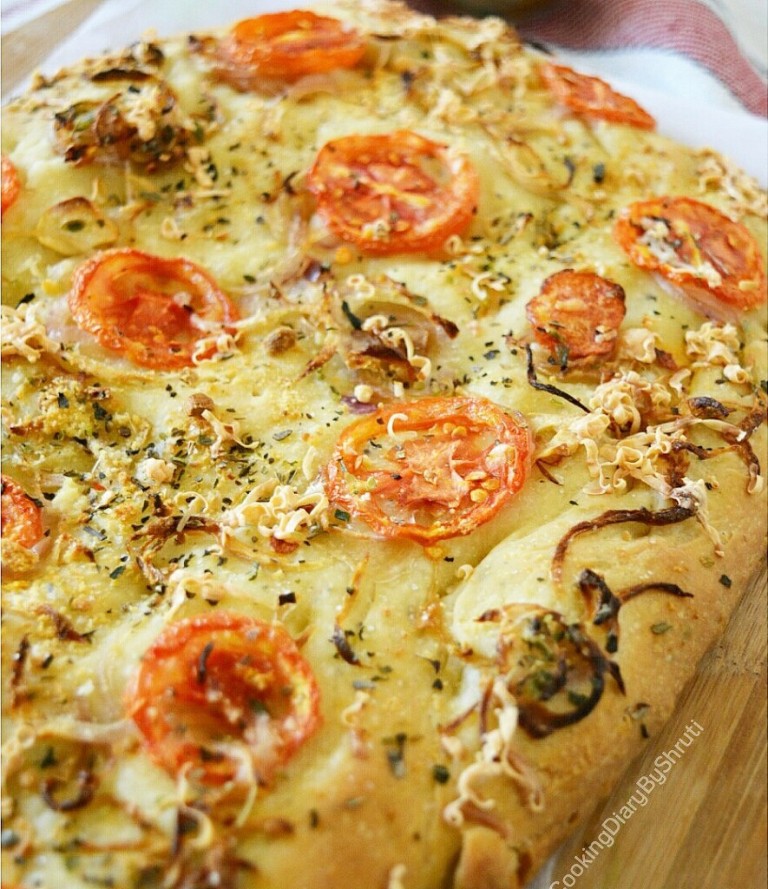
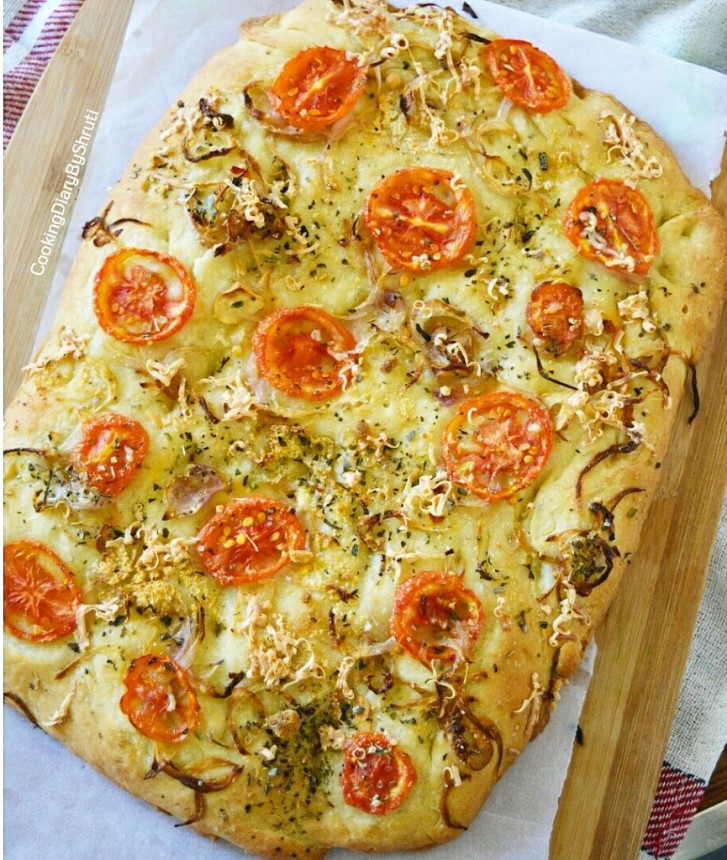
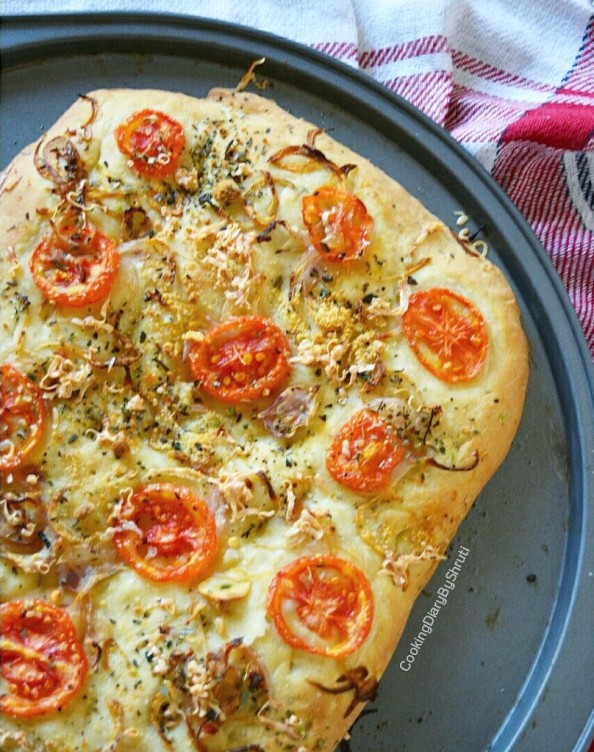
In this one, i have flavored the dough too with herbs, pepper, garlic powder and salt. Again the choice is entirely yours. Even for the topping. To begin with you may just top the bread with some herbs and olive oil. I have used caramelized onions, tomatoes, herbs and parmesan cheese. This takes the bread to a whole new level.

IMG_20150402_181019

Few important things that you need to keep in mind before beginning to make this bread is:

Yeast: The quality of yeast is really important while making the bread. I have used a yeast from SOLAR. You can use any brand from a grocery store near you. Make sure the yeast is not too old as it would not give you similar results. Also when you dissolve the yeast in water..the water should be just warm. Too hot water would kill the yeast and cold water would not activate the yeast.

Kneading the dough: Kneading the dough is the most important part in bread making. Once you have combined all the ingredients of the dough together you have to knead it for about 8 to 10 mins. This helps to form the gluten in the bread. If you knead the dough perfectly you get a really nice textured bread. You cannot skip this step.

Letting the dough rest: If kneading the dough is important then this step too is equally important. You need to let the dough rest for atleast 1 hour in a warm place which will help it rise. No matter how excited you are to start the baking immediately. Do not skip this step.

Measurement of Ingredients: I always keep on repeating this that when you are baking anything, measurement of the ingredients is very important. Do not add anything more or less. Follow the recipe to get perfection.

P.S- I am sure you will fall in love with this Focaccia Recipe.

Lets get started with the recipe now.

IMG_20150402_180902

RECIPE: CARAMELIZED ONIONS, TOMATOES & HERBS FOCACCIA BREAD

Makes- 1 ( 9 /12 ” bread)

Prep Time: 2 hours (Includes dough rising time)

Baking Time: 20 to 25 mins

INGREDIENTS:

For the Dough:

  • All purpose flour- 2 1/2 cups
  • Salt- 1 1/2 tsp
  • Sugar- 1 tsp
  • Dry Active Yeast- 2 1/2 tsp
  • Water- 1 cup (keep 1/4th cup aside to mix yeast)
  • Extra Virgin Olive Oil- 1/2 cup (extra for drizzling)
  • Garlic Powder- 1 tsp
  • Ground Black Pepper- 1/2 tsp
  • Dried Mixed Herbs- 1/2 tsp

For the Toppings: 

  • Onion- 1 large thinly sliced
  • Honey- 1 tbsp
  • Tomatoes-2 medium sized (cut into 1/4th inch slices)
  • Mixed Herbs- 2 tsp
  • Salt- to taste
  • Parmesan Cheese- 1/4th cup grated

PROCESS:

Firstly, in a medium bowl stir together yeast, warm water and sugar. Let is rest until the yeast is bubbled up for about 10 mins.

In a separate bowl, mix together flour, 1/4th cup olive oil, salt, herbs, pepper, garlic powder. Pour in the yeast mixture along with the rest of the water and combine it together. The dough will be really sticky and wet at this stage. Turn the dough into a well floured surface and knead it until the dough is smooth. Knead for about 10 to 12 mins.

Place the dough in a lightly oiled bowl, cover with a kitchen wrap and let the dough rest in a warm place until the dough doubles in size. This should take around an hour.

While the dough is resting, heat a tsp of oil and add onion slices over medium heat and add honey. Cook until the onions have turned light brown and caramelized..

Once the dough has doubled its size..punch it down to remove excess air. Press it into a lightly oiled baking tray and shape it to a rectangle or any other shape. It need not be too neat. Now poke holes using your fingers. Drizzle 2 tablespoons of olive oil and let the dough rest again until it puffs up for about 20 mins.

Top the dough with caramelized onions, tomatoes, herbs and cheese. Bake the focaccia in a pre-heated oven for about 20 to 25 mins at 180 degrees or until golden brown.

Cut into pieces and serve.

This bread is good upto 2 to 3 days.

IMG_20150401_004445_wm

IMG_20150402_181342

For any queries and collaborations contact me at : cookingdiarybyshruti@gmail.com

You can connect with me on FacebookInstagram and Pinterest for more regular updates.

If you cook or bake anything from Cooking Diary By Shruti…Please Share the Pictures on Instagram or Facebook and Tag @cookingdiarybyshruti. I would love to see them. Also I would feature it on my blog.

Blueberry Lemonade

Made these amazing Blueberry Lemonade with Fresh Blueberry Syrup. It is so refreshing, sweet and has the tangy-ness required. It is simply a perfect day to cool down on a hot summer day.

I had a box of fresh blueberries last week and I wanted to make some amazing stuff out of it. I made Blueberry Pie Cookies out of them and wanted to make a drink or a jam too. Its getting hot these days, so I thought I should definitely try a drink. So when life gives you lemons you make Blueberry Lemonade. LOL…

IMG_20150329_110924-1

P.S- This Lemonade is definitely different from the conventional Lemonade…But I just had to make these.

Its mid March now… but already getting quite hot outside.You really need a drink to beat the heat during the day. My favorites for this summer have been Tendo- Coconut Water, Salted Fresh Lime Sodas, and Buttermilk. I have been avoiding soft drinks this summer because of the high amount of sugar in them and in order to avoid those unwanted calories. Though Fresh Lime too isn’t all that great but yes at least better than Cold Drinks.

IMG_20150329_121943_wm-1

P.S- The Fresh Blueberry Syrup is the start ingredient of this recipe.

Summers scream Lemons to me. Lemons are my ultimate favorite. I love drinks with lemon and mint. This drink is just one of those experiments when i wanted to infuse lemon in my drink.With a simple and homemade blueberry syrup, this drink could not get any easier. It is wonderfully fruity and sweet from the plump juicy blueberries with just enough of a tart kick. And it is really the perfect way to cool down on a hot summer day.

IMG_20150329_122045_wm-1

P.S- Its a perfect Sunday Fuss Free Recipe. 

Lets get started with the recipe.

RECIPE: BLUEBERRY LEMONADE

Makes- 2 servings

Prep Time- 20 mins

Making Time- 5 mins

INGREDIENTS:

  • Blueberries- 3/4th cup
  • Granulated Sugar- 1/2 cup
  • Lemon Juice- 1/4th cup
  • Some extra blueberries and lemon for garnishing

PROCESS: 

To make the blueberry syrup. combine sugar and 1 cup water in a heavy bottom sauce pan on medium heat and cook until the sugar melts. Stir in the blueberries and cook the mixture until the blueberries have broken.

Strain the mixture to get a smooth blueberry syrup.

In a pitcher mix together blueberry syrup, lemon juice and water. Serve chilled with ice..blueberries and Lemons.

For any queries and collaborations contact me at : cookingdiarybyshruti@gmail.com

You can connect with me on FacebookInstagram and Pinterest for more regular updates.

If you cook or bake anything from Cooking Diary By Shruti…Please Share the Pictures on Instagram or Facebook and Tag @cookingdiarybyshruti. I would love to see them. Also I would feature it on my blog.

Mini Apple Galettes

Can you wake up to a better morning..than to the aroma of these apple and cinnamon Galettes. I bet not.

Hello Lovely Readers,

IMG_20150325_110255

I can’t tell you how amazing is the aroma of these amazing apple galettes. I just couldn’t hold on for them to be out of the oven so that I could dig on them. These were over in an hour guys. REALLY.
I baked and shot these early morning today. I was craving a warm apple pie since last night and I couldnt wait until morning to bake. I started working on them as soon as I woke up. I think that totally defines a foodie. Nonetheless..once I started working on the recipe, I thought why not make galettes instead of pies because I simply love the rustic look of these galettes. Also..instead of making a whole big galette I went for a single serve one. If you follow my blog you would know that I rather prefer single servings for my desserts. Isnt that good.

IMG_20150325_101403

P.S- The single serve idea behind all my desserts are that I do not like to share my dessert. PERIOD!!

Long ago I wasn’t a fan of apples in my dessert. Even when I went to a bakery I would definitely pick desserts with strawberries..blueberries..chocolate or any other flavor over apples. But once I tasted an apple pie and I thought it was the best. When I first baked an apple pie(click here for recipe) I was amazed with the way they turned out to be. Ever since I have been a huge fan of the apple and cinnamon combination and I look for ways to incorporate them in baking.

IMG_20150325_101236

Coming to this recipe…I believe apple galettes are really fuss free In comparison to apple pies. All you need to do is place your apple and cinnamon mix on a rolled out pie crust and fold the edges. Yes..they are really simple. There is no fuss in making these galettes. You need to have a perfect pie crust to make these. You can either use a store bought crust or make it all by yourself.

IMG_20150325_101147

P.S- You can replace apples by strawberry..blueberry..mangoes..nuts…anything of your choice.

Lets get started with the recipe now.

RECIPE: MINI APPLE GALETTES

Makes-4 to 5 single serve or One 9″ Single crust pie
Prep Time- 20 mins
Baking Time- 20 mins

Ingredients:

For the pie crust:

  • All purpose flour- 100 gms
  • Butter- 40 gms
  • Sugar- 20 gms
  • Salt- A pinch
  • Vanilla essence- 1 tsp
  • Water- 2 tbsp

For the Apple Filling:

  • Apples- 2 medium sized diced or slice
  • Cinnamon powder- 1 1/2 tsp
  • Sugar- 2 Tbsp
  • Lemon Juice- 1 tsp

PROCESS:

In a bowl mix all the ingredients for the apple filling and keep aside.

In a separate bowl..add flour and butter. Rub the butter and flour together until a grainy mix is formed. Now add rest of the ingredients and form a dough by just combining everything together. Dont add excess water.

Now divide the dough into 5 equal parts and start rolling each one into a 4″ circle. Place the apple mix in the centre leaving atleast 1 inch edges to fold. Fold the sides inwards toward the filling.

Sprinkle some sugar and cinnamon on top too.

Line a baking tray with parchment paper and bake the galettes for 20 mins at 180 degrees in a pre heated oven.

Serve warm with caramel sauce or ice cream.

IMG_20150325_002323_wm

Blueberry Pie Cookies

What do you do when you are craving both pies and cookies at the same time? Nothing much…You follow my recipe and bake these pie cookies ❤

Hello Lovely Readers,

Blueberry

This week has been really hectic and I baked and shot like almost 5 recipes. I know you guys must be wondering that I haven’t posted any of those since like 5 days but I just couldn’t manage to do it. So here I am today, posting my most favorite recipe of what I shot.

IMG_20150318_011254_wm

If you have been following my blog, you would know that I always do a mix of recipes through out the week. Like I post at least 1 dessert and 1 savory item on the blog per week. I avoid baking desserts through out the week. Though whenever I am thinking of what to post next all I can think of is some amazing dessert 😛

IMG_20150318_021108_wm

IMG_20150318_020758_wm

P.S- If you are fond of Cookies then this one is definitely a must try for all you Cookie Lovers.

Pies and Tarts are my ultimate favorite. Like you can find a lot of pie recipes on the blog. I prefer them over cakes honestly. My last strawberry hand pies was my absolute favorite. I am thinking of doing savory pies on the blog. Do you have any flavor or ingredient suggestion for the savory pies? Do let me know and I will definitely try them out. I do have a caramelized onion tart on my mind but I am still working on the recipe. 😛

IMG_20150320_143609_wm

I can go on and on discussing about my plans but lets now discuss what all of your are here for : Blueberry Pie Cookies       I had a box of Fresh Blueberries lying with me and I was wondering what should I bake. The first thing I thought of were blueberry muffins. But I had made a batch of my banana muffins (the recipe of which you are going to see soon) and I didn’t want to indulge in muffins again .So I was really confused between blueberry cookies and pies. I was literally craving both. Trust me. But my box of blueberry could suffice only 1 recipe. So I baked these beautiful blueberry cookies in the form of a pie.

IMG_20150320_144130_wm

P.S- Each and every bite of these offers the very best part of an actual Blueberry Pie, with all the convenience of a Cookie. You need no fork to eat these…Yippie

SERIOUSLY!! THIS IS THE BEST COOKIE I EVER HAD.

You know what I love the most about a blueberry pie or any other pie is the oozy baked sugar, chewy-ish bits of baked fruit that gets all caramelized to the crust…I am craving them again guys while writing this post .. but they were over the very same day. Anyways, that is my absolute favorite part of a fruit pie. How great are those sticky little chewy bites. Oh Gawd!! Those gooey and warm bites of Pie Heaven are my inspiration for these cookies.

IMG_20150320_155716_wm

I have made various pies with different fruits right from apples to strawberries to mangoes. But Blueberry is my ultimate favorite as there is no pitting or peeling involved in case of blueberries. Mix the blueberries with sugar, lemon juice and lemon zest for an amazing flavor. These pie cookies have not been made with any artificial dough. I have made fresh dough and fresh blueberry jam for these cookies.

P.S- For the best flavor use Fresh Blueberries.

Lets get started with the recipe now.

RECIPE: BLUEBERRY PIE COOKIES

MAKES: About 6 to 8 cookies

Prep Time: 45 mins (includes dough chilling time)

Baking Time: 20 mins

INGREDIENTS:

For the cookies dough:

  • All purpose Flour- 100 gms
  • Butter- 50 gms
  • Vanilla- 1 tsp
  • Sugar- 3 to 4 Tbsp (can vary according to how sweet you want. This one is just about perfect)
  • Chilled Water- 2 Tbsp
  • Salt- A pinch
  • Baking Powder- 1/2 tsp
  • Granulated Sugar- For sprinkling

For the blueberry jam:

  • Fresh Blueberries- 80 gms
  • Lemon Juice- 1 1/2 tbsp
  • Sugar- 4 Tbsp
  • Lemon Zest- 1 tsp
  • Water- 2 Tbsp

PROCESS:

In a saucepan mix all the ingredients under the blueberry jam and cook it for 5 to 10 mins on slow flame. Make sure you keep stirring. Close once the blueberries have cooked and reduced to a jam like consistency. Let it cool.

On the other hand, in a large bowl, take flour and add butter. Rub the butter and the flour together with the help of your fingers until you get a grainy mixture of flour. Add in the rest of the ingredients and form a dough. The dough wouldn’t be very fine but that is how it is supposed to be. Now cover it with a cling wrap or a foil and put it in the fridge for about 30 mins.

Once the dough is chilled roll is out by dusting some flour on the work slab and cut in into atleast 1/2 inch thick rounds with the help of a cookie cutter. Use the rest of the dough by rolling it and cutting it into thin strips.

Now place the blueberry mix on the surface of the round cut cookies and top it with thin strips in a criss-cross manner.

IMG_20150320_160551_wm

Once these cookies are ready, place them in a tray lined with parchment paper and place the tray for at least 10 mins in the refrigerator. Now sprinkle some granulated sugar on top.

Bake them for about 20 mins at 160 degrees in a pre-heated oven.

And Voila…. the best blueberry pie cookies are now ready. Enjoy them with a glass of milk or coffee or they are just amazing as it is.

IMG_20150320_143945_wm

Freshly Baked Out of the Oven

IMG_20150318_020851_wm

For any queries and collaborations contact me at : cookingdiarybyshruti@gmail.com

You can connect with me on FacebookInstagram and Pinterest for more regular updates.

If you cook or bake anything from Cooking Diary By Shruti…Please Share the Pictures on Instagram or Facebook and Tag @cookingdiarybyshruti. I would love to see them. Also I would feature it on my blog.

Roasted Garlic Hummus

Hello All you Lovely Readers,

Summers are almost here and I am all set for the summer recipes this season. I have quite a lot of them lined up. To begin with is the Roasted Garlic Hummus. Now, I had a lot of you requesting me for Lebanese Food. Right from pita bread to hummus to a lot more. It was quite on my mind to do pita chips also guys but today I am only doing a perfect hummus recipe at home. Although you can check out my whole wheat pita chips recipe (here) which I had done long ago.

IMG_20150312_172552_wm

Now for those of you who don’t know what Hummus is: Hummus is a dip which is made out of cooked and mashed chickpeas blended with tahini, olive oil, lemon juice, salt and garlic. It is mostly served with pita bread but you can widely use it as a salad dip and have it with cucumbers,carrots, and also chips. I prefer it that way. They are high in nutrition and are perfect to eat those raw vegetables with a lot of taste….YUMM 🙂IMG_20150312_172656_wm

IMG_20150312_173228_wm

I think this is the easiest thing I have made soo far. Trust me when I say this. Hummus is a proof that some of the best tasting things in life are the simplest to make. It can be rustled up with just 5 to 6 ingredients and requires no cooking at all- only a food processor. (Really *WINK*)  The hummus recipe below will give you a perfect basic hummus recipe and also a solid base from which you can work on to experiment more new flavor if you like.

IMG_20150312_172759_wm

As I mentioned earlier that Hummus is a chickpea based dip and a staple at any Levantine Table spread. It was mostly popular in Middle East, Turkey etc but now is famous across the world. What I love about hummus is that you can really experiment with it. You can include spices such as coriander seeds, cumin, paprika , dried chili flakes and all sorts of things. You might also come across hummus blended with red-paprika, sun dried tomatoes, and even caramelized onions.

P.S- The best part is there are no hard and fast rules with the flavoring of hummus. You can have fun and experiment with the flavors when at home. Once you have mastered the basic recipe you can flavor it with whatever takes your fancy.

I love the flavor of roasted garlic and I had to add it in these. All you have to do is remove the head of the garlic, drizzle it with some olive oil, and roast it in the oven for 15 to 20 mins at 180 degrees. Its the best thing ever. You can also fry the garlic if you don’t want to bake it.

IMG_20150312_173422_wm

Lets get started with the recipe now.

RECIPE: Roasted Garlic Hummus

Makes: 1 bowl dip

Prep Time: 5 mins

Making Time: 5 mins

INGREDIENTS:

  • Chickpeas- 200 gms soaked ( You can also use the canned ones)
  • Yogurt- 4 Tsp ( You can use Tahini Instead of this)
  • Roasted Garlic- 2 to 3 cloves( Don’t add more than this)
  • Sea Salt- 1 tsp
  • Extra Virgin Olive Oil- 6 Tbsp ( Some more for drizzling)
  • Lemon Juice- 3 Tbsp
  • Paprika- 1 tsp ( Some extra to drizzle on top)
  • Coriander- 2 Tbsp (Optional and extra to add on top)

PROCESS:

Rinse the chickpeas in cold water and and tip into the food processor. Add the yogurt, roasted garlic, salt, lemon juice, coriander, paprika and olive oil. You can also add some water for a better consistency. Blend until everything is smooth and combined.

Now tip it into the serving dish and drizzle it with some extra virgin olive oil, sprinkle some paprika and finely chopped coriander and some chopped roasted garlic.

IMG_20150312_173122_wm

For any queries and collaborations contact me at : cookingdiarybyshruti@gmail.com

You can connect with me on FacebookInstagram and Pinterest for more regular updates.

If you cook or bake anything from Cooking Diary By Shruti…Please Share the Pictures on Instagram or Facebook and Tag @cookingdiarybyshruti. I would love to see them. Also I would feature it on my blog.

Marshmallow Cupcakes Blogiversary Giveaway Contest

Thank you everyone for all the lovely wishes that you sent me on my 1st blog anniversary. Yesterday was a really really special day and I am extremely happy.

Moist and Light Chocolate Cupcakes topped with melted marshmallow and sprinkles. These couldn’t be better.

Hello Lovely Readers.

IMG_20150312_185820_wm

If you love marshmallow’s you are going to adore these cupcakes. These cupcakes are light, fluffy and topped with melted marshmallow as the frosting for the cupcakes. Could it sound better than this?? I guess not. The marshmallow frosting is extremely easy to do unlike others and just takes about 5 mins. All you have to do is pop in the marshmallow 5 mins before the cupcake is baking in the oven and this beautiful marshmallow cupcake is ready 😀

IMG_20150307_183512_wm

I stumbled on these by accident, a sort of kitchen experiment! I was craving to eat cupcakes and was too lazy to whip up a frosting. I had a bag full of marshmallows with me. I thought why not try these as a frosting for my cupcakes. I was so pleased with how they turned out them. I used pink marshmallows and they look absolutely gorgeous. Once cooked the marshmallows give the cupcakes a soft, molten texture. It makes a lovely contrast against the crumbly cake surrounding it. Minimal or no icing is needed as these are already quite sweet. If you wish you can add these on top of your butter cream frosting too…but for me these were enough.

IMG_20150312_191633_wm

P.S- These are really addictive. Make sure you make a huge batch 😛

These cupcakes are a savior when you are running out of time and want to bake something out of this world. Also, no matter how much I love cupcakes with frostings, this one is my all new favorite. If you are fond of marshmallows then this one is definitely a must try for you. Also, if you are a beginner and are not to pro in making cupcake toppings and piping them then you should definitely start with this one. If you are using mini marshmallows then you need to use 3 to 4 marshmallow per cupcake but i used a bigger one which suffices each for a cupcake.

IMG_20150312_185640_wm

I have made a chocolate batter for these cupcakes. You can keep it plain with just vanilla flavor or give it any flavor you like. You can also add a lot of chocolate chips to these. The choice is entirely yours.

IMG_20150307_165218_wm

So lets get started with the recipe now.

RECIPE: MARSHMALLOW CUPCAKES

Makes: 8 cupcakes

Prep Time: 15 mins

Baking Time: 30 mins

INGREDIENTS:

For the Cupcakes:

  • All Purpose Flour-1 1/2 cup
  • Butter- 1/2 cup
  • Sugar-3/4th cup
  • Baking Powder- 1 1/2 tsp
  • Baking Soda- 1 tsp
  • Buttermilk- 1 cup
  • Vanilla Extract-1 tsp
  • Cocoa Powder- 4 tbsp

For the Frosting

  • Large Size Marshmallows- I used Pink
  • Sprinklers

PROCESS:

Beat the Butter and Sugar in a bowl until it is light and fluffy. Add vanilla extract, buttermilk and mix until a smooth consistency. Now in a separate bowl, sift together flour, baking powder, baking soda,and cocoa powder.

Mix the wet ingredients in the dry one and whisk it with a spatula. Do not over mix.

Now line a cupcake tray or muffin tray with liners and pour the batter. make sure you fill only 3/4th of the tray. Bake these in a pre heated oven, for 20 mins at 180 degrees.

Once they are done, pop in one marshmallow on each cupcake and bake further for 5 mins until the marshmallows are soft…then put it in microwave mode for 3 mins. Once u put the cupcakes in microwave the marshmallows will rise really high. But don’t worry, it will come back to normal.

Now your cupcakes are ready with a frosting. Let it cool down. Add sprinklers or you can also top it with your favorite topping.

IMG_20150220_172102_wm

As you guys know, it was my Blog Anniversary yesterday. And I am thankful to each one of you for all your love and support. 

I am holding a GiveAway Contest on Facebook & Instagram. Please participate and you could get a chance to win amazing goodies from Propshop24.

#CONTEST Details
Now most of you send me the pictures of what you cook from the blog. Its time to get awarded for that.

Enter the contest and get a chance to win these quirky and fun baking essentials from PropShop24 (Owl cake mould, Owl Spatula, Chocolate Mould and Doughnut Diary). To Enter the Contest:

1. Follow & Like @cookingdiarybyshruti on instagram and facebook.
2. Make anything of your choice from my blog and post the picture.Tag me and also use a hashtag#CDBSturns1
3. One of you who tries maximum number of recipes from the blog and whose pictures I like the most will win these amazing gifts.

Time to Cook Guys…Make me Happy 

The CONTEST is on upto 20th March 2015.

Contest open in India only!!

instagram contest

Eggless Nutella Brownies

Chewy, Fudgy, Dense, Rich, Crumbly and Chocolaty…This Nutella Brownie have been made completely from scratch and you will never make a box mix brownie again!!!

Firstly, I would like to wish all you lovely women a Very Happy International Women’s Day :*

This Women’s Day Celebrate Yourself :- Be Unstoppable

IMG_20150308_183657

Hello all you beautiful people,

I have a really good news to share with you guys!! Guess what is around the corner??? Its my 1st Blogiversary. Yes guys its about to be a year. I really couldn’t believe it when I got a notification that its almost a year now. WOW, this journey was superbly amazing. I want to thank each one of you who made it possible. I am really really excited and thrilled. Do watch out my Instagram and Facebook page as I have huge surprise lined up for you guys 😀

Sigh.. I can go on and on about how excited I am for my blog anniversary but coming back to what you are here for is this perfect homemade nutella brownies. Is there anything better in the world that can make you happy than a rich, chocolate , fudgy Brownie? I guess No. My Nutella Brownies are a real good deal. You are going to enjoy every bit of it. Its a brownie in its purest form. There are no fancy ingredients in this one. This is my secret and ultimate favorite brownie recipe.

IMG_20150308_183838

P.S- I just baked it like 2 hours ago and more than half of it is over. 😛

This is a plain and simple nutella brownie. I haven’t added any sort of frosting or layering to this one. I wanted to keep it as simple and pure as possible. Now, most of you must have made brownies before and you might have a secret brownie recipe too. Like everyone has a secret brownie recipe…:D

There are a lot of favorite recipes but today I am going to show you how to make chewy, fudgy, homemade brownies. When you say a brownie is chewy it means that it has a really dense structure but still a little crumbly. But a Fudgy brownie are moist with an extremely chocolaty interior. I like my brownies to be a mix of both.

IMG_20150308_183714

Before making a perfect brownie you need to know your ingredients really well. I was only able to develop this brownie recipe after a little practice, trial and error.

Lets get started with the recipe.

RECIPE: EGGLESS NUTELLA BROWNIES

Makes- 16 brownies pieces

Prep Time- 15 mins

Baking Time- 30 mins

INGREDIENTS:

  • All Purpose Flour- 150 gms
  • Sugar- 80 gms
  • Cocoa Powder- 60 gms
  • Baking Powder- 1 tsp
  • Baking Soda- 1 tsp
  • Vanilla- 1 tsp
  • Nutella- 4 tbsp
  • Oil- 60 ml
  • Milk- 50 ml
  • Apple Sauce- 1/2 cup ( Peel and puree 1 apple with 1 tbsp honey & 1tsp lemon)

PROCESS:

In a bowl sift together flour, baking powder and baking soda.

In a mixer, add apple sauce, milk, oil, vanilla extract,sugar, cocoa powder, and nutella. Blend until you get a smooth consistency. Make sure there are no lumps.

Now mix the wet ingredient into the dry ingredients with the help of a spatula. Do not overmix.

Pour it into a 8 by 8″ baking dish lined with parchment paper and bake it in a preheated oven for 30 mins at 200 degrees.

Do a skewer test to see if your brownies are baked nicely. If not bake for 5 more mins.

Lets your brownies cool on the wire rack for atleast 1 hour. (I know this is the most difficult time) and keep it in the fridge for 30 mins.

Cut them in to equal squares once cooled down and dust it with sugar if you wish.

IMG_20150308_183858

Thandai/ Milk flavored with almonds and spices

Happy Holi to all you lovely readers.

IMG_20150306_090822_wm

If you are following me since the beginning you would know that Holi is really special for the blog i.e because it indicates Cooking Diary By Shruti’s first birthday…YEIII… Although there is just about few days left for that… I am really excited already. I am also planning a surprise for you guys so stay tuned .

IMG_20150306_015101_wm

IMG_20150306_015425_wm

Back to today’s post, this is a HOLI Speciality. I was planning to do it last year too and start of my 1st post as this but nonetheless here it is today. If you have been reading the blog, you must have read that I am doing 2 simultaneous posts. Check out my HOLI SPECIAL SWEET RECIPE HERE.(Click Here)

IMG_20150306_091351_wm

IMG_20150306_091504_wm

This is the first time I tried making Thandai, and to my surprise it just turned out perfect. It was a huge hit. Thandai is just milk flavored with a dry fruits and a lot of spices. Try making them now for your HOLI party today.

Lets get started.

RECIPE: Thandai / Milk flavored with almonds and spices

MAKES- 2 Glasses

PREP TIME- 15 MINS

MAKING TIME: 1 HOUR (includes refrigerating time)

INGREDIENTS:

  • Milk: 2 cups
  • Almonds: 10 to 12 (soaked and peeled)
  • Poppy Seeds: 1 Tbsp
  • Melon Seeds: 1 1/2 Tbsp
  • Fennel Seeds: 1 1/2 Tbsp
  • Sugar: 4 to 5 Tbsp
  • Dried Rose Petals-1 tbsp
  • Peppercorns: 8 to 10
  • Green Cardamoms: 6 to 8
  • Saffron- 2 pinches
  • Almond Flakes and Pistachio Flakes- for decoration

PROCESS:

To make thandai, your milk should be cold. For that boil your milk with sugar and saffron until you get a desired color and let it refrigerate atleast for an hour so that its completely chilled.

Mix almonds, poppy seeds, melon seeds, fennel seeds, dried rose petals, peppercorns, rose petals, cardamoms and make a smooth powder or paste.

Now add 3 to 4 tbsp of this mixture into the milk. Mix nicely. You can add more sugar or mixture as per your liking. Let it rest for sometime so that the flavors are infused.

Strain the milk into your desired glass. Top it with pistachios and almond flakes and your thandai is ready to be served.

IMG_20150306_090935_wm

Gujia/Hand Pies filled with dry fruits

CDBS would like to wish all its readers a Very Happy Holi. Celebrate Holi with traditional sweets and drinks with me this time.

IMG_20150305_143251

IMG_20150305_143717

Hello all you lovely readers,

How are your HOLI preparations going? I hope they are going great. Festivals call for traditional sweets and so much food. What is there on your HOLI special menu? Do share with me on Instagram or Facebook and tag me along with the hashtag #CDBSHOLISPECIAL. I am going to do two simultaneous posts for HOLI.

IMG_20150305_143528

If you have been following me on either of the social networking sites Instagram, Facebook or Pinterest you would know that I don’t have much traditional recipes on the blog. I am not very good at it to be very honest. This time I wanted to try making them. When I say try…I did a whole lot of research on how to go about these. Took a lot of help from MOM and finally I was able to do something out of it. These recipes aren’t something special. May be most of you are familiar with it. But as I always say, each one of us can make it differently.

IMG_20150305_145129_wm

IMG_20150305_143734

I will be putting up 2 special recipes for HOLI. Most of you would be making a variety of different sweets and foods for holi but the one special food that i think is made during holi and a traditional dish for holi is the GUJIAS. In other words gujias are similar to hand pies filled with dry fruits mixed in sugar and milk and reduced to make a really dry and consistent mixture. I just recently did strawberry hand pies and this wasn’t tough at all. The process is almost the same. The filling is different though. This is a indian version of pies is all I would say. However, it can be a little tricky if you do not follow the recipe step by step. AS i always say that following a recipe dot to dot is important if you want to recreate something. This one is my MOM’s recipe and I haven’t made any changes to it. I wanted it to be as tradtional as possible.

IMG_20150305_143842

IF you are familiar with making pie doughs then this one wont be difficult at all. All you have to do is make the dough and put it to chill for a bit. Meanwhile prepare the filling and then start making small hand pies out of it. I have made the filling with khoya/mawa and dryfruits along with some spices.

IMG_20150305_142839

Lets begin with the recipe now.

RECIPE: GUJIAS/HAND PIES WITH DRY FRUITS

MAKES: 10 TO 15

PREP TIME: 20 mins

MAKING TIME: 20 mins

 INGREDIENTS:

For the Cover/Dough:

  • All Purpose Flour- 1 1/2 cup
  • Shortening/Ghee/Oil- 3 Tbsp
  • Salt- A pinch
  • Warm Water- As required

For the Filling:

  • Khoya/Mawa- 200 gms
  • Semolina- 1 cup
  • Sugar-1 1/2 cup
  • Dry Fruits- 1 cup (additional for garnishing)
  • Cardamom Powder- 1 tsp
  • Oil to fry

PROCESS:

Mix all the ingredients for the dough and form a soft dough. Cover it with a cling wrap and keep aside.

In a heave bottom pan, add semolina, saute it for a min or two until golden and add khoya, dry fruits and cardamom powder. Just keep it on low flame for 2 mins. Take out the mix in a bowl and once the mixture has come to room temperature add sugar and mix everything to a smooth consistency.

Roll out the dough to a 2 diameter circle and about 1/2 inch thick. Place the mixture on it and fold it to form a semi circle. You can then use a fork to lock the ends.

Fry these on medium flame until golden. You can also bake them at 180 degrees in a preheated oven for 20 mins.

They are ready to serve once cooled.

Note: I have dipped them in sugar syrup after frying but this step is completely optional. If you wish to dip it in sugar syrup too then just boil together 1 cup sugar with 1/2 cup water until the sugar completely dissolves and the mixture is thick. Now dip the fried gujias into them. Take out immediately and let it dry in a butter paper.

IMG_20150305_143752


IMG_20150305_143819


For any queries and collaborations contact me at : cookingdiarybyshruti@gmail.com

You can connect with me on FacebookInstagram and Pinterest for more regular updates.

If you cook or bake anything from Cooking Diary By Shruti…Please Share the Pictures on Instagram or Facebook and Tag @cookingdiarybyshruti. I would love to see them. Also I would feature it on my blog.

Strawberry Oatmeal Smoothie

Do you HATE oats? Eating Oats is more like a healthy option than a tasty one? What if I said, now oats are healthy and tasty too…… Try it for yourself 🙂

IMG_20150224_234411 (1)_wm

IMG_20150224_234118_wm

Hello Lovely Readers,

I believe most of you can relate to the phenomena that OATS aren’t tasty at all. They are more like a healthy option that you are forced to eat. At least I believed in this. Initially when I switched my breakfast to a healthy and low calorie diet, I had to switch to oats. I hated the taste. I ate it like a food supplement for my body not enjoying it at all. But gradually I developed my taste for it. This is not the case for most of you. If you don’t like it, you would probably not try it again.

IMG_20150224_233416_wm

IMG_20150224_233756_wm

My Strawberry Oatmeal Smoothie is a perfect breakfast recipe. Power packed with a lot of nutrients this is the best option to start your day with. It keeps you full until lunch and really easy to make if you dont’t have much time to cook your breakfast.

P.S- Smoothies are healthy if you put in the right ingredients.

Smoothies are a really healthy option if you throw in the right ingredients. You need to cut on sugar and any other calorie adding ingredient like ice- cream, chocolate or cookies. Try make your smoothies healthy. There is a basic breakdown of how you can make your smoothies healthy and avoid adding calories to it.

IMG_20150225_000421_wm

HOW to make a healthy smoothie?

1. Choose a base: A base for a smoothie would mean what liquid are you going to add to your smoothie. Avoid using full cream milk or any other full fat base. Try using something really light and healthy for your smoothie base. You could use from a variety of options like Skimmed/Almond/Soy Milk, Fruit Juice, Coconut Water, Iced Green Tea or just plain water.

2. Add a Fruit: Fruits are a real important part of your smoothie. Choose wisely. Avoid using fruits that are too sweet. Also try using fresh fruits in comparison to the frozen ones. Combine 2 fruits to increase the health quotient.

3. Thicken Up you Smoothie: Its important to thicken up your smoothie for the right consistency /creaminess yet making it more nutritious. Again avoid using high calorie ingredients like ice cream or whipped cream to thicken up your smoothie. Choose healthy options like Nut butter, Skimmed Frozen Yogurt, Oats or Beans.

4. Flavor you Smoothie: Boost flavors of your smoothie. You could use sweetners, spices or herbs. Cinnamon is the best option as it adds a layer of sweetness plus spice, without adding extra calories. A wide variety of options that you could use are Vanilla Bean, Honey, Cinnamon, Figs, Nutmeg etc

5. Power Boost: This is the most important step. Take your smoothie to the next level by adding highly nutritive super foods. Use protein powder, vitamin powder, fish oil, unsweetened cocoa powder, ground flax seeds etc.

P.S- I hope these details help you choose wisely while making a perfect smoothie.

March is about to begin. Holi is round the corner. This post is an official start to the holi celebrations. Its is so colorful that I can’t stop looking at it. All I had in mind while presenting this and shooting this was lots and lots of colors. I hope you enjoy it.

IMG_20150224_234257_wm

Lets begin with the recipe now.

RECIPE: STRAWBERRY OATMEAL SMOOTHIE

Makes- Single Serving

Prep Time- 5 mins

Making Time- 5 Mins

INGREDIENTS:

  • Skimmed Milk- 1 1/2 cup
  • Whole Oats-1 cup
  • Strawberries- 3/4th cup
  • Banana- 1/2 cup
  • Honey- 2 to 3 tbsp
  • Ground Flax Seeds- 1 tbsp
  • Cinnamon- A pinch
  • Sprinklers- Optional

PROCESS:

In a smoothie mixer, crush strawberries and banana together to make a puree.

Now add in all the other ingredients and blend until everything is combined.

Serve in a Jar. Just add some sprinklers at the jar opening to make it look more colorful and vibrant.

Your Strawberry Oatmeal Smoothie is now ready.

IMG_20150225_000828_wm

IMG_20150225_001001_wm


For any queries and collaborations contact me at : cookingdiarybyshruti@gmail.com

You can connect with me on FacebookInstagram and Pinterest for more regular updates.

If you cook or bake anything from Cooking Diary By Shruti…Please Share the Pictures on Instagram or Facebook and Tag @cookingdiarybyshruti. I would love to see them. Also I would feature it on my blog.

Spaghetti Italiano

If you talk about TASTY & EASY yet COMFORTING food….the this one has to top the charts. It is always on the rim when I am thinking of eating something quick and easy.

Hello all you lovely people,

I need not say much about this recipe. This one really really easy to put together. All you have to do is boil your spaghetti, throw in your favorite toppings and season it. Thats it!!! Sounds super easy doesn’t it?

IMG_20150223_000425-1_wm

If you ask me, I prefer my spaghetti without any sauce. I like it light and simple…loaded with my favorite toppings. #Nocheese 😛 Although I am huge fan of mushroom cream cheese sauce and I can have it like everyday but that one is loaded with a lot of calories. I have a lot of requests for a red sauce pasta with the perfect restaurant style sauce. I think I will be doing that one soon. Now, coming to this one, its the simplest recipe ever. Even a kid can make this one it is that easy.

IMG_20150223_000102_wm

IMG_20150222_235918_wm

P.S- If you are looking for an easy, comforting food….Try This One !!!

I like this spaghetti because it is light. I love the infused flavor of garlic and extra virgin olive oil which are total taste enhancers of this recipe. You have to use a generous amount of both if you really want to enjoy the flavors. Now, you can only use garlic, olive oil and seasoning in this spaghetti. But I add a few veggies to add additional flavors and texture to it.

IMG_20150223_000223_wm

Lets begin with the recipe.

RECIPE: SPAGHETTI ITALIANO

Makes: Serving Good for two

Prep Time- 10 mins

Making Time:10 mins

INGREDIENTS:

  • Spaghetti- 1/4th Packet Boiled  ( I have used a really thin one)
  • Extra Virgin Olive Oil- 3 to 4 Tbsp
  • Garlic- 5 to 6 cloves
  • Broccoli- 1/2 cup blanched (optional)
  • Zucchini- 1/2 cup (optional)
  • Mushrooms- 1/2 cup (optional)
  • Onion- 1 diced
  • Salt- to taste
  • Pepper- to taste
  • Oregano- to taste
  • Chili Flakes- to taste

PROCESS:

Boil the spaghetti up to your liking. Do not over cook it. Make sure you give your spaghetti a cold water bath after boiling so that it does not stick together.

In a heavy bottom pan add olive oil, once it is heated add garlic. I like to cook garlic a little longer to infuse its flavors.

Add the vegetables, spaghetti and all the seasoning together.

Just saute everything for a minute.

Your Spaghetti Italiano is now ready.

NOTE: The vegetables are optional. You can add any vegetable of your choice. You can add baby corn, capsicum, bell peppers, corn, olives, beans and a lot more. Or you can just escape the vegetables completely.

IMG_20150222_235738_wm


For any queries and collaborations contact me at : cookingdiarybyshruti@gmail.com

You can connect with me on FacebookInstagram and Pinterest for more regular updates.

If you cook or bake anything from Cooking Diary By Shruti…Please Share the Pictures on Instagram or Facebook and Tag @cookingdiarybyshruti. I would love to see them. Also I would feature it on my blog.

Strawberry Hand Pies

These Strawberry Hand Pies are flaky, sweet, juicy and baked to perfection. These were so yummy that I actually wanted to sell them at a bakery and wanted everyone to taste it. #Justathought 😛

IMG_20150221_154656_wm

Hello all you lovely readers,

Did you enjoy the series of post for valentines special on the blog? Well I got a lot of feedback where in CDBS readers shared the pictures of all that they made. The Vanilla Shortbread Strawberry Trifle with Fresh Strawberry Sauce was a huge hit. That was one of my favorites too. Well I will be sharing all the feedback by the end of the month. I was supposed to do it for January too but it somehow didn’t work. But I promise from this month onwards the CDBS Monthly Highlight page will definitely be up.

IMG_20150221_154554_wm

P.S- If you too want to be featured on the blog, do share your pictures and experience of cooking from CDBS. I would love to share it with the world. ❤

This month has been extremely special. Yes, a lot of amazing posts and feedback is one reason but the most amazing thing that happened a few days ago is Chef Kunal Kapur liked a few pictures of CDBS on Instagram. So did Farah Khan Ali ( Jewelry Designer). I was really taken aback by this. It was such a wonderful feeling. For more updates on that you have to follow me on INSTAGRAM: @COOKINGDIARYBYSHRUTI.

IMG_20150220_165458_wm

IMG_20150220_170957_wm

Coming back to this recipe, its my ultimate favorite. Strawberries are there in the market for a last few weeks and I am trying to make the most of it. Honestly, it was a strawberry custard creme tart which was in my head. But then I had made a similar version with mangoes last year. (Click Here for the recipe of Mango Tarts). My mom was really craving them. Since she is out of town, I didn’t want to bake it.

P.S- You will see them on the blog soon 🙂

A bite sized pie has always been in my head. Its easier to serve and because it is bite sized you can really cut onto the portions. (Although this has never been on my mind)

IMG_20150221_144258_wm

I know most of you find it really difficult to try a pie or a tart because of a simple thought i.e if it will come out the way it should. You can read my post of Mango Custard Creme Tarts for a detailed post on how to make it. The important thing to know while making a pie is that your crust should be perfect. It should be flaky and fudgy. You don’t want the crust to be either too crisp or too soft. It just has to be perfect. There is no other way.

IMG_20150221_144434_wm

IMG_20150221_144638_wm

P.S- There are a few simple rules you need to follow while making a pie to bake it to perfection.

These strawberry hand pies are really easy to put together if you make a perfect pie dough. Once the dough is ready you are sorted to make these. I have mentioned some common mistakes that you could possibly make while making Pies. If you avoid these, you can bake them easily.

Some Common Mistakes that you can avoid while making Pies are:

1. Not Chilling the Pie dough:

I did this mistake for the first time when I made a pie. My pie was hard as a rock. Nothing beats a tender and flaky pie crust. And the key to make a perfect pie crust is chilling the dough for atleast 30 mins. If you are wondering why is this important is because it lets the butter to solidify again and lets the gluten relax and deactivate. If you don’t follow this crucial step your pie crust is most likely to shrink while baking.

2. Not using Chilled Butter:

Baking is really about the rules. We tend to avoid things like this when mentioned in the recipe. It seems less important. But you need to keep every step in mind while baking. Using a chilled butter is really important while kneading the dough. This helps to deactivate the gluten that can be formed while kneading. If you use a warm butter it will activate the gluten in the dough.

3. Over Kneading the Dough:

Whenever you make a pie crust, just combine the dough softly with your hands. It need not be perfect. It will be crumbly. Over Kneading the dough will never give you a flaky crust. Just combine the dough together and refrigerate it.

4. Throwing the pie right into the oven before baking:

Another really common mistake. You need to chill your pie for atleast 15 to 20 mins before you put it for baking. This is because while you are working with the dough the temperature of the dough rises again because of the warmth of your hands. You have to chill it again once you have filled it with your filling so that the gluten is deactivated.

5. Serve it while its hot

I know its really difficult to stop yourself once it is out of the oven…But a hot pie directly from the oven is a really bad idea. You need to cool it for atleast 1 hour before serving so that it sets naturally. Allow it to cool down.

You can make these hand pies in any flavor you like. Right from apples to raspberries to blueberries. You can fill in anything you want. I have caramelized the strawberries with some sugar to avoid the sourness in them.

IMG_20150221_144709_wm

Lets begin with the recipe.

RECIPE: STRAWBERRY HAND PIES

Makes- 7 to 8 pies

Preparation Time- 1 hour( includes dough chilling time)

Baking Time- 20 mins

INGREDIENTS:

For the pie crust:

  • All purpose flour- 120 gms
  • Chilled Unsalted Butter- 60 gms (cut in cubes)
  • Vanilla Extract- 1 tsp
  • Baking Powder- 1/4th tsp
  • Sugar- 2 to 3 tbsp
  • Salt- 1/4th tsp (if you are using salted butter you can skip this)
  • Chilled Water- 2 to 3 tbsp

For the strawberry filling:

  • Finely chopped strawberries- 1 cup
  • Castor Sugar- 4 tbsp
  • Lemon Juice- 1/2 tsp
  • Lemon Zest- 1/2 tsp

PROCESS:

In a bowl mix together all the ingredients of the strawberry filling and keep aside in the refrigerator for cooling.

In a clean work surface, take the all purpose flour and add the chilled butter in cubes. Use a fork to break down the butter until the flour become crumbly.

Now add sugar, salt and baking powder. Make sure you work with really light hands.

Mix the vanilla extract and water together. Now drizzle 1 tsp of the mix at a time to combine a dough.

Do not add excess water. Just add enough to combine the dough. The dough will be crumbly. Form a ball, cover it with a cling wrap and let it chill for atleast 30 mins.

Once the dough is chilled…roll it out roughly till it is 1/2 inch thick, and cut out small circles of it as shown in the pic below.

IMG_20150221_145600_wm

Now fill in the filling, cover it with another circle, and close the ends with the help of the fork. Also punch the fork a few times on top so that there is space for some air and the pie doesn’t burst.

IMG_20150221_145650_wm

IMG_20150221_145730_wm

IMG_20150221_145813_wm

Once these are ready, chill it again in the fridge for about 20 mins before baking.

Bake in a preheated oven for 20 mins at 180 degrees.

Let it cool and enjoy.

IMG_20150220_170904_wm

IMG_20150221_145455_wm

IMG_20150221_144607_wm

For any queries and collaborations contact me at : cookingdiarybyshruti@gmail.com

You can connect with me on FacebookInstagram and Pinterest for more regular updates.

If you cook or bake anything from Cooking Diary By Shruti…Please Share the Pictures on Instagram or Facebook and Tag @cookingdiarybyshruti. I would love to see them. Also I would feature it on my blog.

Vanilla Shortbread Strawberry Trifle with Fresh Strawberry Sauce

Dont know where to find the easiest recipes for your Valentines Day Special Menu. Well your search ends right here. Find a series of valentines special recipes on the blog.

Hello Lovely readers,

IMG_20150202_014818_wm

I think this season I have been highly obssesed with my favorite strawberries. I have possibly included them in most of my dessert ideas. I also made a strawberry meow toast for my sister who is crazyy about cats. Check it out on my Instagram or Facebook page.

P.S-  The is more of it coming on the blog with Strawberry Icecreams, Jam and Pancakes on my mind.. ❤

IMG_20150202_015149_wm

Today on the blog are these classy looking Vanilla shortbread strawberry triffle topped with fresh strawberry sauce. Its not a rocket science at all..its really simple to put together. The main highlight of this dessert is fresh strawberry sauce which gives it an edge. All u have to do is layer the triffle in either personal servings or it can also be prepared in a pudding bowl.

This dessert can be considered almost guilt free because the sugar content isn’t too high. Also it doesn’t have any sort of butter or fats. Also if you wish to make it more healthy you can replace the whipped cream with your favorite flavored yogurt. Another option is the shortbread that you use can also be replaced by a healthy brownie or any other low calorie cake.

IMG_20150202_015700_wm

The main highlight of this dessert recipe is the topping. I have topped it with fresh strawberry sauce and I think its the best thing. It just adds so much more flavor to the dessert. The strawberry sauce can be prepared in just about 10 mins. Also you have to do is put the strawberries and sugar or honey in a pot and cook it in slow flame until the strawberry leaves its juices and is cooked with sugar.

P.S- The strawberry sauce can be used with other desserts too. You can store it up to 3…4 days.

To ease the process of making this dessert you can easily buy a shortbread or dry cake from the market. I have used a custard flavored shortbread. You can use any flavor of you choice. You can give it an entirely new taste.

IMG_20150202_015342_wm

Lets begin with the recipe now.

RECIPE: VANILLA SHORTBREAD STRAWBERRY TRIFFLE

WITH FRESH STRAWBERRY SAUCE

Makes- 3 to 4 personal servings

Prep Time- 15 mins

Making Time- 10 mins

INGREDIENTS:

  • Vanilla shortbread sponge- 1/2 loaf
  • Sweet Whipped Cream- 1 cup
  • Fresh Strawberries- 2 cups choppped
  • Sugar or Honey- 1/2 cup
  • Vanilla essence- 2 tbsp

PROCESS:

In a heavy bottom sauce pan, add 1 cup fresh strawberries and sugar and let it cook on low flame until the sugar melts. Keep stirring in every few minutes. Cook on low for at least 10 mins.

After some time the strawberries will be completely cooked and will reduce to form a semi liquid sauce with strawberry pieces.

Keep the sauce aside and let it cool down.

Meanwhile add vanilla extract to your whipped cream.

Now in a serving glass add a layer of whipped cream. Top it with shortbread cake cut in cubes.

Add a layer of freshly chopped strawberries. Again add a layer of whipped cream

Lastly top it with the fresh strawberry sauce.

You can also add chocolate chips or sprinkles as per your liking. This is optional.

IMG_20150202_014925_wm

For any queries and collaborations contact me at : cookingdiarybyshruti@gmail.com

You can connect with me on FacebookInstagram and Pinterest for more regular updates.

If you cook or bake anything from Cooking Diary By Shruti…Please Share the Pictures on Instagram or Facebook and Tag @cookingdiarybyshruti. I would love to see them. Also I would feature it on my blog.


Nutella, Strawberry & Cream Crepes

This is the easiest & quickest dessert ever. Aren’t you tempted to try them straight away looking at the pictures. A combination of Nutella & Strawberry is to die for.

Hello Lovely Readers,

IMG_20150203_150800_wm

Well, if you have been following the blog and a last few recipes, you would know that this month I am doing a lot of easy, no-bake, egg less… Valentines Day Special Recipes. Have you tried making the Chocolate Mousse I posted on weekend? It is supremely easy to make and a must try if your loved ones love chocolate. Click the above name to open the recipe directly.

IMG_20150205_035622-1_wm

Crepes is a French Dessert. You can also call it a very thin form of pancake. Crepes can be both sweet and savory. The savory crepes come with a great variety of fillings right from mushrooms to cottage cheese to tofu to soya. You can make them with any filling and eat it for lunch or dinner. However crepes are also popularly eaten in a sweet from. You can have it for breakfast as well as a dessert. I am yet to try a savory crepe. There is already a caramelized banana crepe on the blog. Today, since its valentines special, I couldn’t think of a better combination than nutella, strawberries and cream.

Step by Step Process 

PhotoGrid_1422964896801_wm

P.S- These crepes are absolutely mouth watering and yummy.

I think this one is the most easiest no bake dessert I have made so far on the blog. The best part is that you can make lots of crepes and store them for the future. While serving all you got to do is heat the crepes in a microwave… fill in your favorite filling…add your favorite topping and you will be good to go. I feel this is perfect for your valentines special menu because it can be prepared in advance and is so easy to put together.

When I first tired my caramelized banana chocolate crepes, I was really doubtful as to how they would turn out. The most challenging part I thought was to make an eggless version of crepes. Also crepes are more like a breakfast affair, to make a sweet version was a task. Also it is supposed to be extremely thin in comparison to pancakes. But to my surprise they turned out extremely good.

P.S- You a good non-stick pan and your crepes will not stick.

Lets get started with the recipe.

RECIPE: Nutella, Strawberry & Cream Crepes

Makes- 2 to 3 crepes

Prep Time- 10 mins

Making Time- 10 mins

INGREDIENTS:

  • All Purpose Flour- 3/4th cup
  • Baking Powder- 3/4 tsp
  • Milk Powder- 1 tbsp
  • Powdered Sugar- 2 tbsp
  • Salt- 1/4th tsp
  • Milk- 1 cup
  • Cinnamon Powder- 1/4th tsp(optional)
  • Melted Butter- 2 Tbsp
  • Strawberries- 1 cup
  • Nutella- 1/2 cup
  • Whipped Cream- 1/2 cream

PROCESS:

Add flour, baking powder, salt, milk powder, powdered sugar, cinnamon powder, melted butter, milk in a bowl and whisk everything well to a nice pouring consistency.

Brush some oil on a frying pan over medium high heat. Pour or scoop the batter onto the griddle, using approximately 1/4 cup for each crepe. Tilt the pan with a circular motion so that the batter coats the surface evenly.

Cook the crepe for about 2 minutes, until the bottom is light brown.

Cook till brown spots appear on the crepe. Be careful while turning it.

Apply nutella on the thin crepe and add some sliced strawberry and fold it to make a cone like shape. You can even fold it to a quarter or just roll it.

Serve it with some whipped cream.

IMG_20150205_203515

For any queries and collaborations contact me at : cookingdiarybyshruti@gmail.com

You can connect with me on FacebookInstagram and Pinterest for more regular updates.

If you cook or bake anything from Cooking Diary By Shruti…Please Share the Pictures on Instagram or Facebook and Tag @cookingdiarybyshruti. I would love to see them. Also I would feature it on my blog.

Chocolate Mousse

Chocoholics Beware!!! This delicious Chocolate Mousse has a rich Chocolate Flavor and is light and airy with a velvety smooth texture.

Its February… the Valentines Special Month ❤ ❤

IMG_20150131_163918-1

A spoonful of my Eggless Chocolate Mousse and I assure you that you will be hooked to this forever 🙂 I believe mousse is what you could call a grown up chocolate pudding. Although a chocolate mousse does seem like a really complicated recipe but it is simple yet an elegant dessert. This Chocolate Mousse Recipe uses only a few ingredients, but its chocolate flavor is rich, & its texture is silky smooth, airy and almost foamy.

P.S- Foamy is the apt description for a mousse because “Mousse” in French means “FOAM”

IMG_20150131_155212_wm

Valentines Day is really special occasion for people in love. They like to do everything super special for their loved ones. I do not believe that it should be the only day to pour in all the love but for many of you out there it truly is a special day. I appreciate that an therefore there will be a series of easy valentines special recipes this month for all of you.

IMG_20150131_160130_wm-1

IMG_20150131_155349_wm-1

I am sure you would want to cook something spectacular for Valentines Week. Valentines week calls for really gorgeous looking desserts and recipes. But obviously you do not want to spend much time in the kitchen. Do You? The recipes have to be easy and beautiful at the same time so that they can be enjoyed with your loved ones.

P.S- So please hold yourself as there are a lot of EASY…EGG LESS…QUICK…NO BAKE recipes coming up on the blog this month.  🙂

IMG_20150131_160015_wm-1

IMG_20150130_233138_wm

Chocolate Mousse is everybody’s all time favorite. I mean if you love chocolate you ought to love the rich & creamy chocolate mousse. There are a lot ways to make chocolate mousse. Mostly a chocolate mousse requires the usage of eggs or egg whites to make it fluffy and creamy. When you fold in the egg whites in chocolate it really gives it a smooth and rich texture. Nonetheless..I bring to you an EGG LESS version of Chocolate Mousse and trust me there is no compromise in the texture or the flavor of this mousse.

IMG_20150131_154710_wm

IMG_20150131_154818_wm-1

Usually you can make the easiest mousse by folding in chocolate with a good heave whipped cream and let it set in the refrigerator for that desired texture. However in this recipe I have used a secret ingredient which makes the mousse so light and fluffy is marshmallows. Yess..you heard it right. MARSHMALLOWS are the secret star ingredient of this recipe. It is entirely optional. This foamy chocolate mousse is a combination of melted chocolate, marshmallows and heavy whipped cream. The marshmallows contain gelatin and it is the gelatin that helps the mousse to set. It truly gives it the same softness and foamy texture that comes with egg whites.

Please remember that the marshmallows are a completely optional ingredient. Since, it has gelatin most of you wouldn’t want to use it. You can skip using marshmallow entirely and go ahead with the rest of the ingredients as given. Just refrigerate the mousse for at least 2 hours to give it a settled finish.

P.S- Melted Marshmallow is the Secret Star Ingredient of this recipe 🙂 (Optional)

Since there are really few ingredients in a Chocolate Mousse recipe it is really important for you to pick the best quality of chocolate. Use a good quality semi sweet or bitter sweet chocolate that you enjoy eating. My preference is semi sweet chocolate with atleast 60 % of coco content. However, to make a perfect and classy chocolate mousse..even the best quality chocolate is not enough. You need to mix together some coffee into your chocolate while melting it to really bring out the rich flavor of chocolate.

IMG_20150131_155715_wm-1

IMG_20150131_154508_wm-1

This chocolate mousse can be used to fill cakes or tarts too. But I personally prefer a scoop of these beauties in my favorite pair of glass. You can garnish it with whipped cream, shaved chocolate, raspberries or strawberries. I obviously chose strawberries. Don’t they look lovely.

You can serve them directly but would taste amazing when you serve them chilled after placing them in the refrigerator for a few hours.

P.S- So all you boys & girls..gear up..and make these choco-licious and foamy Chocolate Mousse for your loved ones this valentines day ❤

IMG_20150131_155040_wm-1

IMG_20150131_155715_wm-1

Lets get started with the recipe.

RECIPE: CHOCOLATE MOUSSE

Makes: 3 to 4 glasses 

Prep Time- 10 mins

Making Time- 5 mins

INGREDIENTS:

  • Semi Sweet Chocolate- 200 gms
  • Marshmallows- 100 gms (Optional- You can avoid it if you don’t eat gelatin)
  • Unsalted Butter- 2 Tbsp
  • Castor Sugar- 3 to 4 Tbsp
  • Strong Coffee or Espresso- 2 tsp
  • Vanilla Extract- 1/2 Tsp
  • Heavy Whipped Cream- 150 gms
  • Shaved Chocolate or Strawberries- For Garnishing (Optional)

PROCESS:

Put the marshmallows, butter, semi sweet chocolate and coffee powder mixed with 1/2 cup boiling water into a pan and let everything melt down. Keep stirring constantly. For a quick result make sure you chop the marshmallows into smaller pieces.

If you are not using marshmallows then skip it and add rest of the ingredients in a pan and move further.

Remove from heat once the chocolate mixture has melted and a smooth consistency is formed.

Meanwhile the mixture is cooling, whip the cream  with vanilla and sugar until soft peaks are formed. Make sure the cream is not too stiff. Although it should be a heavy good quality whipped cream.

Fold in the cooled down chocolate mixture into the cream. Be as gentle as you can and use a cut and fold technique to mix it.

Serve in your favorite glasses. Make sure you only fill 3/4th of the glass so that you can garnish it with your favorite topping. I garnished it with strawberries. You can use whipped cream or shaved chocolate or raspberries or blueberries. The choice is yours.

Let the mousse set in the refrigerator for at least an hour.

Your easy, no bake, chocolate mousse is now ready. 🙂

IMG_20150131_162900-1

For any queries and collaborations contact me at : cookingdiarybyshruti@gmail.com

You can connect with me on FacebookInstagram and Pinterest for more regular updates.

If you cook or bake anything from Cooking Diary By Shruti…Please Share the Pictures on Instagram or Facebook and Tag @cookingdiarybyshruti. I would love to see them. Also I would feature it on my blog.

Raw Spicy Zoodle Salad

This year you will see a lot of easy and less ingredient recipes on the blog.

Hello Lovely Readers,

IMG_20150122_223225_wm

Yes. You heard it right. Last year I did get a lot of feedback from most of you asking me to post savory recipes and easy recipes which do not require baking. Though eggless baking is my forte and I love to put up those on the blog I will also try to add a lot of DIY easy recipes on the blog.

ZOODLES!! Also known as zucchini noodles is the STAR ingredient of the recipe.

Everyone is shifting from noodles to zoodles these days. And why not? They are way more healthier than noodles. You definitely need a Spiralizer to get those perfect zoodles..But incase you do not have one you can use a regular grater to do so. It wont be perfect but will give you long spirals of Zucchini which very much does the job. This salad is definitely my new found love. It is supremely rich in nutrition and a bowl filled with flavor and health. With a shelf life if up to 2 days without the dressing this is definitely a perfect option when travelling. It is filling and can be a perfect crunchy snack for those hunger pangs. 🙂

P.S – I am in love with the addition of Red Cabbage.

IMG_20150122_231320_wm

The red cabbage is really high in fiber ans looks beautiful when you add it in a recipe. It is easily available in the markets these days. I never picked them until I thought about adding it to the salad and I am completely in love with these beauties. They are absolutely gorgeous. This sald is raw and has nothing cooked. So all you have to do is mix all the ingredients together and you are sorted. If you want to prepare it in advance for an early dinner or lunch you can mix everything together and just add the dressing when ready to serve. It truly is divine.

IMG_20150126_190557_wm

The dressing is spicy and the special addition of Mustard is like a cherry on the cake. The base is definitely of Olive Oil and Lime. The dressing does have a lot of spices yet has a balanced flavor with the addition of honey.

Lets get started.

RECIPE: Raw Spicy Zoodle Salad

Makes- A bowl

Prep Time- 10 mins

INGREDIENTS:

For the Salad

  • Zucchini- 1/2 Spiralized or Grated
  • Carrot- 1/2 Grated
  • Red Cabbage- 1/2 cup Grated
  • American Sweet Corn- 1/2 cup
  • Cilantro- Chopped

For the Dressing

  • Olive Oil- 2 to 3 Tbsp
  • Lime Juice- 1 1/2 Tbsp
  • Ginger- 1 inch grated
  • Jalapeno- 1
  • Mustard Sauce- 1/2 tsp
  • Honey- 1 tsp
  • Salt- to taste
  • Pepper- to taste

PROCESS:

Grate zucchini, carrots and red cabbage. Add all the other ingredients under the salad heading in a large bowl and mix together.

Mix all the ingredients under the dressing section until it is of a fine consistency.

Pour the dressing over the salad, mix well and you are ready to serve.

Your Raw Spicy Zoodle Bowl is now ready.

IMG_20150122_230713_wm

For any queries and collaborations contact me at : cookingdiarybyshruti@gmail.com

You can connect with me on FacebookInstagram and Pinterest for more regular updates.

If you cook or bake anything from Cooking Diary By Shruti…Please Share the Pictures on Instagram or Facebook and Tag @cookingdiarybyshruti. I would love to see them. Also I would feature it on my blog.

Looking for similar Recipes? Try My:

Cucumber Ribbon Salad with Yogurt Mint Dressing

Screenshot_2014-09-12-00-32-45-1_wm

Strawberry Jello Mousse with Nutella Ganache

Looking for a dessert which is light and pretty? Easy, Guilt Free, Low-fat, Low sugar Strawberry Jello Mousse with Nutella Ganache. So yummy and so pretty, this dessert is completely party worthy. This 3 ingredient no bake dessert is absolutely the star recipe of this year on the blog.

IMG-20150115-WA0011_wm

Hello Readers,

If you have been a regular reader on the blog, you would no how much I love strawberries. I mean there would be most of you who are fond of strawberries but I love them with all my heart. I wait the entire year for these yummy babies. They are on top of my list when it comes to making desserts. I believe they are the star ingredient in a dessert.

IMG_20150115_173751-1_20150117180434277_wm

P.S- If I had to share a little secret with all of you, I prepare a separate list of things to make with strawberries throughout the year so that i can make all of them when Strawberries are in season 🙂

This dessert is a complete win- win. I mean who doesn’t love the combination of Nutella & Strawberries. I believe its a match made in heaven. Secondly with just 3 ingredients this dessert doesn’t require any baking. It is a NO BAKE dessert and that is the best part. So all of you who want to make amazing single serve desserts without any hassle of baking, this one is just the best for you.

IMG_20150117_180909_wm

These shots look really beautiful but the best part about it is the making process. Its so much fun to make jellies. It truly reminded me of my childhood days. This is a really easy dessert. So even your kids or the younger ones can make it without any difficulties. If there would be a contest for the easiest dessert this one is surely going to be on boards.

IMG_20150115_225410_wm

All you have to do is make the jelly, the strawberry mousse and top it with nutella ganache. You only need 3 ingredients which is Nutella, Strawberry Jelly Crystals and Cream.

Lets get Started.

RECIPE: STRAWBERRY JELLO MOUSSE & NUTELLA GANACHE

Makes- 5 to 6 shots

Prep Time- 15 mins

Making Time- 1 hr ( includes the chilling time)

INGREDIENTS:

  • Srawberry Jelly- 1 packet any brand
  • Whipped Cream- 1 cup
  • Nutella- 3 to 4 tbsp
  • Strawberry- 1/2 cup

PROCESS:

Prepare half the jelly according to the instructions given in the pack. Set aside 1/3rd cup of the mixture and add freshly chopped strawberries to the remaining strawberry jelly mix.

Spoon this mix into shot glasses. Chill the glasses at an angle until the jelly is set for atleast 30 mins.

Meanwhile, fold in half the whipped cream into the measured 1/3 cup of strawberry jelly mix. Fold in the whipped cream lightly until a creamy texture is achieved.

Spoon in this mix in the set jelly glasses.

Mix in the remaining whipped cream with nutella until its smooth. Top this mix on top and garnish with fresh strawberries.

Enjoy the easy dessert. Serve Chilled.

IMG_20150117_181642_wm

For any queries and collaborations contact me at : cookingdiarybyshruti@gmail.com

You can connect with me on FacebookInstagram and Pinterest for more regular updates.

If you cook or bake anything from Cooking Diary By Shruti…Please Share the Pictures on Instagram or Facebook and Tag @cookingdiarybyshruti. I would love to see them. Also I would feature it on my blog.

Crock Pot Hot Chocolate

Rich & Creamy Crock Pot Hot Coco

I assure you that this is the Best You Have Ever Had….So delicious that you might want to lick the crock pot once you have made the hot chocolate.

 IMG_20150108_145425

Hello Lovely Readers,

From the time I am back from my Holiday to Singapore, I have been cribbing each day about winters and how cold it is. It really chilling here in Delhi. I constantly crave to have a cup of hot chocolate during the evening or post dinner. Hot Chocolates are an all time favorite and its really easy to make at home. But I loved the rich and creamy texture of hot chocolate that we get in some cafes and I could never get the same thing at home until I tried it last time.

IMG_20150108_150258

IMG_20150103_180733


So the 1st post this year definitely had to be a Hot Cocoa in the Crock Pot. This is the Real Deal !!! On a chilly day this one warms you from the inside out. Serve it to someone who loves Hot Chocolate and they will light up like a Christmas Tree.. 😀

IMG_20150109_203338

I came across the term Crock Pot some days ago in the internet. It is a slow cooking process. It gives you the best cooking results by keeping intact the flavors. I thought of trying the same method for the Hot Chocolate for a creamy texture and Voila!!! Its was just amazing. Just stir in the Cream, Sweet Condensed Milk, Chocolate Chips, Milk and Vanilla together in your Crock Pot.

P.S- The best Hot Coco will be ready in about 20 mins.

As i told you, it is a slow cooking process but completely worth the wait. Just Sit back and relax and wait for the magic to happen.

RECIPE: CROCK POT HOT CHOCOLATE

Makes: 2 cups

Prep Time: 5 mins

Cooking Time: 20 mins

INGREDIENTS:

  • Sweet Condensed Milk- 1/4th cup
  • Whipped Cream- 1/2 cup
  • Milk- 1/4 cup
  • Vanilla Extract- 1 tsp
  • Chocolate Chips- Dark chocolate 1/2 cup
  • Marshmallows- to garnish
  • Hershey’s Chocolate Syrup- Optional

PROCESS:

Stir in the condensed milk, milk, whipped cream and vanilla in a heavy bottom non-stick pan.

Once it comes to a boil, add the chocolate chips, lower the flame and let this simmer. Stir occasionally and and wait until the chocolate melts completely.

After 15-20 mins switch off the flame.

Pour the Hot Chocolate in a Cup and top it with Marshmallows. If you don’t like marshmallows you can simply add some whipped cream on top.

Serve Hot.

IMG_20150103_180213

For any queries and collaborations contact me at : cookingdiarybyshruti@gmail.com

You can connect with me on FacebookInstagram and Pinterest for more regular updates.

If you cook or bake anything from Cooking Diary By Shruti…Please Share the Pictures on Instagram or Facebook and Tag @cookingdiarybyshruti. I would love to see them. Also I would feature it on my blog.

THERE IS A GOOD NEW FOR ALL YOU READERS. IF YOU HAVE BEEN FOLLOWING MY INSTAGRAM @COOKINGDIARYBYSHRUTI YOU WOULD KNOW THAT I AM ABOUT TO BEGIN MY COOKING WORKSHOPS FROM NEXT WEEK IN DELHI.

PLEASE FOLLOW ME ON INSTAGRAM FOR MORE DETAILS. 

Top 10 Recipes of 2014 (Snapshot)

Year 2014 has been really special to me. I began my blog in March 2014 and its been an amazing journey ever since. This post is about Top 10 Recipes this year on the blog.

2015 2

Hello Lovely Readers,

First of all Wishing Everyone a Very Happy New Year!!!

If you have been following me on INSTAGRAM you must be knowing that I was on a holiday in December which is why I couldn’t post any new recipes this month.

Nonetheless, there will be a lot of new recipes this year. I also plan to start my you tube channel this year. Lots of exciting giveaways and contests coming up on the blog. 🙂  Also I will be adding a New Page for all you lovely readers. Yes, you heard it right.

I will be adding a new page in the Menu bar which will feature the readers of the blog who will share their pictures or reviews of what they cook from the blog. This will be on a monthly basis. So if you wish to be a part of the blog, keep sharing the pictures and dont forget to tag #cookingdiarybyshruti.

Well, In March 2014, when I wrote my 1st post, I honestly thought I wouldn’t even be lasting a week here. It is really a difficult thing to do. But with so much love and support from all you guys, I just could not take a step back. I continued to think ways to be better with each post I made. Also, it wouldn’t be possible without the love and support of the wordpress family. I met some amazing people here who inspired me and left no choice but to be better each time. I got 5 awards at WordPress just in about 8 months… so many appreciation from the readers… some really overwhelming moments… my pictures finally got selected at Food Gawker and alot more… ITS BEEN AN AMAZING YEAR!!!!

Thanks to each one of you who made this possible ❤

2015 1Caramelized Apple Pie

Do you love eating pie but don’t know how to bake it? Do you love the apple and cinnamon combination? Do you wish to make a perfect pie at home? Well.. if Yes..Your search ends right here.

My Caramelized Apple Pie is perfect

Screenshot_2014-08-16-01-36-35-1_wmBaked Cheesy Nachos

Who doesn’t Nachos? Well, all of us do. Do you know you could make your favorite nachos at home all by yourself.  If you wish to make your favorite nachos in a baked version you definitely should try this recipe.

Screenshot_2014-08-29-00-39-55-1_wmPomegranate Gingerale

One of my Favorite Drinks I have Made so Far. I love the Color of this drink and a flavor that you will never forget. Easy, Cool, Summery, Colorful…This drink is all that you can think of!!!

Screenshot_2014-09-11-17-26-54-1_wmOreo Cheesecake Mousse

If you talk about the most sinful dessert ever..Your search ends right here. Oreos…Cheesecake…Creamy Mousse.. Is there anything better you can think of? I dont think so. My Oreo Cheesecake Mousse is Creamy, Fancy, and For all OREO Lovers!!!

IMG_20140918_194006-1Strawberry Coconut Candies

 My Coconut Candies are one of the easiest and gorgeous looking dessert I have ever made. They melt in the mouth like Candies..And I love that Pastel Color…

Screenshot_2014-09-24-08-27-21-1_wm


Piri Piri Corn Salad with Whole Wheat Pita Chips

Piri Piri Corn Salad with Wholewheat Pita Chips is surely a great way to start the month of October. Healthy is surely Tasty too. My Piri Piri Corn Salad Just Defines That.

Screenshot_2014-10-01-13-59-32-1


Gulab Jamuns

Surprising..Amazing..Delicious.. Soft… Sweet..Indian…Easy…Yummilicious…

My Gulab Jamun Recipe defines all these adjectives.

IMG_20141023_163826_wm


Semolina Pancakes

Tired of thinking what to make for breakfast? or Bored of making those sweet pancakes with fruits. I bring to you these healthy yet yummy savory pancakes.

Screenshot_2014-09-22-01-22-12-1_wm


Chili Chickpea & Salsa Tacos

Looking for a easy 10 mins starter? Nothing better than a hot serving of Tacos!!!!This one that I have made is the easiest Taco Filling and the yummiest one. This is a Spicy Chickpea and Salsa Tacos which is really spicy. 

Screenshot_2014-11-19-17-32-12-1


Pistachios,Nuts & Chocochip Loaf

This Loaf totally defines the start of the fall winter season and also that Christmas is about to come. Loaded with a lot of nut..chocolate chips and Pistachios, I don’t know anyone who wouldn’t fall in with this cake.

Moist, Fluffy, Nutty….My Pistachios,Nuts & Chocochip Loaf is the best Loaf Cake I made so far!!!!

Screenshot_2014-11-24-12-14-13-1_wm


For any queries and collaborations contact me at : cookingdiarybyshruti@gmail.com

You can connect with me on FacebookInstagram and Pinterest for more regular updates.

If you cook or bake anything from Cooking Diary By Shruti…Please Share the Pictures on Instagram or Facebook and Tag @cookingdiarybyshruti. I would love to see them. Also I would feature it on my blog.

IMG_20140628_004634[1]

Crunchy Italiano Pizza Strips

Bored of thinking what to make as a quick party snack or starter? Want to make something quick, easy yet impressive? Want to crunch something along with your hot winter soup? Well, if answer to all these is a Yes,

Then you surely need to try these Crunchy Italiano Pizza Strips. These are a quick 15 mins starter and gets ready in a jiffy. ❤

Screenshot_2014-11-28-23-50-22-2

Hello my lovely readers,

I am constantly striving to try making recipes which are ready in no time. I mean obviously there are days when you don’t want to bother yourself much or are extremely hungry that you need something amazing urgently to kill those hunger pangs. Well, the latter happens with me most of the time. So here is my another quick starter recipe which I call the Crunchy Italiano Pizza Strips 🙂

Screenshot_2014-11-28-17-27-51-1_wm

Screenshot_2014-11-29-00-04-18-1_wm

The recipe that I have used to make these Pizza Strips isn’t something new, though the idea is quite innovative i feel. I don’t know how many of you can relate to this, but decades ago when people didn’t know how to make the restaurant style pizza sauce at home..all they did was to apply tomato ketchup as the base sauce for the homemade pizza and throw in some cheese and it was ready. It was much later when people started making a specific kind of pizza sauce at home. However, I still know a lot of people who just use ketchup as the base. In this recipe of pizza strips I have done something similar.

P.S- All you need to do is to add some Italian seasoning to make it taste much better.

Screenshot_2014-11-29-00-00-14-1_wm

This is totally an evening snack to munch on and doesn’t make you full. You can crunch these along with your hot bowl of soup in the evening or simply serve it as a starter along with some dip or mustard sauce. It is super easy to prepare and even if you are not much aware about cooking and baking this one is totally a hands down…..its that easy.

Screenshot_2014-11-28-23-59-31-1_wm

You can prepare the strips in advance, and just bake them when your guests arrive or you are ready to eat. You just need to mix a couple of ingredients, apply them as a base to a thin pizza base, top it up with cheese and cut them in thin half inches strips. The baking time is just 10 mins as the base that we need to use in this recipe is a thin one and it will get crunchy in no time.

P.S-Bake them just till you get the desired crunch. Do not overbake!

RECIPE: CRUNCHY ITALIANO PIZZA STRIPS

Makes- 10 to 12 strips

Prep Time- 5 mins

Baking Time- 10 mins

INGREDIENTS:

  • Thin Crust Pizza Base- 2
  • Tomato Ketchup- 2 tbsp
  • Tabasco Sauce- 1 tsp
  • Chili Garlic Sauce- 1 tsp
  • Red Onion- 1 small finely chopped
  • Bell Peppers- 1/4 finely chopped
  • Salt- A pinch
  • Roasted Red Chili Flakes- to taste
  • Mixed Herbs- to taste
  • Processed Cheese- 1/2 cup grated
  • Olive Oil- to coat

PROCESS:

Brush some olive oil on the top side of the base and keep it aside. In a mixing bowl add all the other ingredients and mix well.

Apply a spoonful of mix on the base. Make sure you apply a very thin coat of the sauce mix..it is just to flavor the bread a little. Do not add excess sauce.

Sprinkle over cheese and tap it with your hands so that it sticks to the sauce. Cut the base into thin half inches strips with the help of a pizza cutter.

You may also sprinkle some chili flakes and mixed herbs on top for additional flavor.

In a greased non-stick baking tray, line these strips and bake them for 10 mins at 180 degrees in a pre-heated oven.

Every oven is different so make sure you first bake it for 8 mins and if they aren’t brown and crunchy,bake them for a few more minutes.

Your Crunchy Italiano Pizza Sticks is now ready.

Screenshot_2014-11-28-17-59-16-1_wm

For any queries and collaborations contact me at : cookingdiarybyshruti@gmail.com

You can connect with me on FacebookInstagram and Pinterest for more regular updates.

If you cook or bake anything from Cooking Diary By Shruti…Please Share the Pictures on Instagram or Facebook and Tag @cookingdiarybyshruti. I would love to see them. Also I would feature it on my blog.

IMG_20140628_004634[1]


Pistachios, Nuts & Chocochip Loaf

This Loaf totally defines the start of the fall winter season and also that Christmas is about to come. Loaded with a lot of nut..chocolate chips and Pistachios, I don’t know anyone who wouldn’t fall in ❤ with this cake.

Moist, Fluffy, Nutty….My Pistachios,Nuts & Chocochip Loaf is the best Loaf Cake I made so far!!!!

Hello Lovely Readers,

Screenshot_2014-11-24-15-55-11-1

You know sometimes, once in a while, I am completely taken aback by something new that I try and it turns out to be astonishingly SUPERB. This Loaf would be the apt example of this situation. I was so happy with the end results that it left me awestruck. I mean just look at this beauty.

Screenshot_2014-11-24-12-37-25-1_wm

Screenshot_2014-11-24-12-18-25-1_wm

I completely love the fall winters and they are my favorite part of the year. Right from wearing my favorite socks to those soft full sleeves, fall winters makes it up for everything. I kinda feel that baking is more fun during this season because we just tend to look for warm and rich flavors during this season. I personally like to gulp down something baked..right from cookies to muffins along my hot chocolate cup. Baking gives more pleasure and all those warm and gooey cakes and pies make the winter season all the more special.

P.S- Baking is much more fun during winters.

Screenshot_2014-11-24-12-14-13-1_wm

Screenshot_2014-11-24-12-12-45-1_wm

Screenshot_2014-11-24-12-16-52-1_wm

How many of you love the Christmas Fruit Cake? I like wait for the entire year to eat a slice of those beauties. I love the fact that it is loaded with plums and fruits and nuts and how amazing all of these tastes. Well, i know most of you must be thinking that why am I talking about Christmas a month in advance. That is because my Pistachios, Nuts & Chocochip Loaf is very much inspired by the Christmas Fruit Cake. Since I was craving it so much I had to try making something which would kill my craving for the Christmas Cake. Obviously, I couldn’t bake one of those, because it requires a lot of preparations so I tried to make a loaf which is loaded with nuts and chocolate chips.

During my early stages of baking, I never baked a cake loaf or a pound cake. Although, ever since my childhood I have been extremely fond of sliced dry cakes, I never had the confidence to bake one. I always thought that these loaf cakes cant be made without the use of eggs or without any expert advice. Till today I prefer dry slice cakes in comparison to anything. My first attempt to a loaf cake was my Banana Chocochip Loaf and it was a victory. That was really amazing. It is my mom’s favorite and she asks me to bake it once a week..phew 😉

Screenshot_2014-11-24-12-08-54-1_wm

Screenshot_2014-11-24-12-07-52-1_wm

It was my MOM’s 50th Birthday on the weekend and she didnt want any cake from the baker. All she demanded was for her favorite Banana Loaf. I was quite bored of baking that again and again. Its something with us food bloggers that we keep wanting to try something new all the time. So I promised my mom a loaf cake but I wasn’t sure as to what to make. Meanwhile, I was craving the nutty Christmas cake.. So I kinda mixed both the ideas and made a nutty pistachio loaf with a lot of chocolate chips. Voila!!!! It turned out to be amazing.

P.S- Its my MOM’s new favorite thing now 😛

Screenshot_2014-11-24-12-11-12-1_wm

This Loaf has a lot of nuts and pistachios because I like that nutty flavor in each bite. I have added crushed almonds, cashews and walnuts. You can add or remove any of these according to your taste and preference. Also, the chocolate chips is not compulsory at all. If you want to keep it entirely nutty you may do so. I have added a whole lot of chocolate chips because, I love the bitterness. The only thing that I would mention is that if you at all are thinking of adding the chocolate chips add the bitter dark chocolate chips. The semi-sweet or the sweet ones would not go well with this loaf as they would overpower the flavor of the nuts and also make the loaf extremely sweet.


Screenshot_2014-11-24-12-03-07-1_wm

Unlike my banana loaf I have used all purpose flour in this loaf. I haven’t replaced it with whole wheat. The flavor does change and I didn’t want to compromise on that. Again, its entirely upto you.

This loaf is extremely moist, soft and rich in flavor. Its tastes as good as a store bough slice of dry cake or even better may be. It is extremely easy to put together and is fuss free. If you are a beginner at baking, this loaf is totally for you. Ready in about an hour or so, this loaf will not disappoint you at all.

P.S- The loaf tastes best the next day once all the flavors are incorporated. Only if you have that much of patience eat it the next day. 🙂

Screenshot_2014-11-24-12-05-04-1_wm


Screenshot_2014-11-24-15-50-33-1_wm


RECIPE: PISTACHIOS, NUTS & CHOCOCHIP LOAF

Makes- 9″ Loaf (One)

Prep Time- 20 mins

Baking Time- 45 to 50 mins

INGREDIENTS:

  • All Purpose Flour- 1 1/2 cup
  • Baking Powder- 1/2 tsp
  • Castor Sugar- 1 cup
  • Unsalted Butter- 2 sticks
  • Buttermilk- 1 cup
  • Apple Sauce- 3/4th cup( Boil 2 large apples in water,sugar and lemon juice for about 20 mins and then grind them to a smooth paste)
  • Vanilla Extract- 1 tsp
  • Cashews- 1/4th cup chopped
  • Walnuts- 1/4th cup chopped
  • Almonds- 1/4th cup chopped
  • Pistachios- 1/2 cup thinly sliced
  • Chocolate Chips- 1/4th cup

PROCESS:

Sift together all purpose flour & baking powder and keep aside. In a separate bowl, whisk together apple sauce and butter for a few mins until they are combined. Now add sugar and beat the mixture well.

Now add the flour mixture alternating it with butter milk to for a smooth cake mixture. Make sure there are no lumps at all. Do not whisk much. Now keep the beater aside and fold in all the nuts and chocolate chips. Fold in these very lightly. Lastly, add vanilla extract and mix everything together….

Line a 9″ Loaf tin with butter paper. Also grease the sides. Add in the cake mix. Top with sliced pistachios and chocolate chips and bake for at least 40 mins at 180 degrees in a pre-heated oven.

Each oven is different. Therefore, bake for 35 mins first and poke a skewer to check if the cake is done or not. If it doesn’t come out clean you may bake it for another 10 mins.

Your Pistachios, Nuts & Chocochip Loaf is now ready. 

Screenshot_2014-11-24-12-18-25-1_wm


For any queries and collaborations contact me at : cookingdiarybyshruti@gmail.com

You can connect with me on FacebookInstagram and Pinterest for more regular updates.

Chilli Chickpea & Salsa Tacos

Looking for a easy 10 mins starter? Nothing better than a hot serving of Tacos!!!!

Screenshot_2014-11-19-17-32-12-1

Hello All you Lovely Readers,

If you have been a regular reader of my blog, you would know how much I love Mexican Food. Right from Quasedillas to Cheesy Pizza Nachos I have posted quite a few of them on the blog. I love Mexican food because it is spicy and can be made in a lot of universal ways. I mean it appeals to the taste bud of the Asian People I believe.

Screenshot_2014-11-19-17-26-50-1-1_wm

Screenshot_2014-11-19-18-02-37-1_wm

Tacos is one of the most famous Mexican Food. These are corn tortillas folded and  filled with a variety of filling of ones choice and can be made in the most easiest way possible. The best part that I love about Tacos is that it is really versatile. Right from a simple salsa or gucamole to a variety of beans you can fill this up with anything of your choice. It need not be necessarily fancy.

This one that I have made is the easiest Taco Filling and the yummiest one. This is a Spicy Chickpea and Salsa Tacos which is really spicy. You can serve it with Sour Cream or it is even good just the way it is, All you have to do is make the filling before hand and you can just fill it in the tacos and warm it just when needed.

Screenshot_2014-11-19-17-26-01-1_wm

Well, These days a Taco Shell is very easily available in the market. The one I have used for this recipe too is a ready made Taco Shell. Honestly, I have never tried making them on my own. However, If you do not find a taco shell at your place, all you could do is prepare corn tortillas and fold them once the filling is added. I will do a recipe of that sort very soon.

Screenshot_2014-11-19-17-25-03-1_wm

Chickpeas are very healthy. It has a lot of nutrients and can be eaten in many forms. The mixture that I have made for the taco filling is simply chickpea cooked in salsa. It is tangy and really spicy. I will be doing a lot more recipes out of chickpeas.I think they turned out quite well. I though I could make these with only beans but these chickpeas have turned out to be amazing. On my mind, is a chickpea soup and salad. I will try fill those up soon.

Screenshot_2014-11-19-18-00-30-1_wm

Its Day 10 of workout today. Trying to be regular and trying to eat as healthy as possible. I dont believe in crash diet and all. You could just maintain the intake of your calories. Cheat meals are my favorite and its important too, so that you can keep all those cravings aside. I have replaced my sweet cravings with a fruit and it has worked for me. What is you secret mantra? Do share it with me. I will be sharing a few healthy meals that I am eating these days once I complete a month of my workout session. 🙂

RECIPE: CHILI CHICKPEA & SALSA TACOS

MAKES- 6 TACOS

PREP TIME- 5 MINS

BAKING TIME-3 MINS

INGREDIENTS:

  • Boiled Chickpeas- 1 cup
  • Garlic Cloves- 2
  • Red Onion-1 chopped
  • Green Chillies- 2 chopped
  • Tomatoes- 1 chopped
  • Cilantro- 2 tbsp
  • Salt- to taste
  • Red Chilli Flakes- 1 tsp
  • Taco Seasoning Mix- 1 tsp
  • Lemon Juice- 1/2 tsp
  • Black Pepper- to taste
  • Taco Shells- 6
  • Olive Oil- 1 tsp

PROCESS:

In a pan heat oil and add garlic, followed by green chilies and onions. Cook it for a minute or so. Then add chopped tomatoes and all the seasonings. Lastly add chick peas and let it cook for atleast 5 mins. Don’t add water to this mixture because we want the filling to be dry. Lastly add Cilantro and keep aside.

When ready to serve, fill the Taco Shells with the Chickpeas Mixture and bake it for 3 mins at 180 degrees. You can also Microwave it for 90 secs on high.

Your Chili Chickpea & Salsa Tacos is now ready.

Screenshot_2014-11-19-17-32-12-1_wm


For any queries and collaborations contact me at : cookingdiarybyshruti@gmail.com

You can connect with me on FacebookInstagram and Pinterest for more regular updates.

Looking for more Mexican Recipes? Try my:

Cheesy Quesadilla with Salsa

Screenshot_2014-08-20-00-42-29-1_wm

Baked Cheesy Nachos

Screenshot_2014-08-28-01-17-22-1_wm


Chocolate Dipped Sweetheart Cookies

Are you an extreme Cookie Lover? Don’t know how to bake amazing Cookies? Try these sweetheart cookies and I bet these would be the best you have tasted. ❤

Screenshot_2014-11-17-19-21-38-1

What can be more sinful than baking eggless, sweet, buttery and Chocolate Coated Cookies at home? Nothing Right? I love these cookies. They look so sinful and gorgeous than I cant stop adoring them. Its been quite some time that I have blogged something. So I though why not start with these amazing cookies. I have recently joined a workout session in a gym nearby.

Screenshot_2014-11-17-18-45-01-1_wm

Yes..Yes i know..Foodblogging and gymming dont go together. Actually, I am doing workouts so that I can eat without any guilt. 😛 You know..I am not much of a calorie counter. Due to my initial days of workout, i really had a sore body because of which I didnt have the stamina to make something new or blog. Finally, Its been about more than a week and I am back in form. I kind of did a little cheating and had few of these cookies today. LOL.

P.S- These chocolate dipped cookies are to die for.

Screenshot_2014-11-17-18-19-47-1_wm

Although these cookies give an impression of a lot of hardwork gone in to make these…These are fairly easy to bake. These cookies are ready in about 30 mins and its the easiest one could make. There is no hidden time when I say these cookies just took about 30 mins to bake and get ready. Ofcourse there is a dough chilling time which too isn’t much in this case. Just about 15 mins and you will be sorted with the dough.Easy to put together and really impressive these cookies are a must try.

Honestly, I love the entire process of making a cookie in comparison to the quantity of cookies I would eat. I just adore them. I have fairly about 1 or 2 of the batch of cookies I make and that is about it, But I love baking these. The aroma of a baked cookie in your kitchen is the best thing that can happen. So yes.. that is my favorite part.

Screenshot_2014-11-17-18-18-07-2_wm

Its not been more than an hour that I have baked these cookies and more than half the batch is over. These cookies are that addictive. If you have kids at home, I would suggest you to make loads of them. I make a really small quantity of anything new that I make so that I don’t waste much things if they don’t turn out to be nice.

P.S- These Cookies take less than an hour to get ready.

RECIPE: CHOCOLATE DIPPED SWEETHEART COOKIES

Makes About- 15 cookies

Prep Time- 15 mins

Baking Time- 10 mins

INGREDIENTS:

  • All Purpose Flour- 1 cup
  • Unsalted Butter- 60 gms
  • Castor Sugar- 50 gms
  • Salt- A pinch
  • Vanilla Extract- 1 tbsp
  • Dark Chocolate- 1 cup

PROCESS:

1. Beat together butter and sugar until light and fluffy.

2. Add vanilla extract and beat for some more time.

3. Add in flour and salt and make  a dough which will be a little sticky.

4. Make sure you refrigerate the dough for atleast 15 mins before you roll it out.

5. Once the dough is chilled, roll it out in a floured surface with about 1/2 inch thickness. With the help of cookie cutter cut out heart shaped cookies.

6. Line the cookies on a baking tray which should be lined with a cookie sheet.

7. Bake the cookies in a preheated oven for about 10 mins at 180 degrees.

8. Once the cookies are baked and cooled down its ready to be dressed in chocolate.

9. Melt chocolate in a double boiler until it is in a smooth consistency.

10 Now dip half the cookies in them..Sprinkle some sugar and Let is cool in a baking sheet.

Your Chocolate Dipped Sweetheart Cookies are now ready.

Screenshot_2014-11-17-19-23-04-1

For any queries and collaborations contact me at : cookingdiarybyshruti@gmail.com

You can connect with me on FacebookInstagram and Pinterest for more regular updates.

Looking forward to similar recipes? Try my:

Sugar Kissed Strawberry Cookies

Screenshot_2014-07-21-23-50-37-1

Double Chocochip Cookies

Screenshot_2014-07-09-01-16-21-1_wm

Strawberry Jim Jam Cookies

Whole Grain Rotini with Fresh Herbs & Vegetables

Looking for Comfort Food over the weekends? This one totally surpasses the weekend laziness and you wouldn’t mind making them for your Sunday Brunch or for Dinner along with your favorite Movie 🙂

Screenshot_2014-11-07-16-59-22-1

Pastas are my ultimate favorite and I can have them any time of the day. They never disappoint me. I look at them as comfort food. With a huge variety of whole grain pastas in the market these days you can very much eat them guilt free and as much quantity as you like. Yeah, when it comes to pastas I can actually hog on them very much. To make a guilt free pasta all you got to do is cook them without any sauce and with minimum flavoring. The best thing about  them is that with just a handful of ingredients too you can make them and they taste amazing. I mean i could just make them with 3 ingredients i.e Olive oil, Garlic and some chilli.

P.S- Pastas are my ultimate comfort food.

Screenshot_2014-11-05-17-30-38-1_wm

I love my mushroom sauce pasta the most when it comes to my favorites but again there is no limits to how many ways you can make these in. I am definitely gonna do more recipes on these. However, when it comes to making them guilt free i prefer a whole grain pasta cooked in veggies without any sauce. You could go ahead with a red tomato sauce but only if you make them without cheese. 😛

This one is really easy to put together. I mean combine your favorite pasta with your choice of veggies and these are ready. It cant get easier than this..Can It? I dont think so. The variety of vegetables that can go in the pasta is amazing. You can combine them with anything and you are ready to put through. They suffice a perfect meal and my meal cant get better.

Screenshot_2014-11-06-01-33-03-1_wm

I have used fresh Mushrooms, Broccoli, Zucchini and Bell Peppers. You can definitely go ahead and add corns, baby corns, spinach, carrots or anything you  prefer. So next time when you dont know what to eat or cook for yourself make these whole grain rotini and you wont be disappointed at all.

RECIPE: Whole Grain Rotini with Fresh Vegetables and Herbs

Serves- 2

Prep time: 5 mins

Cooking time: 10 mins

INGREDIENTS:

  • Whole Grain Pasta- 1 cup Boiled
  • Olive Oil- 2 Tbsp
  • Garlic- 3 to 4 Cloves finely chopped
  • Broccoli- 1/2 cup diced
  • Mushroom- 1/2 cup diced
  • Zucchini- 1/2 cup diced
  • Green Bellpeppers- 1/2 cup diced
  • Onion- 1 thinly sliced
  • Fresh Basil Leaves- Few
  • Salt- to taste
  • Pepper- to taste
  • Red Chilli Flakes- 1 tsp
  • Oregano- 1 tsp
  • Pasta Seasoning- Optional

PROCESS:

1. In a pan, heat some olive oil and add garlic and onions. You don’t need to overcook any of the vegetables as the bite to it tastes good.

2. Throw in all the other vegetables and saute for a few minutes.

3. Now add in the pasta and all other seasonings.

4. Cook for a few minutes and voila…your pasta is ready.

It really cant get simpler than this. Your Whole Grain Rotini with Fresh Vegetables and Herbs is now ready.

Screenshot_2014-11-05-17-28-58-1_wm

You can connect with me on FacebookInstagram and Pinterest for more regular updates.

If you cook or bake anything from Cooking Diary By Shruti…Please Share the Pictures on Instagram or Facebook and Tag @cookingdiarybyshruti. I would love to see them. Also I would feature it on my blog.

IMG_20140628_004634[1]

Semolina Pancakes

Tired of thinking what to make for breakfast? or Bored of making those sweet pancakes with fruits. I bring to you these healthy yet yummy savory pancakes.

Screenshot_2014-09-13-13-54-08-1_wm

Hello Lovely Readers,

When I did my earlier post on Savory Pancakes i.e Farmhouse Oats Pancakes little did I know about savory pancakes. For me they were quite an innovation. I honestly preferred the savory ones more in comparison to the sweet ones. Although, I cant wait for the strawberry season to hit in so that I can make my favorite strawberry pancakes 😛 Nonetheless, today I am up with another savory pancake recipe which is the semolina pancakes.

Screenshot_2014-09-22-01-22-12-1_wm

This recipe is one of my favorites and I wouldn’t be lying if I said that I have these at least 3 times a week. This one is totally my Mom’s recipe and I do not want to take credits for this. It is ready with simplest of ingredients and is so surprisingly delicious. You can have them for breakfast, or for your evening snack or also for lunch. These are light yet filling. Who doesn’t want these kind of recipes which are healthy yet satisfying to the taste bud.

Screenshot_2014-09-13-13-53-20-1_wm

My semolina pancakes are ready in a jiffy and wouldnt take much of your time and effort. This is the best part. I mean, I am always looking for recipes which hardly take any time but the end results are amazing. Easy yet delicious is the way to be. These pancakes are best when they are served hot and they do not require any syrup or dip. You can enjoy eating them just the way they are.

P.S- They do not have any vegetables in them just the goodness of semolina.

Screenshot_2014-09-22-12-42-58-1

Semolina is very healthy and it is very light for the stomach. I simply love any dish made out of it. You can have it daily. It does not carry any fats if it is steamed or cooked with minimum amount of oil. As I said earlier this recipe has minimal ingredients and it works the best that way. If you wish you can add veggies to it but it is not a compulsion. The main ingredients to be used in this one are green chillies, curry leaves and yogurt.

RECIPE: SEMOLINA PANCAKES

Makes : 4 to 5 medium sized pancakes

Prep Time: 15 mins

Making Time: 5 mins

Serve: Hot

INGREDIENTS:

  • Semolina- 1 cup
  • Yogurt- 1/2 cup
  • Water- 1/4th cup
  • Green Chillies- 2 Finely Chopped
  • Onions- 1 Finely Chopped
  • Cilantro- A handful Chopped
  • Salt- to taste
  • Black Pepper- to taste
  • Curry Leaves- A handful
  • Black Mustard Seeds- 1 Tsp
  • Oil- 2 Tbsp
  • Cooking Soda- 1/4th tsp

PROCESS:

1. In a bowl mix semolina along with yogurt, water, green chillies, onions, cilantro, salt, black pepper and cooking soda.

2. Mix all the ingredients to for a smooth consistency. It should have a pour-able consistency but not to thin. If needed add more water.

3. Leave this mixture aside for atleast 15 mins for it to be ready to be made.

4. In a deep pan, add 1 tsp oil and heat.

5. When heated add black mustard seeds a little and curry leaves. Once it starts cooking add a ladle full mixture in the pan. Cover the pan and let it cook for a minute. Now flip it on the other side and again cook for a few minutes.

6. Cook until it has brown spots on both sides. Make sure you cook it on low flame and covered.

7. Serve hot with yogurt or eat it just like that.

Your Semolina Pancakes are now ready.

Screenshot_2014-09-22-12-44-09-1

You can connect with me on FacebookInstagram and Pinterest for more regular updates.

If you cook or bake anything from Cooking Diary By Shruti…Please Share the Pictures on Instagram or Facebook and Tag @cookingdiarybyshruti. I would love to see them. Also I would feature it on my blog.

IMG_20140628_004634[1]


Looking for similar recipes? Try my:

Farmhouse Oats Pancakes

Screenshot_2014-07-12-14-24-26-1_wm

Oats and Vegetable Patties 

Screenshot_2014-07-02-03-22-50-1_wm

Gulab Jamuns

Surprising..Amazing..Delicious.. Soft… Sweet..Indian…Easy…Yummilicious…

My Gulab Jamun Recipe defines all these adjectives.

IMG_20141023_163826_wm

Heyy Lovely Readers,

OMG, I can’t believe its been more than 3 weeks I haven’t Blogged. I am sure most you might be wondering where have I dissappeared. Well, I know its not fair and I should have blogged more often. I was too busy this Festive Season. Firstly, I went to a Family Holiday during Dusshera and then so many preparations for my birthday..followed by Diwali.

P.S- Wishing all of you a Very Happy Diwali. May this Diwali bring prosperity and joy 🙂

IMG_20141023_184348

This is my first Indian Sweet attempt and I cant tell you guys how thrilled I was. You will find more of sweet recipes in my blog in comparison to the savory dishes but this one is my ultimate favorite. This one was special because its my first attempt to make an Indian Dessert. I did not want to modernize this because I love the Gulab Jamun just the way it is. I was really nervous before I began this because it was specially for Diwali and I couldn’t mess it up. Honestly, I never thought i would be trying any of this at home. But I just had to do it.

IMG_20141024_143327_wm

Screenshot_2014-10-26-14-51-00-1_wm

Making these Gulab Jamuns at home is really easy. I would never want to purchase it from outside now. These were that good. All you have to do is keep a check on the measurements and the temperature of the oil while frying these…Rest will be taken care of on its own. You will be flooded with a zillion recipes online for Gulab Jamuns but they might be quite tricky and wouldnt be mentioning the Do’s and Dont’s of the recipe. Most of them use Milk Powder..Semolina and Alot of Maida to make it. I did not use any of these. I wanted to keep it authentic. I have used Khoa or Mawa for this Gulab Jamun Recipe along with Cottage Cheese(Paneer).

Screenshot_2014-10-26-14-49-03-1_wm

Screenshot_2014-10-26-14-52-28-1_wm

The main and the most important part of this recipe is to smoothen the  khoa and paneer together to make it as soft as possible. It should form a soft texture without any lumps. Once you have mastered this step the rest of the process is very easy. Make sure they are no cracks formed while you make the balls.

P.S- Make these Gulab Jamuns at home and enjoy them ❤

RECIPE: GULAB JAMUNS

Makes About: 15-20 Medium Sized Gulab Jamuns

Preparation Time- 10 mins

Cooking Time- 15 mins

INGREDIENTS:

For the Sugar Syrup (Chashni):

  • Sugar- 1 1/2 Cup
  • Water- 1 Cup
  • Cardamom Power-1/2 Tsp
  • Rose Water- 1 Tsp
  • Kesar- 1 pinch

For the Gulab Jamuns:

  • Khoa or Mawa: 250 gms
  • Paneer or Cottage Cheese: 200 gms
  • All Purpose Flour or Maida: 1/4 th Cup
  • Cardamom Powder- 1/4th Tsp
  • Pure Ghee- 2 cups (for frying)
  • Pistachios- A handful for garnishing

PROCESS:

1. In a pan add all the ingredients under the Sugar Syrup section and heat them until the sugar is dissolved and a little thickened.Make sure the sugar syrup or chasni is not too thick.

2. Cook for about 5 mins and then keep aside. While the sugar syrup is boiling… Grate the khoa and Paneer together and mash it with your hands for about 2..3 mins. Make sure there are no lumps and it is really smooth in texture.

3. Once the khoa and paneer and combined together to a smooth dough like texture, you can now add the all purpose flour and cardamom powder and combine everything together.

4. Divide the dough in equal parts and make medium sized balls. Make sure there are no cracks in them or you will need to mash it some more to form a smoother dough like mixture.

5. In a heavy bottom pan, heat pure ghee. Keep it on medium heat and once you add the balls to it reduce the temperature to really low.

6. Fry the gulab jamuns in ghee very carefully on a really low flame. It shouldn’t be high at all. Fry them until golden brown and then dip them in sugar syrup.

7. Leave aside for atleast 30 mins so that they soak in the sugar syrup before serving.

8. Top with pistachios and rose petals to serve.

Your Homemade Gulab Jamuns are now ready.

new

For any queries and collaborations contact me at : cookingdiarybyshruti@gmail.com

You can connect with me on FacebookInstagram and Pinterest for more regular updates.

If you cook or bake anything from Cooking Diary By Shruti…Please Share the Pictures on Instagram or Facebook and Tag @cookingdiarybyshruti. I would love to see them. Also I would feature it on my blog.

IMG_20140628_004634[1]


Looking for Similar Recipes..Try My:

Strawberry Coconut Candies

Screenshot_2014-09-24-08-27-21-1_wm

Piri Piri Corn Salad with Wholewheat Pita Chips

Piri Piri Corn Salad with Wholewheat Pita Chips is surely a great way to start the month of October. Healthy is surely Tasty too. My Piri Piri Corn Salad Just Defines That. ❤

Screenshot_2014-10-01-13-59-13-1

Heyiii All You Lovely Readers 🙂

Firstly, I would like to thank each one of you for all your love. Each day I receive alot of  Messages and Emails , and my day is just made with all the amazing things you say and it gives me confidence to do more better. I also whole heartedly welcome your feedbacks so please keep writing in. Also, I just reached my 1st Milestone on INSTAGRAM with 1000+ Followers 🙂 OCTOBER couldn’t begin more better than this…..Isn’t It?? Well there is a lot more to do…. but the first 1k followers are always special I believe. ❤

Screenshot_2014-10-01-13-59-32-1

If you have been a regular follower and reader of my blog you would know that I have been really excited about the month OCTOBER since my last blog post. October is my favorite month because Its my Birthday month and also because of all the Festivals and Celebrations around. Through out the month, I feel each day is a Celebration. My Piri Piri Corn Salad with Wholewheat Pita Chips just show that the celebrations have begun.

P.S- My Piri Corn Salad with Wholewheat Pita Chips are spicy, tangy, and healthy.

As you know, I started my new section SALADS in the previous month. The Cucumber Ribbon Salad with Yogurt Mint Dressing was loved by everyone. On one hand where that salad was cool…sweet…and very summery, this salad is very peppy. It is spicy..tangy and is served with wholewheat pita chips for that extra crunch. You can also eat it as a salsa with any other chips of your choice. I preferred homemade wholewheat pita chips. In this recipe you will learn to make both the salad and the chips. You can use the Whole Wheat Pita Chips and serve it with Soups, Salsa and even Pastas. It is really versatile.

Screenshot_2014-10-01-16-37-09-1

If you Love Amercian Sweet Corn you are surely going to love this salad. I have used a ready made Piri Piri Sauce to add in the spice to this salad. If you don’t have it you can also use Piri Piri Powder or make the sauce at home. The choice is totally yours. Now, whether you can make this sauce without any Piri Piri Sauce then my answer would be NO. I mean you will have a salad but it wouldn’t be a Spicy Salad anymore. However, if not this, I would suggest you to add a few chopped green chilies for the flavor.

Screenshot_2014-10-01-16-38-33-1

This Salad tastes amazing with Whole Wheat Pita Chips. It balances out the spicy-ness of the Salad. You can serve it with a ready to eat chips of your choice if you don’t prefer making the Whole wheat Pita chips. These are fairly easy to make and are ready in no time. This salad can be well prepared before hand and served when desired. I am in love with these pita chips. They are made without yeast. I will be doing a pita bread recipe soon on the blog. You can surely replace the whole wheat flour with all purpose flour (maida). The quantities and the recipe remains the same.

 Without much a do…lets begin with the recipe.

RECIPE: PIRI PIRI CORN SALAD WITH WHOLE WHEAT PITA CHIPS

Makes- 2 cups salad and a plate full of chips

Prep Time- 20 mins

Baking Time of Pita Chips- 15 to 20 mins

INGREDIENTS

For the Salad:

  • Partly Boiled American Sweet Corn- 1 cup
  • Red Onion- 1 Chopped
  • Tomatoes- 2 (Diseeded and Chopped)
  • Cabbage- 1/4th piece (Chopped)
  • Ginger- 1 Inch Chopped
  • Lemon Juice- 1 to 2 Tbsp
  • Piri Piri Sauce- 1 Tbsp
  • Salt- to taste
  • Pepper- to taste
  • Taco Mix- 1 Tbsp
  • Cilantro- 2 to 3 Tbsp (Finely Chopped)
  • Roasted Red Chilli Flakes- 1/4th Tsp

For the Whole Wheat Pita Chips:

  • Whole Wheat Flour- 1 cup
  • Water- To knead the dough
  • Butter- 2 tbsp
  • Baking Powder- 1/2 tsp
  • Oil- 30 ml

PROCESS

1. In a large bowl, Take whole wheat flour, Oil, Baking Powder and knead a soft dough using adequate water. Knead the dough for atleast 5 to 7 minutes on a flat surface so that the gluten in the dough is developed. Cover with a damp towel and leave aside for 1 hour.

2. In another bowl, add Onions, Tomatoes, Cabbage, Corn, Ginger, Salt, Pepper, Taco Mix, Roasted Red Chilli Flakes and keep aside.

3. Now, take one fourth of the dough and roll it out. Apply Melted butter and fold it to form a Semi- Circle. Do the same with all the dough.

4. Grill this in the oven for about 15 mins at 180 degrees or until the dough is crisp. Once done, you can sprinkle over a lot of taco mix and cut them into triangles or any desired shape of your choice.

5. While serving, mix lemon juice and cilantro to the salad. Place them in your serving dish and top with a lot of pita chips.

Your Piri Piri Corn Salad with Whole Wheat Pita Chips is now ready.

Screenshot_2014-10-01-10-55-24-1

 Thank You for Making it Happen 🙂 1000 + Followers on Instagram. If you wish to connect with CDBS on a daily basis follow me on Instagram @cookingdiarybyshruti.

instagram dp

Looking For Similar Recipes? Try My

Cucumber Ribbon Salad with Yogurt Mint Dressing

Screenshot_2014-09-12-00-37-39-1_wm

Strawberry Coconut Candies

Festive Season has just begun and so has my cravings for Sweets. I am sure that lot of you can relate to this. My Coconut Candies are one of the easiest and gorgeous looking dessert I have ever made. They melt in the mouth like Candies..And I love that Pastel Color…

Screenshot_2014-09-24-09-08-51-1_wm

Hello Readers,

Festivals are just around the corner. I Love October for various reasons. Firstly, Because its my birthday month. Me and my Sister both have birthdays this month which makes it all the more special. And Secondly, because I love this entire festive feel and mood. Just makes one happy. Feels like there is some kind of celebration going on. I love Diwali and I wait for it the entire year. Festivals around…Definitely means a lot of FOOD around. Sweets, Snacks, Drinks and a lot more just enhance the Festive mood. Navratra  has begun today so begins the Festive Mood.

P.S- Wishing everyone a very Happy Navratra. You can enjoy these candies during your fast too 🙂

Screenshot_2014-09-24-09-03-05-1_wm

Screenshot_2014-09-24-08-56-40-1_wm

When Festive Season is around, the first and foremost thing that comes in Mind are SWEETS. We Indians love having sweets and I guess we are born with a Sweet Tooth. Our meal isn’t complete unless we have a dessert. The preference and choices obviously vary depending on what one likes but everyone atleast enjoys having sweets. I personally feel that no matter how much we like the doughnuts and the cupcakes….Muffins or Crepes…Yogurt or Ice-creams…. We always have this soft corner for Indian Sweets. Nothing Can beat the flavor and taste of Jalebi…or Shahi Tukdas…or Ladoos..or Gulab Jamuns and a lot more. These sweets are like an integral part of our daily food consumption. I like a few, not all of these..Jalebi and Shahi Tukda being my favorite ones.

P.S- We are all crazy about Indian Sweets. Aren’t We?

Screenshot_2014-09-24-08-59-55-1_wm

This is my very first attempt at making an Indian Dessert an I must admit I was really nervous. My Mom thought I was kidding when I told here that I was making these Coconut Candies. Although, she was really happy and amazed to see them at the end. I was nervous at making them because I really had no idea how are they going to turn out. Baking desserts is my favorite thing to do and honestly, i can come up with any mad idea and creativity but this one was completely different. It was scary because it was my very first attempt to something like this. The only difficult thing in my head was to be able to bind everything together and make perfect candies. I didn’t want them to fall apart.

P.S- To my surprise these came out extremely well.

These candies are sweet..have the flavor and goodness of texture..and above all I have given these candies a twist by adding a hint of strawberry flavor. It not only enhance the taste but also gives it a kick and makes it something amazingly different. If you do not like strawberry you can very well skip adding it onto your recipe. This step is completely optional or you can go ahead and try your favorite flavor. You could add chocolate or mango flavors to these. These sweets are prepared with the easiest and basic ingredients which are readily available in the kitchen for us. All you have to do is be careful while cooking these and you are sorted.

Screenshot_2014-09-24-08-53-50-1_wm

I am sure this is not the first time when someone has seen the recipe of these amazing coconut candies. Its a very common recipe and I know most of you know it. But this is my version of it and I can proudly say that these were amazing. :)If you are beginner at making Indian Sweets, I would always suggest you to begin with this one. They are the easiest desserts I have ever made. They are almost ready in less than 10 mins and can be served immediately too. I have never made something so easy to put through.

Screenshot_2014-09-24-09-00-50-1_wm

I have used a perfect ratio of Desiccated Coconut and Condensed Milk in this recipe. They are the main ingredients that we use in this recipe. All you have to do is cook the condensed milk with the coconut for about a few mins…add in your flavors and you are done with the most amazing dessert ever. I have used Strawberry Syrup to give it a even better flavor which is an entirely optional step. Once they are a little cooled down you can give them any shape of your choice and serve. As you can see, I served the candies in quiet an interesting way. This picture is inspired by a picture I saw on Pinterest with a double coconut layering. I loved it and wanted to do something similar while serving. 🙂

RECIPE: STRAWBERRY COCONUT CANDIES

Makes about- 20 candies (Medium Sized)

Prep Time- 5 mins

Cooking Time- 3 mins

INGREDIENTS:

  • Desiccated Coconut- 100 gms
  • Condensed Milk-3/4th cup
  • Sugar- 2 Tbsp
  • Milk- 2 Tbsp
  • Vanilla Extract- 1/2 Tsp
  • Strawberry Syrup- 2 to 3 Tbsp
  • Pink Color- A drop

PROCESS:

1. In heavy bottom pan, add the condensed milk and start cooking. Make sure you cook it on low flame and keep stirring so that it does not stick to the bottom.

2. After a minute add 80 gms of desiccated coconut and mix it together.

3. Now add sugar, milk, vanilla extract and strawberry syrup. Combine everything together.

4. Now switch of the flame and lastly add food color.

5. Let the mixture cool down a little before you start rolling them into candies.

6. Make small balls out of it and roll them in the remaining 20 gms of desiccated coconut to add that additional crunch to the candies.

7. You can now store them in a air tight container.

Your Strawberry Coconut Candies are now Ready.

Screenshot_2014-09-24-08-27-21-1_wm


For any queries and collaborations contact me at : cookingdiarybyshruti@gmail.com

You can connect with me on FacebookInstagram and Pinterest for more regular updates.

If you cook or bake anything from Cooking Diary By Shruti…Please Share the Pictures on Instagram or Facebook and Tag @cookingdiarybyshruti. I would love to see them. Also I would feature it on my blog.

IMG_20140628_004634[1]

Oreo Cheesecake Mousse

If you talk about the most sinful dessert ever..Your search ends right here. Oreos…Cheesecake…Creamy Mousse.. Is there anything better you can think of? I dont think so. My Oreo Cheesecake Mousse is Creamy, Fancy, and For all OREO Lovers!!!


IMG_20140918_194006-1

Hello Lovely Readers,

If you have been following me on Instagram and Facebook you would know I had a posted a picture with a caption “YOLO- You Only Love Oreos”.  Isnt it True? All of us LOVE OREOS. As promised to my readers, here I am with an amazing Oreo Cheesecake Recipe. This is a no bake, no gelatin Cheesecake Mousse and is ready in a Jiffy. Yes, you heard it right, No matter how difficult they look to put up, they are no where close to that. If you are looking for a No bake easy dessert recipe this one is truly a must try.

Screenshot_2014-09-16-02-12-58-1_wm

Its been long that I have been wanting to try a cheesecake. My refrigerator was loaded with 3 boxes full of Cream Cheese but I just couldn’t think of something creative. I wanted to give it a different flavor. I really wished to make a strawberry three layered cheesecake but strawberries are out of season. The frozen ones are not too great. I don’t like them personally. I didn’t want to make a Mango cheesecake. I dont really like the flavor. It has actually been weeks where in I didn’t know what to do with the cream cheese because I just couldn’t think of anything. Finally, I thought can I just give them a chocolaty Oreo Cookie flavor. These are the best CheeseCake ever.

P.S- A Cheesecake can be made without baking and gelatin 🙂


Screenshot_2014-09-19-17-40-34-1

Cheese Cakes can be made in a lot of variety. They have been drooling at the bakeries these days. Honestly, when I had my first Cheesecake I didnt enjoy it much. May be it took me time to develop the taste for it. These cheesecakes are a savior for your dessert cravings. My personal favorite cheesecake flavors are Fresh Strawberry and Blueberry ones. Well after this successful attempt of a CheeseCake Mousse, I cant wait to try the others. I never expected to make it all by myself. Isn’t  Cheese Cake supposed to be at the bakeries…I mean its unbelievable as to how easy are these to put through.

Screenshot_2014-09-16-02-11-10-1_wm

The reason why I made these mousse in a shot one serve glasses are that, I wasn’t sure how would they turn out to be. This is my first ever Cheese Cake recipe. I read a lot about them. Most of the recipes required Gelatin to make them. I was not too keen to use a gelatin to make my Cheese Cake. Also I wanted to make it a big different from the regular ones.

P.S- I can’t wait for the strawberry season to try a Strawberry Cheese Cake.

Screenshot_2014-09-17-23-28-52-1-1

My recipe for the Oreo Cheese Cake Mousse is different. Its extremely creamy in texture because I have used a lot of Heavy whipped Cream. Also the combination of cream cheese with Oreo is spectacular. I have used a plain Oreo without any flavor but if you wish you can go ahead and use a Chocolate, Strawberry, Orange or any other flavor of OREO biscuits you prefer. This mousse takes a little time to set since we are not using any binding agent in them..nor are we baking this. So you really need patience to make these. But trust me, its worth all the efforts.

RECIPE: OREO CHEESECAKE MOUSSE

Makes about- 6 shot glasses

Prep Time- 2 hrs ( Including Chilling Time)

INGREDIENTS:

For the Crust:

  • Oreo Biscuits- Crushed 1 cup
  • Butter- 2 to 3 Tbsp
  • Honey- 2 tbsp

For the Cream Cheese Mousse:

  • Cream Cheese- 3/4th cup
  • Heavy Whipped Cream- 1 cup
  • Castor Sugar- 1/4th Cup
  • Salt- A pinch
  • Lemon Juice- 1/4th tsp
  • Vanilla Extract- 1 tsp
  • Oreo- 1/4th cup Crushed

PROCESS:

1. Mix all the ingredients under the Crust section and set them in a shot glass or any other dish of your choice. Make sure you only fill 1/4th of your serving glasses or dish with these.

2. Let is set in the Freezer for at least 30 mins.

3. Meanwhile, In a bowl take some cream cheese. Now slowly fold in whipped cream in to the Cream Cheese. Make sure you fold it very lightly and do not use an electric beater. Fold in with a Spatula.

4. Add the remaining ingredients and fold in softly until everything is combined. Add the crushed Oreo at the end and mix everything together.

5. Fill in this mixture to the shot glasses. Let this set in the freezer for atleast 1 hour.

6. When ready to serve, top with crushed Oreos and Mint Leaves.

Your Oreo Cheesecake Mousse is now ready.

Screenshot_2014-09-16-02-12-58-1_wm


For any queries and collaborations contact me at : cookingdiarybyshruti@gmail.com

You can connect with me on FacebookInstagram and Pinterest for more regular updates.

If you cook or bake anything from Cooking Diary By Shruti…Please Share the Pictures on Instagram or Facebook and Tag @cookingdiarybyshruti. I would love to see them. Also I would feature it on my blog.

IMG_20140628_004634[1]

Looking for Similar Recipes? Try my

Red Velvet Oreo Fudge Brownies

PicsArt_1403856905795

Pomegranate Ginger Ale

One of my Favorite Drinks I have Made so Far. I love the Color of this drink and a flavor that you will never forget. Easy, Cool, Summery, Colorful…This drink is all that you can think of!!!

Screenshot_2014-09-11-17-26-54-1_20140915023147484

I Love Drinks. I believe not any meal of mine is complete without a Drink to go along. Just a little secret to share is: I wish one day I become perfect at making amazing mocktails and serve them in the best manner possible. I have this fetish for collecting classy glasses. I just own a few right now..but yes I certainly am investing into my collection.

Screenshot_2014-09-11-17-23-07-1_wm

This drink is more like an imagination and a mix match of ingredients. To my surprise it came out extremely well. I love Pomegranate Juice and have it almost daily when I am at home. I like the Fresh Homemade Juice. I find the Packed one a bit sour. What about you? So during such a regular day, I had a few ingredients right in front of me while I was at the rim of consuming my Juice..I just mixed those ingredients for fun…. but soon I realized it was the best combination ever.

Screenshot_2014-09-11-17-23-52-1_wm

If you have a perfect blend of flavors..You can make the best mocktails at home. They are really simple and easy to put through. My pomegranate Ginger Ale is a savior on a hot summer day. Ginger Ale these days is easily available in the market and I love the flavor. You could also use Ginger Beer in this recipe. It just adds on to the amazing flavor of the drink.

P.S- You need to make this drink Fresh for your guests.. If you plan to serve 🙂

This one Unlike my Lychee Ginger Mojito cannot be prepared before hand. The mix of Pomegranate Juice and Gingerale taste Amazing when they are made Fresh. I wouldnt recommend to pre- prepare this drink. You don’t want to lose onto the flavors.. Do you? 

P.S- This drink is ready in less than 5 mins.

Screenshot_2014-09-11-17-24-42-1_wmRECIPE: POMEGRANATE GINGER ALE

Makes- 1 Pitcher

Prep Time- Less than 5 mins

INGREDIENTS

  • Pomegranate Juice- Fresh ( 3 Cups)
  • Ginger Ale- 3/4 th cup
  • Soda- 2 cups
  • Lemon Juice- 1/4th Cup
  • Salt- 1/2 tsp
  • Lemon Juliennes – 1/2 cup
  • Ginger Juliennes- 1/4th cup
  • Ice Cubes – 1 cup
  • Mint Leaves- Few (Optional)

PROCESS

1. In a pitcher add Ice cubes, Lemon Juliennes and Ginger Juliennes.

2. Now add lemon juice and salt

3. Mix everything together

4. Add pomegranate juice and ginger ale together. Mix well

5.Top with Soda. Pour it slowly. 

6. Garnish with a few mint leaves and ready to serve.

Your Pomegranate Ginger Ale is now Ready.

Screenshot_2014-09-11-17-21-16-1_wmFor any queries and collaborations contact me at : cookingdiarybyshruti@gmail.com

You can connect with me on FacebookInstagram and Pinterest for more regular updates.

If you cook or bake anything from Cooking Diary By Shruti…Please Share the Pictures on Instagram or Facebook and Tag @cookingdiarybyshruti. I would love to see them. Also I would feature it on my blog.

IMG_20140628_004634[1]Looking for Similar Drinks? Try My:

Lychee Ginger Mojito

Screenshot_2014-08-19-15-02-41-1_wm

Orange Banana Smoothie

Smoothie 1

Cucumber Ribbon Salad with Yogurt Mint Dressing

Fond of Salads? Try my new Cucumber Ribbon Salad which is the easiest salad ever. Ready in less than 5 mins….This Salad totally is worth a try.

Screenshot_2014-09-12-00-36-02-1_wm

Hello Lovely Readers,

Its weekend and I am just too lazy to make something fancy. I don’t understand: but the fact is I like cooking on weekdays. Just the thought of weekend makes me Lazy. 😛 Also, I think my creativity works the best when I am alone and cooking. I like my space in the kitchen to cook. So yeah, I love cooking on weekdays. It just makes me really happy. I have thought of a few new recipes this week. I hope they come out well and I can share it on the blog.

P.S- Weekends are the best for lazy and easy cooking.

Screenshot_2014-09-13-13-35-47-1

I am not a SALAD fan. I like it once in a while. Also I like eating my veggies just like that instead of putting it all together in the form of a salad. So yeah…Here I am with my first salad recipe on the blog. Actually this new addition is due to my sisters desire for me to make various salads. She is very fond of them and she really has encouraged me to try a lot of salads. So you will definitely be reading a lot of salad recipes coming on the blog.

This Cucumber Ribbon Salad with Yogurt Mint Salad is the easiest salad ever. The ingredients that are used are not very fancy. I believe you can find them at your kitchen on a day to day basis. It is really easy to put together and comes out amazing. Also, I have sliced the salad in the form of ribbons which look really gorgeous. The sprouts just enhance the taste and the health quotient of the salad. It adds that crunchy-ness to the Salad and goes really well with the dressing.

Screenshot_2014-09-12-00-37-39-1_wmEven if you are a kid, or a beginner  in the kitchen, this one is really easy. Anyone of you can make these. Its best for a hot a summer day. I had them for lunch and it was really nice. I have here used a Yogurt Mint Dressing. You can also go ahead and use a regular lemon dressing for the same. It would taste good with a Lemon Dressing too but turn out to be the best with this Yogurt Mint Dressing. This dressing is really Universal and you can use it for a lot of other salads or as a dip. Will be doing a post for the same too.

Screenshot_2014-09-13-13-40-45-1_wm

P.S- If you are not a Salad Fan, try these. I am sure you would ❤ them. 

RECIPE: CUCUMBER RIBBON SALAD WITH YOGURT MINT DRESSING

MAKES- 2 BOWLS

PREP TIME- 5 MINS

INGREDIENTS:

For the Yogurt Mint Dressing:

  • Greek Yogurt- 1/2 cup
  • Olive Oil- 2 Tbsp
  • Lemon Juice- 1  1/2 Tbsp
  • Salt- To taste
  • Pepper- To taste
  • Chat Masala- 1/2 Tsp
  • Green Chilli- 1 Finely Chopped
  • Mint Leaves- 5 to 6 Finely Chopped
  • Sugar- 1 pinch

For the Salad:

  • Cucumber- Ribbons( Cut with the help of a peeler)
  • Sprouts- 1/2 cup
  • Pomegranate- 2 Tbsp

PROCESS:

1.  In a bowl mix all the ingredients under the heading of the Yogurt Mint Dressing and keep aside to chill in the refrigerator.

2. Add cucumber ribbons, sprouts and pomegranate in a bowl.

3. Add the dressing and top with a few mint leaves.

4. Serve Chilled.

Your Cucumber Ribbon Salad with Yogurt Mint Dressing is now Ready.

Screenshot_2014-09-12-00-32-45-1_wmEnjoy Making These!!

For any queries and collaborations contact me at : cookingdiarybyshruti@gmail.com

You can connect with me on FacebookInstagram and Pinterest for more regular updates.

If you cook or bake anything from Cooking Diary By Shruti…Please Share the Pictures on Instagram or Facebook and Tag @cookingdiarybyshruti. I would love to see them. Also I would feature it on my blog.

IMG_20140628_004634[1]


Chocolate Caramelized Banana Crepes

These Chocolate Caramelized Banana Crepes are the most sinful dessert ever. You don’t mind gulping down these calorie loaded dessert because they are worth every bite. I am totally in ❤ with these!!!!

Screenshot_2014-09-11-14-01-19-1_wm

Every time I make something totally new, something which I haven’t tried making before , I really feel nervous. I want it to come out perfect on the very first attempt. Most of the times I am successful but sometimes I am not. That is my bad day. Nonetheless, These crepes totally surprised me. I was super happy with the final results. In my very first attempt of making crepes at home, I was successful. They not only look glorious but taste heavenly. The Caramelized Bananas add richness to the crepes and makes them all the more “Sinful” 🙂

P.S- Homemade Crepes will surely Surprise you. ❤

Screenshot_2014-09-11-10-47-44-1

A crepe is a very thin form of a pancake and has its origin from France. They are made by pouring a very thin batter over a hot pan and cooked lightly on both sides. A crepe can be made in a variety of ways. It can be both sweet and savory. I will be doing a savory version of the crepes soon. They might look complicated but are extremely easy to make. If you are a beginner at cooking, you Must try these crepes and you could be star of the evening by serving these hot crepes to your guests.

Screenshot_2014-09-09-18-47-39-1_wm

I feel to have discovered the most easiest yet sinful dessert recipe. All you have to do is, put the ingredients together and whip up a batter. The batter has to be of a thin consistency so that it can be spread easily. The filling in the crepes is entirely your choice. I am waiting for the strawberry season in order to make some amazing crepes out of strawberries. I have used Caramelized Bananas. They add enormously to the flavor of the chocolate crepes.

P.S- My house was filled with the Aroma of Cinnamon and Brown Sugar while making these.

IMG_20140910_112807

Screenshot_2014-09-11-13-59-44-1_wm

I am really proud that these crepes came out just the way I wanted them to be. Like all of you, I thought of them to be a real wonder before I actually ended up trying these. As you know my Blog is entirely eggless, the greater challenge here was to make these crepes without eggs. I didn’t want to compromise on the texture. After a lot of research, and flipping back through my cooking diary , I thought of various combination of ingredients which could give me similar consistency. Finally, here I am with an Eggless Crepe Version. I made chocolate crepes instead of the normal vanilla crepes. I love the chocolate flavor. Also it really complemented my Caramelized Bananas.

You can enjoy your crepes both as a dessert or for breakfast. When you are serving your crepes for dessert, you can add fresh fruits and serve it with honey or maple syrup. This is the most exotic part about crepes that they can be eaten in any form. It is a healthy option for breakfast because it is made out of wheat flour and when served with fresh fruits and honey it becomes a sinful yet not calorie loaded. If you wish to make savory crepes you can always skip the sugar and add in your favorite veggies. I am thinking of a mushroom and broccoli crepe. Lots of idea in my mind though 😛 Enjoy these !!!

P.S- You can serve the crepes with Whipped Cream, Chocolate Sauce or your favorite flavored Ice-Cream.

RECIPE: CHOCOLATE CARAMELIZED BANANA CREPES

Prep Time- 10 mins

Makes About- 5 Crepes

Cooking Time- 10 mins

INGREDIENTS:

For the Caramelized Bananas:

  • Bananas- 2 to 3
  • Brown Sugar- 4 Tbsp
  • Butter- 2 Tbsp

For the Chocolate Crepes:

  • Whole Wheat Flour- 1/2 cup
  • Rich Dark Cocoa- 2 Tbsp
  • Sugar- 2 Tbsp
  • Honey- 1 Tbsp
  • Baking Powder- 1/4th Tsp
  • Cinnamon Powder- 1/2 Tsp
  • Nutmeg Powder- 1/4th Tsp
  • Water- As required

For Garnishing:

  • Icing Sugar
  • Chocolate Syrup- 2 Tbsp

PROCESS:

1. In a bowl mix all the ingredients given under the Chocolate Crepes Section and mix until you get a smooth consistency and keep it aside.

2. In a pan, heat butter, once it starts to melt add brown sugar.

3. Once the sugar start to bubble up add bananas and let them cooking for about a minute on each side.

4. Pour a large spoon full of batter in a non-stick pan and distribute the batter with the help of a spatula on evenly.

5. Let the crepe cook for about 2 mins on each side.

6. Layer them with chocolate sauce and caramelized bananas and fold them.

7. Dust some Icing Sugar on top.

Your Chocolate Caramelized Banana Crepes are now ready ❤

Screenshot_2014-09-09-18-49-07-1-1_wm

For any queries and collaborations contact me at : cookingdiarybyshruti@gmail.com

You can connect with me on FacebookInstagram and Pinterest for more regular updates.

If you cook or bake anything from Cooking Diary By Shruti…Please Share the Pictures on Instagram or Facebook and Tag @cookingdiarybyshruti. I would love to see them. Also I would feature it on my blog.

IMG_20140628_004634[1]

Apple and Cinnamon Muffins

These Muffins are Sinful, Moist and Fluffy. They are so soft that they melt in the mouth like a cotton candy. These Muffins are the best I have made so far. I ❤ These.

Hello Lovely Readers,

It has been more than a week that September has started. I haven’t made any new post so far. I really feel sad about it. Not blogging for more than a week is more like a nightmare for any blogger. I am going thorough a Root Treatment for my tooth which has just kept me away from my favorite thing. I hate going to the Dentist. Do you feel the same?Well it is much more better now. I just have a few sittings left. I am hoping for the best.

August is over. And I am so excited about September. Will be meeting my Sister soon…Gawd I miss her soo much. August was an amazing month. I received soo much appreciation from all you readers. The Cheesy Quesadillas with Spicy Salsa and my Apple Pie were a huge hit. I am still getting alot of messages for these. My timetable for September is quite exotic. I have planned new things. I hope they are executed well…So Stay Tuned…There is alot more coming on the blog.

P.S- Stay Tuned!! Lots of surprises await you this month.

IMG_20140902_183122_wm

These muffins are really basic. There aren’t any fancy ingredients and the best part about these is that they are quite adjustable when it come to flavors. By that I mean is, If you do not like the flavors of Apple and Cinnamon you can very well change it. Or just keep it simple. Trust me these muffins are heaven on earth even when you eat them without any flavor. They are extremely moist and fluffy. Yes, I know most of you would be surprised with the fact that although they do not have EGGS , they are really moist. I felt scared picking them. One had to be gentle with these.

PhotoGrid_1410233072977_wm

Muffins are my Mom’s Favorites. She simply ❤ Muffins. Her favorite flavors are banana, chocolate and vanilla. She is motivating me to try some coffee flavor too which I would soon be trying. Nonetheless, I made these ones for her. Her eyes lit with joy whenever I bake muffins and just like a little kid she cant wait for them to cool down. She gulps in one or two without even letting them cool. She is super cute.

P.S- I ❤ my MOM. She inspires me each day.

I prefer my muffins sweet. By sweet I don’t mean they have to be extremely sweet or one cant have them, I just like them a little sweeter than normal. The choice is yours. The Apple Cinnamon Muffins are heaven on earth. The combination of Apple and Cinnamon just makes it the best thing in the world. I love the combination of Apple and Cinnamon…What About You?

They are fairy easy to put together and wont take long to bake. In order to make the muffins right it is really important that you choose the correct apples. Make sure that they are not too sour. We add a little extra sugar in the muffins in order to sweeten the apples too. Again it is entirely your choice if you want to add caramelized apples or just normal apples. You can make it simpler by just adding the plain apples so that they are not too time consuming. The apples will cook along with the batter.

PhotoGrid_1409661658183_wm

RECIPE: APPLE AND CINNAMON MUFFINS

Makes about- 10 muffins

Preparation Time: 15 to 20 mins

Baking Time: 20 mins at 180 degrees

 INGREDIENTS:

  • All Purpose Flour- 100 gms
  • Whole Wheat Flour- 50 gms
  • Greek Yogurt- 3/4th cup
  • Baking Powder- 1 tsp
  • Baking Soda- 1/2 tsp
  • Castor Sugar- 1 cup
  • Cooking Oil- 45 ml
  • Vanilla Extract- 1 tsp
  • Apples- 2 Diced
  • Cinnamon Powder- 1 tsp
  • Salt- A pinch

PROCESS:

1. In a large bowl, add Greek Yogurt and whisk well until smooth with an electric meter.

2. Add Baking Powder and Baking Soda and leave aside  for 5 mins.

3. After 5 mins you will see that the yogurt would have started foaming up.

2. Now slowing add oil and whisk lightly.

4. Once its is white and foamy add sugar and whisk well.

5. Finally we will add flour mix to this mixture and combine everything together.

6. Now add vanilla extract and salt.

7. Lastly add apples and cinnamon and fold in lightly in the mixture.

8. Line a muffin tray with muffin liners and add the mixture into the tray.

9. Make sure you only fill 3/4th of the muffin tray.

10. Bake the muffins for 20 mins at 180 degrees.

11. Let them try on a cooling rack and you can digg on them once they are cooled.

Your Apple Cinnamon Muffins are now ready.

PhotoGrid_1409661543043_wm

For any queries and collaborations contact me at : cookingdiarybyshruti@gmail.com

You can connect with me on FacebookInstagram and Pinterest for more regular updates.

If you cook or bake anything from Cooking Diary By Shruti…Please Share the Pictures on Instagram or Facebook and Tag @cookingdiarybyshruti. I would love to see them. Also I would feature it on my blog.

IMG_20140628_004634[1]


Looking For Similar Recipes. Try My:

Choco Swirl Almond Fudge Muffins

Screenshot_2014-06-11-01-30-08-1-1

Banana Chocochip Loaf

Screenshot_2014-06-04-00-41-58-1_wmChocolate Cupcakes

Screenshot_2014-05-27-11-33-49-1-1_wm

Lemon Cupcakes with Lemon ButterCream

Lemon 2

Strawberry Vanilla Chocochip Muffins

IMG_20140228_222625_wm (1)


Baked Cheesy Nachos

Who doesn’t ❤ Nachos? Well, all of us do. Do you know you could make your favorite nachos at home all by yourself.  If you wish to make your favorite nachos in a baked version you definitely should try this recipe.

Screenshot_2014-08-29-00-38-35-1_wm

P.S-  It is like a must when you are out with your friends or watching a movie or just a chit chat over tea. Nachos serves as the best thing to munch and is an all time favorite.

Honestly, I prefer Nachos over other chips like Lays, Uncle Chips etc. I have never been a huge fan of these. Even if I do eat them, I like the Plain Salted Flavor. Nachos has become an all time favorite. I like the spicy salsa over the cheesy one. What about you? They come in so many flavors these days and are an ultimate favorite among kids and elders. I think people prefer eating nachos over popcorn these days in the theaters. You can either eat them directly from the packets or the baked ones that we get in restaurants.

I  like LOVE baked nachos. I feel its a meal in itself. Topped with a lot of cheese and sour cream its the best thing ever. A plate full of baked nachos and a perfect drink to go along with it and my day is sorted. I have been wanting to make my baked version of the nachos and I finally made them. I call these Pizza Nachos because they are exactly like a pizza. It has a lot of veggies and cheese.

Screenshot_2014-08-28-01-17-22-1_wm

P.S- Nachos these days have become a party ESSENTIAL ❤

Truely, No party is complete without nachos. It is not only easy to assemble but also yummy. I have made the corn tortilla chips i.e nachos myself. YES, you heard it right. It is extremely easy to make. If you don’ t wish to make it on your own, you can go ahead and get your favorite flavor from the store too. The choice is entirely yours. I chose to make the nachos on my own because I was quite excited to make this dish from the scratch. And it is really a challenge for a food blogger to come up with better ideas for the readers. We really have to be on our toes to bring something new and innovative all the time.

Screenshot_2014-08-28-12-23-41-1_wm

Making the Nachos all by Yourself:

You have to keep 3 Things in Mind:

1. To knead a perfect dough. Cornmeal is different from the regular flour that we use..and hence you have to be careful while kneading the dough. Make sure you do not add a lot of water to it. The dough shouldn’t be too soft.

2. Rolling out the dough is a difficult thing to do. You have to be gentle and patient. Avoid using too much flour while kneading the dough.

3. Fry them at a really low flame so that they are evenly cooked.

Talking about the procedure or efforts in making the nachos all by your own is that, the process is fairly easy. If you are a beginner at cooking this could be a little difficult. By this, I do not mean to discourage you…but all I am trying to say is you have to be extra careful. The only difficult part here is rolling out the dough for the nachos as cornmeal dough can be difficult at times to handle. If you are a pro at using a cornmeal dough then this wouldnt be a difficult process for you at all. One has to be quite patient while rolling out the dough as it tears off easily. You have to be very gentle and alert while rolling the dough. Once you have succeeded this step..all you have to do it cut it into triangle shapes and fry them.

The toppings can vary depending upon your taste. You could go ahead with a typical mexican version by incorporation baked beans, kidney beans, sour cream, spring onions, etc. or could go ahead with regular veggies. Since, I call it a Baked Pizza Nachos…. I have kept it closer to pizza toppings. I have included onions, bell peppers, tomatoes, mushrooms, cilantro and my favorite seasonings. You can really play around with the flavors and toppings. 🙂

Screenshot_2014-08-29-00-39-55-1_wm

RECIPE: BAKED CHEESY NACHOS

Makes about- 1 serving

Preparation time- 1 hr 30 mins ( includes dough resting time)

Baking time- 10 mins

INGREDIENTS:

For Nachos:

  • Cornmeal- 100 gms
  • All Purpose Flour- 3 to 4 Tbsp
  • Thyme- 1 Tsp
  • Oil- 2 Tbsp
  • Water

For Toppings:

  • Onions- 1/2 cup ( Finely Chopped)
  • Tomatoes-1 cup
  • Bell Peppers- 1/2 cup
  • Mushrooms- 1/4 cup
  • Cilantro- 2 Tbsp
  • Green Chili- 2
  • Salt- 1/2 tsp
  • Red Chilli Flakes- 1/2 tsp
  • Fajita Seasoning- 1/2 tsp
  • Lemon Juice- 1/2 tsp
  • Mozzarella Cheese- 1 cup

PROCESS:

1. In a large bowl, mix all the ingredients under the Nachos heading and knead a smooth dough. Cover it with a cling film and keep aside for an hour.

2. Once the dough is ready, divide it into two parts and start rolling each at a time. Roll it very carefully until you get a very thin rolled out dough.

3. Now cut it into triangles, and deep fry them in a pan.

4. Once they are fried, add fajita seasoning mix when they are hot so that the chips are nicely coated with the seasoning.

5. In a bowl, mix all the ingredients under the toppings section until combined.

6. Now, in a baking dish place the chips at the bottom, add the toppings mixture and finally top with mozzarella cheese.

7. In a pre-heated oven, bake it for 5 to 10 mins at 180 degrees.

8. Serve Hot.

Your Baked Nachos Pizza is now ready.

Screenshot_2014-08-28-01-15-51-1_wm


For any queries and collaborations contact me at : cookingdiarybyshruti@gmail.com

You can connect with me on FacebookInstagram and Pinterest for more regular updates.

If you cook or bake anything from Cooking Diary By Shruti…Please Share the Pictures on Instagram or Facebook and Tag @cookingdiarybyshruti. I would love to see them. Also I would feature it on my blog.

IMG_20140628_004634[1]


Looking for More Mexican Recipes? Try My:

Cheesy Quesadillas with Salsa

Screenshot_2014-08-20-00-42-29-1_wm

Corn Cheese Poppers

Looking for something to have with your Evening Tea? Or a Perfect Monsoon Snack? Try these Corn Cheese Poppers. They are spicy…and filled with Cheese.

Screenshot_2014-08-25-00-56-29-1-1_wm

Hello Readers,

Do you also love fried snacks during Monsoons. Well I simply ❤ them. I know fried means added calories…but lets face it..nothing beats the taste of a yummy fried snack. No matter you bake them or fry them in an air fryer the latest trend these days…… the taste would never be the same. I believe its good to count the calories but  once a while indulgence isn’t a bad thing 😛 What do you think?

Screenshot_2014-08-25-00-53-52-1_wm

P.S- I am not a strict calorie counter..but I  like to balance the food.

These Corn and Cheese Poppers are perfect, spicy and cheesy snack. If you are looking for a tea time snack, I would really recommend to make these. It is ready in no time and are bite sized. I feel they are an amazing party snacks too. They just melt in the mouth like a cotton candy. I prefer them a little spicy. I add both green chilli and chilli flakes to these so that it cuts down the sweetness of corn and makes it spicy. Well, if you don’t prefer it spicy, you can go with a normal one too.

Screenshot_2014-08-25-00-52-21-1_wm

These are really simple to do and you don’t need any fancy ingredients to make these. Just sweet american corn, cheese (preferably mozzarella cheese), green chilies and a few spices. All you have to do is mix all the ingredients together and fry them.

RECIPE: CORN CHEESE POPPERS

Makes : 10 to 12 poppers

Prep Time: 10 mins

INGREDIENTS:

  • American Sweet Corn- 1 1/2 cup (boiled)
  • Mozzarella Cheese- 3/4th cup
  • Green Chillies – 2 to 3 chopped
  • Potato- 1 (boiled and mashed)
  • Cilantro- 2 Tbsp (Finely Chopped)
  • All Purpose Flour- 2 Tbsp
  • Corn Flour- 2 Tbsp
  • Salt- to taste
  • Red Chilli Flakes- 1/2 Tsp
  • Black Grounded Pepper- 1/4th Tsp
  • Oil- For Frying

PROCESS: 

1. Boil the corn for about 5 mins and griddle them in a mixer just a little so that a few are mashed.

2. In a large bowl, add mashed potato and all the ingredients mentioned under the ingredients heading.

3. Mix all the ingredients nicely, so that they are all combined.

4. Divide in equal proportions, make round balls and deep fry them

5. Fry them on low flame so that they are cooked perfectly from inside.

Your Corn Cheese Poppers are now ready.

Screenshot_2014-08-24-16-49-30-1_wm

For any queries and collaborations contact me at : cookingdiarybyshruti@gmail.com

You can connect with me on FacebookInstagram and Pinterest for more regular updates.

If you cook or bake anything from Cooking Diary By Shruti…Please Share the Pictures on Instagram or Facebook and Tag @cookingdiarybyshruti. I would love to see them. Also I would feature it on my blog.

IMG_20140628_004634[1]

Cheesy Quesadilla with Salsa

LOVE ❤  Mexican Cuisine?

Try My Cheesy Quesadilla with Salsa and you will feel like a pro at making Mexican Food. Its really simple and gets ready in no time.

Screenshot_2014-08-20-00-38-06-1_wm

Screenshot_2014-08-20-00-42-29-1_wm

I love Mexican Cuisine. The reasons are quite obvious. I love spicy and cheesy food. Whenever we talk about Mexican Cuisine all that comes in our minds are Nachos, Tacos, Burritos, Mexican Rice, Mexican Salad, Fajitas, Sour Cream, Gucamole,  Salsa etc. Well is Mexican Cuisine all about this? Not really. There is a lot more to it. But these are some of the exclusive dishes which people do not eat everyday . Like here in India, whenever we go to restaurants we find Dal Makhni, Paneer ButterMasala, Naan etc on the menu..which is not something we Indians eat daily but these are our premium dishes. Similarly, when we talk about Mexican Cuisine we think of all these Premium Dishes. I am going to make all these with the course of time. To begin with I chose Quesadillas as they are my super favorite.

P.S- I Love Mexican Food because its Spicy.

Screenshot_2014-08-20-00-48-19-1_wm

Screenshot_2014-08-20-00-47-13-1_wm

A quesadilla is a flour tortilla or a corn tortilla filled with  a savory mixture and lots of cheese and covered with another tortilla and cut into a pizza like shape. Quesadilla can be served with salsa, sour cream or simple plain. It has a lot of cheese including processed cheese, mozzarella cheese and yellow cheddar cheese. These enhance the flavor and texture of the dish. The filling however can be of your choice. You could go for a mix veg version or a paneer version. The choice is totally yours.

You can also call them as a Mexican style stuff pancakes, like a toasted sandwich, made with two tortillas sandwiched together with a cheese based filling. They are warmed through and meant to be served hot. Some people like to fry their quesadillas in oil, but I dont like it that way. It makes them extremely oily and unhealthy. I like to put them in a dry non-stick frying pan on a medium heat , so that after a minute or two you are left with a really crispy outside and an oozy stringy filling.

Screenshot_2014-08-20-00-44-33-2_wm

P.S- Quesadillas are really easy to make. If you are a beginner at cooking Mexican Food.. try these and you will be amazed with the way they turn out to be.

The Tortillas can either be ready to eat or you can make them at home. Its really easy. I prefer fresh home made tortillas. All you have to do is mix four ingredients- Flour, Salt, Oil and Water and form and dough. Roll it out and put them in a dry non-stick pan on medium heat and let it stay there for about a minute on each side & voila …your fresh homemade tortillas will be ready. They have a shelf-life for about a day or two. You just have to keep them covered.

Screenshot_2014-08-20-00-52-31-1_wm

The filling for the Quasedillas completely depends on your choice. I have prepared a basic cheese quesadillas with Corn, Tomatoes, Onion, Corn and lots of cheese. You can fill in any other combination of veggies you prefer. The choice is totally yours. However, for a classic version of Veg Quesadillas, Corn..Tomatoes..Green Chilli and Cottage Cheese is preferred.

Screenshot_2014-08-20-00-39-53-1_wm

RECIPE: CHEESY QUESADILLAS With  SALSA

Makes- 2 Quesaldillas

Prep Time-30 mins

Making Time- 10 mins

INGREDIENTS:

For Fresh Tortillas:

  • Flour- 1 1/2 cup
  • Oil- 1 Tbsp
  • Salt- 1/2 tsp
  • Water- As Required

For Salsa:

  • Onion- 1/2 cup Finely Chopped
  • Tomatoes- 1 Cup Finely Chopped
  • Green Chilli- 2 Finely Chopped
  • Cilantro- A handful Finely Chopped
  • Lemon Juice- 2 Tbsp
  • Salt- 1/2 tsp
  • Red Chilli Powder- 1/4th Tsp
  • Sugar- A pinch

For Tortillas Stuffing:

  • Cottage Cheese- 100 gms (Diced into small cubes)
  • Corn- 1/2 cup ( Boiled)
  • Tomatoes- 1 (Finely Chopped)
  • Onion- 1 (Finely Chopped)
  • Green Chilli-1 (Finely Chopped)
  • Mushrooms- 2 to 3 (Finely Chopped)
  • Salt- To Taste
  • Pepper- 1/4th Tsp
  • Chilli Flakes- 1/4th Tsp
  • Fajita Seasoning- 1/2 Tsp
  • Oil- For cooking
  • Processed and Mozzarella Cheese- 50 gms

PROCESS:

1. To make Fresh Tortillas, In a large bowl mix all the ingredients given under the Tortillas recipe and form a dough. Cover the dough with a wet cloth.

2. Heat oil in a pan, then add green chilli and onion. Saute for a min, then add corn, tomatoes, mushrooms, cottage cheese, salt, pepper, chilli flakes and fajita seasoning. Just cook them for about 2 mins.

3. Now,Evenly divide the dough into round chapati balls and  Roll out the dough similar to a chapati, and cook on a non- stick pan. Just cook for 1 min on each side. Cook all the tortillas and keep them aside.

4. Take a thin tortilla and spread the filling and top it up with cheese. Now put the second tortilla on top and press it to make it stick. Cook it in a non stick pan by pressing it on both sides till crisp.

5. Cut like pizza wedges and serve hot along with SALSA

6. For the Salsa, Mix all the ingredients under the Salsa heading and leave for 30 mins.

Your Cheese Quesadillas are now ready.

Screenshot_2014-08-20-00-50-12-1_wm

For any queries and collaborations contact me at : cookingdiarybyshruti@gmail.com

You can connect with me on FacebookInstagram and Pinterest for more regular updates.

If you cook or bake anything from Cooking Diary By Shruti…Please Share the Pictures on Instagram or Facebook and Tag @cookingdiarybyshruti. I would love to see them. Also I would feature it on my blog.

IMG_20140628_004634[1]


4.

Lychee Ginger Mojito

This mocktail is surely the best to beat the heat in summers. All you need is a handful of ingredients and a perfect summer mocktail is ready.

Screenshot_2014-08-19-14-59-00-1_wm

Hello Lovely Readers,

Its Mid- August and yet so hot outside. Its really humid and no rain. You really need a drink to beat the heat during the day. My favorites for this summer have been Tendo- Coconut Water, Salted Fresh Lime Sodas, and Buttermilk. I have been avoiding soft drinks this summer because of the high amount of sugar in them and in order to avoid those unwanted calories. Though Fresh Lime too isn’t all that great but yes at least better than Cold Drinks.

Screenshot_2014-08-19-15-02-41-1_wm

Summers scream Lemons to me. Lemons are my ultimate favorite. I love drinks with lemon and mint. This drink is just one of those experiments when i wanted to infuse lemon and mint together. Also to add a little twist to the flavor I have added Ginger to this drink. Ginger brings about that additional taste and also minimizes the sweetness of Lychee Juice. The amount of ginger totally depends upon your taste. But about 1 tsp of Grated Ginger is more than enough in each glass. So don’d add a lot of ginger as the drink  will get bitter. If you are not a big fan of Lychee Juice, you can replace it with either sprite or Grape Juice. But not with any other flavor.It is super easy to make. All you got to do is mix all the ingredients together and your drink is ready.

P.S- The Lychee Juice is the heart of this mocktail.

RECIPE: LYCHEE GINGER MOJITO

Makes about- 1 Glass

Prep Time- 5 mins

INGREDIENTS:

  • Lychee Juice- 200 ml
  • Mint Leaves- 7 to 8
  • Ginger Grated- 1 tsp
  • Lemon Juice- 2 tsp
  • Lemon pieces- 5 to 6 (Thinly Sliced)
  • Ice Cubes- 4 to 5

PROCESS:

1. In a mixer, add mint leaves, Ginger and  Lemon Juice and mix it well.

2. In a glass, add Ice cubes, then add Lemon pieces thinly sliced, and add the mixture.

3. Now top it up with Litchee Juice.

4. Top with a few more mint leaves.

5. Serve Chilled

Your Litchee Ginger Mojito Is now Ready.


Screenshot_2014-08-19-15-01-19-1_wm

For any queries and collaborations contact me at : cookingdiarybyshruti@gmail.com

You can connect with me on FacebookInstagram and Pinterest for more regular updates.

If you cook or bake anything from Cooking Diary By Shruti…Please Share the Pictures on Instagram or Facebook and Tag @cookingdiarybyshruti. I would love to see them. Also I would feature it on my blog.

IMG_20140628_004634[1]

Caramelized Apple Pie

Do you love eating pie but don’t know how to bake it? Do you love the apple and cinnamon combination? Do you wish to make a perfect pie at home? Well.. if Yes..Your search ends right here.

My Caramelized Apple Pie is perfect ❤

Screenshot_2014-08-16-01-46-10-1_wmIt feels amazing to be blogging after so many days. Being on holiday is fun..But as a blogger.. you somewhere down the line miss  blogging and your blog. Well atleast for me it has been really tough. All this while, I was so anxious about my blog. I couldn’t wait to get back home…Cook.. and Blog. Just after a day’s rest, I couldnt resist myself than to blog. Blogging is more like a therapy now… It makes me happy. Its like my food diary, where in I love to pen down my recipes for all you lovely people.

Screenshot_2014-08-16-01-36-35-1_wm

Screenshot_2014-08-16-01-47-24-1_wm

An Apple Pie has been on my mind ever since I was on my holiday, and had it in one of the restaurants. I had to try it myself. So, as soon as I got back..I started working on my recipe. I am so glad with the final results. They tasted amazing. Making a pie is not a rocket science. You just have to follow a few important steps and once you are over them with perfection..you will have the best pie ever.I love the combination of Apple and Cinnamon. I believe its a match made in heaven. Your room will be filled with the aromatic fragrance of cinnamon..and its really difficult to stay away from that OVEN :p Though a pie doesn’t take alot of time, i couldn’t keep myself away.

P.S- Apple and Cinnamon are a match made in HEAVEN ❤

Screenshot_2014-08-16-01-54-59-1_wm

Screenshot_2014-08-16-01-56-17-1_wm

If you are a regular reader of my blog you would know that I really love pies are tarts. Most of us do have this myth that pies and tarts are the same. Well there is a significant difference among them.

PIE: A pie is a sweet or savory dish with a crust and a filling. The sides of a pie dish or pan are sloped. It can have a just a bottom, just a top, or both a bottom and a top crust. Pies are served straight from the dish in which they were baked.

TARTS: A tart is a sweet or savory dish with shallow sides and only a bottom crust. Tart crusts are usually made from pastry dough: traditionally flour, unsalted butter, cold water, and sometimes sugar.

A pie usually has a bottom and a top crust and is served in the baking dish itself. So its quite different from the tarts. You will find a lot of tart recipes on my blog. A variety of Fresh Fruit Tarts.. Raspberry Tarts..Mango Tarts.. and a lot more yet to come. But baking a pie is my very first attempt. A pie can both be sweet and savory… it totally depends upon your liking and preference. I will be doing a savory pie really soon.

Screenshot_2014-08-16-02-02-18-1_wm

This caramelized apple pie is my ultimate favorite. The taste of these caramelized apples is unbelievable. There are two ways you can make the apple filling ready for the pie. You can either cook them in butter and sugar and simmer it for some time so that the apples are cooked and caramelized. If you wish to opt a simpler option you can just mix sugar and cinnamon along with the apple and let it rest for some time. Once they are baked the apples would be caramelized. I prefer the first option. Although it is a little time consuming but its totally worth it. The apples become really soft and juicy and you really cant stop yourself.

P.S- My Caramelized Apple Pie is extremely Addictive.

The pie crust is really simple to make. There is no difficulty at all in making it. Just take the correct measurements and your pie crust will be ready. A pie takes about good 20 to 25 mins to bake. In case of an apple pie… you firstly need to bake the pie crust for about 5 to 7 mins..then add the filling and cover the pie from top and bake it again for about 15 mins. The pie is sweet and hence the crust need not be golden brown in color. A light brown color looks perfect. Do not over bake the pie. It has to be a little soft and chewy. If you over bake it the crust will become hard.

Screenshot_2014-08-16-02-04-14-1_wm

RECIPE: CARAMELIZED APPLE PIE

Makes – Single 9″ Pie

Prep Time- 30 mins

Baking Time- 20 mins

INGREDIENTS:

For the Pie Crust:

  • All Purpose Flour- 100 gms
  • Castor Sugar- 50 gms
  • Unsalted Butter- 30 gms
  • Baking Powder- 1/4th tsp
  • Chilled Water- 2 Tbsp

For the Apple Filling:

  • Large Red Apples- 2 to 3( diced in cubes)
  • Sugar- 4 to 5 Tbsp
  • Cinnamon Powder- 1 tsp
  • Unsalted Butter- 2 Tbsp
  • Salt- A pinch

For Serving: (Optional)

  • Ice-Cream
  • Whipped Cream
  • Apricot Jam

PROCESS:

1. In a large bowl, add flour and butter. Rub the butter with your hands until it is evenly mixed with the flour. Now add sugar, baking powder, water and form a dough. Do not over knead the dough.

2. Once the dough is ready cover it with a plastic wrap and let it set in the refrigerator.

3. In a heavy bottom pan, heat butter and add the diced apples to it. Let it cook for about 2 mins. When the apples simmer down a little, add sugar to it.

4. The mixture will start bubbling up, and the apples are caramelized , add cinnamon and salt and turn off the flame. Let the mixture cool down.

5. Take out the dough, and roll it into a circle larger than 9 inches in diameter so that it can cover up the pie tray. Once the dough is rolled out.. Line it in a 9″ pie dish. Make sure it is at least 1/2 cm thick.

6. Circle out the remaining dough, and cut thin strips to cover the pie from top.

7. In a pre – heated oven, bake the pie crust for about 6 mins at 180 degrees.

8. Once the crust is half baked, take it out and add the apple filling. Now cover it with thin strips in any combination your desire..You can either make only vertical lines or make square boxes by putting one horizontal and one vertical line.

9. Now bake it for 15 mins at 180 degrees.

10. Let it cool a little. Serve warm directly from the baking dish.

Your Caramelized Apple Pie is now ready.

Screenshot_2014-08-16-01-59-25-1_wm

Screenshot_2014-08-16-01-51-34-1_wm

For any queries and collaborations contact me at : cookingdiarybyshruti@gmail.com

You can connect with me on FacebookInstagram and Pinterest for more regular updates.

Looking For Similar Recipes? Try My:

Mango Custard Creme Tarts

IMG-20140521-WA0002

Raspberry Tarts

PicsArt_1395773071344_wm

Fresh Fruit Tarts

Screenshot_2014-03-11-16-53-24_wm-1

Sugar Kissed Strawberry Cookies

Looking forward to bake something for your loved ones? If Yes, These Sugar Kissed Strawberry Cookies are perfect! Bake these and see your loved ones SMILE ❤

Screenshot_2014-07-21-23-50-37-1

What can be more sinful than baking sweet, buttery, eggless and flavored cookies at home? Nothing right. These cookies are really pretty and you would love to bake them. The color is so gorgeous that I was in Awe with these. They are not too sweet and just taste perfect. I call them Sugar Kissed because the sugar dusting on top just enhances both its appearance and flavors. If you don’t prefer a sugar dusting on top you can alter it with coco or sprinklers or chocochips but trust me nothing replaces the sugar dusting for these cookies.

P.S- You will fall in ❤ with these cookies.

Screenshot_2014-07-09-02-02-08-1_wm

I tried my Double Chocolate Chip Cookies a while ago and they tasted yumm. This time I wanted a flavor different than the regular chocolate or butter in the cookies. When I am willing to try a new flavor to my dish… The first thing that comes to my mind are STRAWBERRIES. If you are a regular reader on my blog, I am sure you know my love for strawberries. I like…nah… I ❤ strawberries. I haven’t used fresh strawberries for the cookies because I just wanted the flavor. I have used strawberry syrup (Hershey’s) or any other that you can find in the market. An American Garden Strawberry Syrup would also work which is easily available. The quantity of the syrup totally depends on how strong you want the flavor to be but a minimum of 5 Tbsp is suggested to get a correct amount of flavor in the cookie. You can go ahead with your own experiments with any flavor you prefer.

P.S- If you are a beginner at baking try these cookies & you wont be disappointed.  🙂

Screenshot_2014-07-24-22-13-57-1

If you have never baked cookies and you are a beginner at baking….I would suggest you to start with these cookies. They are really easy and require minimum ingredients infact only 5. If you keep the dough chilling time aside these cookies take barely 12 mins to bake and are ready in no time. I bet you can’t resist trying one of them right out of the oven. Well, I did it..They are buttery… and when I say buttery you really need to keep the calories aside. These cookies are chewy and soft. Don’t overbake them as you wont be able to enjoy these cookies. Over baking will make them hard and once they cool down and it wont taste as amazing as ever.

Screenshot_2014-07-09-02-04-02-1_wm

With very minimum ingredients the cookie dough is really easy to make but you need to chill the dough for about an hour. Chilling the dough is very important. Do not skip this step. Also do not over chill your dough. 1 hour or maximum 2 hours is more than enough. When you take the dough out of the refrigerator leave it for 10 mins so that it comes at room temperature. Over chilling of the dough will spoil our cookies. So you must be thinking :

Why is it important to chill the cookie dough?

Chilling the cookie dough is important so that you can handle the dough well. It helps in rolling out the dough well and also helps in baking. I know this step required alot of patience but its totally worth the wait. Once this step is over all you have to do is…Roll out the dough… Cut it in the desired shape.. Bake… and Enjoy your cookies.

Screenshot_2014-07-24-22-14-50-1_wm

RECIPE: SUGAR KISSED STRAWBERRY COOKIES

Makes- 15 medium sized cookies

Prep Time- 1 hr 15 mins (Including Dough Chilling Time)

Baking Time- 12 to 14 mins

INGREDIENTS:

  • All Purpose Flour- 1 cup
  • Cornflour- 2 Tbsp
  • Castor Sugar- 1/2 cup ( There is sugar dusting on top too so use less sugar in the cookie)
  • Unsalted Butter- 80 gms
  • Vanilla Extract- 1 Tsp
  • Strawberry Syrup- 4 to 5 Tbsp (Minimum)
  • Baking Powder- 1/4th Tsp
  • Icing Sugar- 2 to 3 Tbsp (For Dusting)
  • Sprinklers- Optional

PROCESS:

1. In a large bowl, Rub butter and Flour together with your fingers until they are combined.

2. Now add sugar, cornflour and baking powder and mix well.

3. Add vanilla essence and strawberry syrup and knead to form a dough.

4. The dough will be a little sticky. At this stage cover the dough with a plastic wrap and refrigerate it for an hour.

5. Once the dough is chilled, leave it for 10 mins so that it comes down to a room temperature.

6. Divide the dough into equal medium sized balls. Make circle and then press it to give it a round and flat cookie shape. You may use a fork or cookie cutter to give it a design.

7. Line a baking tray with parchment paper and place the cookies on it. Make sure you maintain atleast 2 inch gap between the cookies as they will spread a little while baking.

8. Bake the cookies in a pre-heated oven for 12 mins at 180 degrees.

9. Take them out after 12 mins and let them cool on a wire rack. Once they are cooled dust icing sugar on them and voila your cookies are now ready.

For any queries and collaborations contact me at : cookingdiarybyshruti@gmail.com

You can connect with me on FacebookInstagram and Pinterest for more regular updates.

COOKING DIARY BY SHRUTI GIVEAWAY CONTEST

CDBS is again holding a giveaway contest sponsored by Urban Dazzle. You can follow @cookingdiarybyshruti and @urbandazzle  on instagram or log on to www.facebook.com/urbandazzle to know more about the contest. Participate and you can get a chance to win DENVOW BOWLS set of 12 exclusively from UrbanDazzle..India’s Best Online Shopping website for Premium Products. Contest is for Indian Residents Only.

Please do Participate!!

downloadfile-4

Looking for more cookies or strawberry flavored recipes? Try My:

Double Chocochip Cookies

Screenshot_2014-07-09-01-16-21-1_wm

Strawberry Vanilla Chocochip Muffins

IMG_20140228_222625_wm (1)

Strawberry Jim Jam Cookies

Farmhouse Oat Pancakes

These Savory Pancakes are the heartiest breakfast meal and the best way to start the day. My all new breakfast recipe is high on taste quotient but super high on health quotient.If you wish to make a tasty and healthy breakfast combination this one is a must try for you!!!

Screenshot_2014-07-12-14-24-26-1_wm

My Oats and Vegetable Patties were a huge hit. They were amazingly delicious and healthy. When I made those, I thought that they were the best oats recipe attempt ever. But I guess I was wrong. Because these Oat Pancakes are a 10 on 10 recipe. A complete win-win…You neither lose on the taste quotient and nor on the health quotient.

P.S- These are my new favorite breakfast recipe ❤

I have been attempting a lot of healthy breakfast options these days. My motive is to make the first meal of the day as healthy as possible. No matter how much we aspire to eat healthy food… Lets face it…The fact is, if the food isnt tasty then we really don’t like to it. Oats is one of those. As I mentioned in my previous post I am not a oat lover at all. Infact, given an option I would rather skip it. But its really high on protein and fiber and should be a part of your daily meal. So here is yet another healthy oat recipe.

Screenshot_2014-07-12-11-11-59_wm-1

These pancakes are savory unlike the regular pancakes or the fruit flavored ones. Also, they have a lot of vegetable toppings. The choice of vegetable is totally yours. The batter too is a mix of herbs and spices. It has rice flour, semolina, herbs and vegetables. Its a really easy mix and an instant pancake. These pancakes take very little time to cook and are ready in less than 15 mins.

P.S- MyFarmhouse Oat Pancakes are perfect to start your day with!!

Screenshot_2014-07-12-14-28-08-1_wm

Oats are really high on Protein and Fiber. They help you maintain weight and its worth it if you include them in your diet plan. They keep you full for quite sometime and yet are low on fats and sugar content. This recipe is a hub of nutrients. Oats and alot of healthy vegetables. I have used carrots, bell peppers, onions and tomatoes to top my pancakes but you can use a wide variety of other vegetables like mushrooms, corn, green leafy vegetables etc. I have drizzled over some Sweet Thai Chilli Sauce over them. Its not compulsory but this sauce really enhances the taste and flavor. You can again use any sauce of your choice but yes a sweet and sour flavor would work well with the pancakes.

The pancake batter is really rich in flavors. The taste quotient is high. You don’t need to add too fancy ingredients on top because there are a lot of flavors and spices added to the batter. The green capsicum and spring onions gives them a nice earthy flavor. All other spices add to the exotic flavor to the pancakes.

RECIPE: FARMHOUSE OAT PANCAKES

Makes- 8 Pancakes (Medium Sized)

Preparation Time- 10 mins

Cooking Time- 5 mins

INGREDIENTS:

For the pancake:

  • Oats Flour- 2 cups (Roast the oats in a pan for 5 to 6 mins and then grind them)
  • Rice Flour- 3/4 cup
  • Semolina- 1 cup
  • Capcicum- 1/2 finely chopped
  • Corriander- 2 Tbsp finely chopped
  • Garlic- 5 to 6 cloves
  • Green Chilli- 2 to 3
  • Spring Onions- Finely chopped (Greens of it)
  • Garam Masala- 1/2 tsp
  • Cumin Powder- 1/2 tsp
  • Salt- to taste
  • Black Pepper- 1/2 tsp
  • Lemon Juice-1 Tbsp
  • Water- 1/2 cup

For the Toppings

  • Onions- 2 sliced
  • Tomatoes- 2 to 3 Chopped
  • English Carrots- 2 to 3 Grated
  • Green Chilli- 2 to 3 Finely Chopped
  • Crushed Black Pepper- 1/2 tsp

PROCESS:

1. Add all the ingredients under the pancake section in a grinder along with a 1/2 cup water and grind it until a smooth consistency is reached. Add a little more water if desired.

2. The batter should be smooth and not too watery.

3. Now heat a non- stick pan and add a little oil to it.

4. Add a spoon full of the mix in the pan to get a perfect round. The pancake would be thick.. dont spread it.

5. Now, add the toppings along with crushed black pepper and flip.

6. Cook evenly from both sides. This process should take about 5 mins

7. Line the pancakes one on top of another and drizzle some Thai Sweet Chilli Sauce over it or any other sauce of your choice.

8. Serve Hot.

Your Farmhouse Oat Pancakes are now ready.

Screenshot_2014-07-12-14-26-28-1_wm

For any queries and collaborations contact me at : cookingdiarybyshruti@gmail.com

You can connect with me on FacebookInstagram and Pinterest for more regular updates.

Looking for more Breakfast Ideas? Try my:

Oats and Vegetable Patties

Screenshot_2014-07-02-03-22-50-1_wm

Fruit Parfaits

IMG_20140315_200043_wm

Orange and Banana Smoothie

Smoothie 1

Banana Chocochip Loaf

Screenshot_2014-06-05-16-07-48-1_wm

Double Chocolate Chip Cookies

Do you ❤ Cookies? Don’t know how to Bake them ? Well I have the answer to these:

These cookies are the best I have made so far. They are the most fudge-y, chewy and chocolaty cookies you will eat and you wont be able to stay away from them!!! 

Screenshot_2014-07-09-00-46-30-1_wm

Screenshot_2014-07-09-01-03-32-1-1_wm

Its been quite sometime that I haven’t posted cookies on the blog. When deciding what next should be coming up on the blog ….. the only thing that was in my mind were “COOKIES”. Its not like, I didn’t try cookies for so long.. but my last attempt was a huge disaster. I am so glad that I finally made the best possible Double Chocolate Chip Cookies. I call them Double Chocolate Chip Cookies because it has loads of chocolate chips inside and on top too. I just cant get enough of chocolate chips ever. After my last attempt at chocolate chip cookies,  I never thought I would be able to bake them ever again. I didn’t follow my regular method of making cookies and instead followed a new technique. I was so sure that the technique would give me the best cookies that I made them double the quantity. To my bad luck, the cookies turned out awful. I added way too much butter to the cookies and they went totally flat and hard as stone. All I could do with them was dump them in the bin 😦

Screenshot_2014-07-09-01-16-21-1_wm

Screenshot_2014-07-09-01-15-01-1_wm

I am so happy that this time it wasn’t so. I went back to my method of baking cookies and they just turned out to be perfect. My Double Chocolate Chip Cookies are going to be your FAVORITE. You will love the recipe because it is really simple and like my all recipes this one is EGGLESS too. They BEST part about this recipe is that the cookies are chewy and not hard which is a really common mistake while baking. The outer layer does have a cookie crunch but it is really chewy inside.

P.S- I love my cookies chewy. ❤ If you like your cookies crunchy then wait for my next crunchy cookie recipe. 🙂

Screenshot_2014-07-09-01-44-56-1_wm

Screenshot_2014-07-09-01-07-25-1_wm

I added lots of chocolate chips inside the cookies too. I added both while chocolate chips and dark chocolate chips in them. I love the combination of these. But its entirely your choice. You can add either of the chocolate chips as per your liking. The combination just adds more flavor I believe. Though I preferred topping them with ultimate dark chocolate chip cookies. These are perfect to go with your evening coffee or when you want to snack on to something.

P.S- These are perfect for your midnight cravings!!

Baking these cookies is really easy. The preparation time is just about 15 to 20 mins and you cookie dough will be ready in a Jiffy. All you have to do is let your dough chill in the refrigerator for about 1 hour. I know it needs a lot of patience. But trust me you will be way to happy with the final results. Chilling the cookie dough is really important. I would recommend not to skip this step at all. This helps in better handling of the dough and for a better texture. It helps you better in shaping the cookies. Do not over chill the dough…. this will again lead to making the cookies harder.

Screenshot_2014-07-09-00-56-33-1_wm

Screenshot_2014-07-09-00-53-56-1_wm

Once the dough is ready all you have to do is give them your favorite shape and bake them. Although I have all the shapes of a cookie cutter. My favorites are the heart shaped and the star shaped ones. I preferred sticking to the classic shape of chocolate chip cookies that is round. I made them slightly bigger in size so that I don’t end up having more than 1 cookie at a time 😛 The baking time for these cookies is barely 15 mins. Since I like these a little chewy you don’t need more than 15 mins to bake them. Your cookies will definitely become more firm once they cool down. Let them cool down on the wire rack for at least 30 mins before you start digging on them. Be careful while you transfer them.

RECIPE: DOUBLE CHOCOLATE CHIP COOKIES

Makes about- 15 cookies

Prep Time- 1 hr 20 mins ( Includes 1 hour dough chilling time)

Baking Time- 15 mins

INGREDIENTS:

  • All Purpose Flour- 1 cup (150 gms)
  • Unsalted Butter- 80 gms
  • Cornflour or Cornstarch- 1 1/2 Tbsp
  • Baking Powder- 1/4th Tsp
  • Castor Sugar- 100 gms
  • Unsweetened Cocoa Powder- 2 to 3 Tbsp
  • Vanilla Extract- 1 Tsp
  • Milk- 2 Tbsp
  • Dark Chocolate Chip – 1/2 cup
  • White Chocolate Chips- 1/2 cup (Optional)
  • Salt- A pinch

PROCESS:

1. Rub butter and flour together with your finger until it is combined.

2. Add sugar and combine everything together.

3. Now add Corn flour, Baking Powder, Cocoa Powder, Salt and mix together.

4. Add vanilla extract followed by milk and try to combine all together.

5. Lastly add a mix of chocolate chips and form a sticky dough.

6. Wrap it in a plastic wrap and let is set in the refrigerator for about an hour.

7. After 1 hour, Divide the dough into equal parts and give the cookies a desired shape. Make sure your cookies are atleast 1 cm thick.

8. Place them in a cookie baking tray lined with parchment paper. Leave atleast 2 inches gap between each cookie.

9. Top with Chocolate Chips. Press with your fingers. This step is optional.

10. Bake in a pre-heated oven for 15 mins at 180 degrees.

11. Let them cool for 30 mins before you start digging in them.

Your ULTIMATE Double Chocolate Chip Cookies are now ready.

The shelf life of these cookies are 5 to 7 days. Keep them in an air tight container.

Screenshot_2014-07-09-00-49-52-1_wm

Screenshot_2014-07-09-01-05-45-1_wm

For any queries and collaborations contact me at : cookingdiarybyshruti@gmail.com

You can connect with me on FacebookInstagram and Pinterest for more regular updates.

COOKINGDIARYBYSHRUTI GIVE AWAY CONTEST

Are you foodie? Do you love going to restaurants, nighclubs, health spas and other premium places in DELHI.Then Participate in the CDBS GiveAway Contest and  You could get a chance to win Exclusive Delhi Platinum Card worth Rs. 6000 Free.

Follow me on Instagram or Facebook @cookingdiarybyshruti for more details on the contest.

Contest New Poster


Looking for more Cookie Recipes? Try My:

Strawberry Jim Jam Cookies

Carom Seed Cookies

IMG_20140309_225211

Red Velvet Cake Shake

I told you not to be surprised with a lot of Red Velvet Recipes coming on the blog. Didnt I? 😀

Screenshot_2014-07-01-11-33-08-1-1_wm

Screenshot_2014-07-01-11-55-46-1-1_wm

My Red Velvet Oreo Fudge Brownies were such a hit and I was in love with the flavor, color and texture. Was really amazed with the way they turned out to be. I had to try more red velvet recipes because I was just not done with the brownies 😛

I have always been a Red Velvet Fan. But only if I knew, I would be making them some day. They are totally like a dream come true. This Red Velvet Shake is the best I have had. Truely. It had the right flavor, smoothness and alot of colorful confetti’s . I just couldn’t stop adoring them which is why I didnt want to finish them. But they were over before I could even Imagine.

Screenshot_2014-07-01-11-49-06-1-1-1_wm

I would say making a Red Velvet Shake or Brownies is totally over-rated. Trust me, they are really really easy to make. You really dont have to be super skilled to make this. The recipe for this shake is simple and you don’t need much fancy ingredients. If you though my Red Velvet Oreo Fudge Brownies were simple, these are the simplest of all. If you happen to make the red velvet cakes don’t forget to make these shakes as they are totally worth it. They taste even better than the cake and I love it.

P.S- These shakes look like a gift. They are really gorgeous.

RECIPE: RED VELVET SHAKE

Makes – 2 glasses

Preparation Time- 5 mins

INGREDIENTS:

  • Red Velvet Brownies- 2 to 3 slices (Click Here for the Recipe of Red Velvet Brownies or you can use 2 to 3 Tbsp of Red Velvet Cake mix)
  • Vanilla Icecream- 2 scoops
  • Milk- 3/4th Cup
  • Sweet Whipped Cream- 1 cup
  • Sprinklers
  • Wafers (Optional)

PROCESS:

1. Crumble the Red Velvet Brownies with your hands.

2. Now in a blender, blend together brownies, vanilla icecream, milk and a few ice- cubes.

3. You want it to be smooth… so blend for about 2 mins.

4. Top with whipped cream, sprinklers and wafers.

5. Serve Chilled.

Your Red Velvet Shake is now ready.

Screenshot_2014-07-01-11-53-48-1-1_wm

For any queries and collaborations contact me at : cookingdiarybyshruti@gmail.com

You can connect with me on FacebookInstagram and Pinterest for more regular updates.

COOKINGDIARYBYSHRUTI GIVE AWAY CONTEST

Are you foodie? Do you love going to restaurants, nighclubs, health spas and other premium places in DELHI.Then Participate in the CDBS GiveAway Contest and  You could get a chance to win Exclusive Delhi Platinum Card worth Rs. 6000 Free.

Follow me on Instagram or Facebook @cookingdiarybyshruti for more details on the contest.

Contest New Poster

Looking for similar recipes? Try My

Red Velvet Oreo Fudge Brownies

PicsArt_1403856905795

Orange and Banana Smoothie

Smoothie 1